Time Traveler 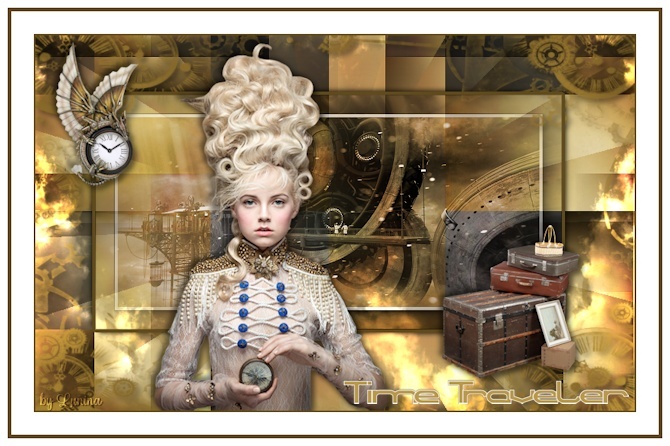
Obrigada Manuela por autorizar a tradução  Material Aqui Agradecimentos aos Tubers pelos materiais: Tubes Renee_TUBES_Mars 6 STD0007 (Isa) cloud_station__by_shelest-steampunk3 Mask TD_Mask_Steampunk Selection SelectionMDesign104 Time Traveler Wordart WAMDesign Time Traveler Plugins: Filters Unlimited 2.0 / Unlimited 2.0 - &<Bkg Kaleidoscope> Radial Replicate Unlimited 2.0 / VM 1 - Web Weaver AAA Frames / Photo Frame Graphic Plus / Cross Shadow Coloque a seleção na pasta "Selections" (essa seleção será usada muitas vezes) Está usando outras cores e tubes? Então é possível ter que alterar o blend mode e a opacidade da layer porque o efeito final pode resultar diferente Escolha 3 cores de seus tubes Aqui foram escolhidas as seguintes cores  Cor 1 #7e7c75 / Cor 2 #0f131e / Cor 3 #604b1e Coloque no Foreground a cor 1 e no Background a cor 2 No foreground forme o gradiente Style Linear / Angle 0 / Repeats 0 / Invert desmarcado 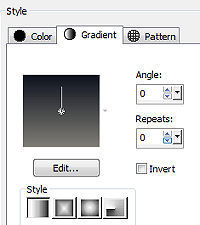
Abra uma imagem de 800 x 500 pixels, Transparente Pinte a imagem com o gradiente Layers / New Raster Layer Selections / Select all Abra o tube cloud_station__by_shelest-steampunk3 ou seu próprio tube Edit / Copy – Edit / Paste into Selection Selections / Select none Layers / Merge / Merge Visible Layers Effects / Image Effects / Seamless Tiling / Default Adjust / Blur / Gaussian Blur / Radius 15 Effects / Plugins / Unlimited 2.0 / &<Bkg Kaleidoscope> Radial Replicate: 100 / 12 / 40 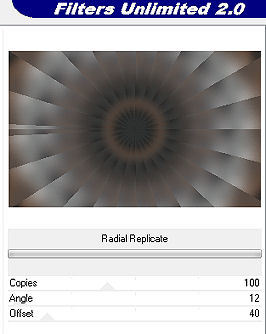
Layers / New Raster Layer Pinte a layer com a cor 3 Effects / Plugins / Unlimited 2.0 / VM 1 / Web Weaver: 160 / 129 / 0 / 1 / 0 / 80 / 186 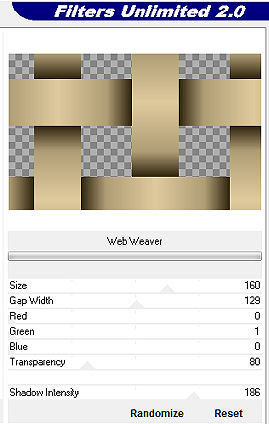
Mude o blend mode da layer para Overlay e baixe a opacidade para 85 Layers / Duplicate Effects / Image Effects / Seamless Tiling / Settings: Stutter Diagonal Adjust / Sharpness / Sharpen Effects / 3D effects / Drop shadow: 0 / 0 / 50 / 10 - preto Repita o Drop Shadow Layers / New Raster Layer Selections / Load/Save Selection / Load Selection from Disk Aplique a seleção "SelectionMDesign104 Time Traveler" 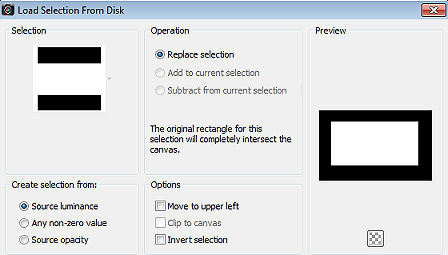
Abra novamente o tube cloud_station__by_shelest-steampunk3 / ou seu próprio tube Edit / Copy – Edit / Paste into Selection Selections / Select none Mude o blend mode da layer para Luminance Adjust / Sharpness / Sharpen Selections / Load/Save Selection / Load Selection from Disk Aplique a seleção "SelectionMDesign104 Time Traveler", novamente Effects / Plugins / AAA Frames / Photo Frame: 25 / 0 / 0 / 4 / 0 / 0 / 0 / 90 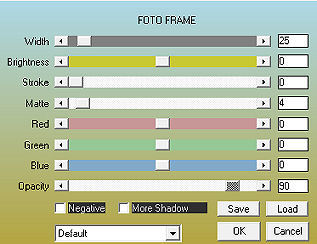
Effects / 3D effects / Drop shadow: 5 / 5 / 50 / 10 - preto Repita com -5 / -5 / 50 / 10 - preto Selections / Select none Layers / New Raster Layer Pinte a layer com a cor 3 Effects / Plugins / Graphic Plus / Cross Shadow: 50 / 50 / 50 / 50 / 50 / 50 / 50 / 255 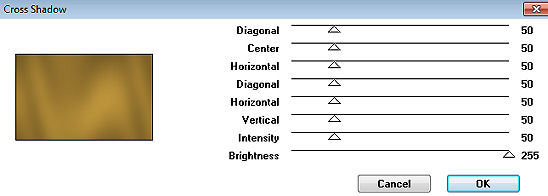
Abra a Mask TD_Mask_Steampunk e minimize no Psp Layers / New Mask Layer / From Image aplique a mask TD_Mask_Steampunk 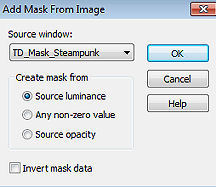
Layers / Merge / Merge Group Effects / 3D effects / Drop shadow: 5 / 5 / 50 / 10 - preto Abra o tube Wolken Edit / Copy – Edit / Paste as New Layer Effects / 3D effects / Drop shadow: 20 / 20 / 50 / 10 - preto Repita o Drop Shadow Mude o blend mode da layer para Dodge Layers / New Raster Layer Selections / Load/Save Selection / Load Selection from Disk Aplique a seleção "SelectionMDesign104 Time Traveler", novamente Selections / Modify / Select Selection Borders: Outside / Border width 4 / Anti alias marcado 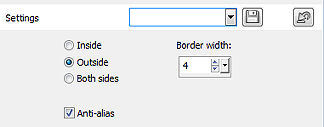 Pinte a seleção com a cor 3 Selections / Select none Abra o tube Cases Edit / Copy – Edit / Paste as New Layer Effects / 3D effects / Drop shadow: 5 / 5 / 50 / 10 - preto repita com -5 / -5 / 50 / 10 - preto Mova o tube para a base à direita, como no modelo final Abra o tube STD0007 (apague a marca dágua) Edit / Copy – Edit / Paste as New Layer Effects / 3D effects / Drop shadow: 5 / 5 / 50 / 10 - preto repita com -5 / -5 / 50 / 10 - preto Effects / Image Effects / Offset: Horizontal -320 / Vertical 145 / Custom e Transparent marcados 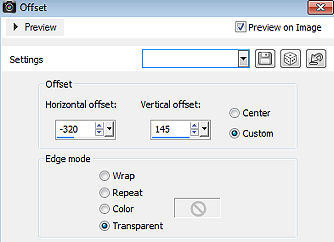 Abra seu tube personagem Edit / Copy – Edit / Paste as New Layer Dê resize, se necessário Effects / 3D effects / Drop shadow: 5 / 5 / 50 / 10 - preto repita com -5 / -5 / 50 / 10 - preto Posicione em um lugar de seu agrado na imagem Image / Add Borders / symmetric: 2 pixels na cor 3 30 pixels na cor branca 5 pixels na cor 3 10 pixels na cor branca Abra o tube WAMDesign Time Traveler Edit / Copy – Edit / Paste as New Layer Mova par a base à direita, como no modelo final Layers / New Raster Layer Assine Layers / Merge / Merge All Layers https://maantje-psp-design.jouwweb.nl/time-traveler | 
 AimooHelpForum
Aimoo Forum List |
Ticket |
Today |
Member |
Search |
Who's On |
Chat Room | Photos | Help |
Sign In |
AimooHelpForum
Aimoo Forum List |
Ticket |
Today |
Member |
Search |
Who's On |
Chat Room | Photos | Help |
Sign In |
 |
|


