| Hot Couture 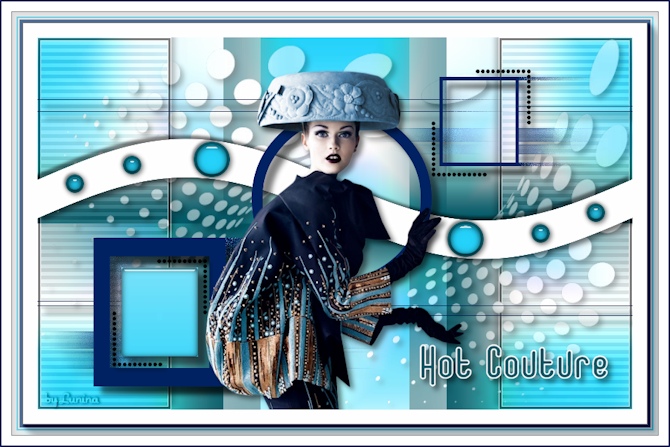
Obrigada Manuela por autorizar a tradução  Agradecimentos aos criadores dos tubes e materiais Tube Betsie 49-2013 Masks Mask @ - Ildiko_Desings_Created @ Mask _ & _ ildiko_kjk 1a-35b (4) Selections SelectionMDesign Hot Couture Wordart Deco's Plugins: Filters Unlimited 2.0 Visual Manipulation / Transmission Mehdi / Wavy Lab / Sorting Tiles AAA Frames / Transparent Frame / Photo Frame AP 01 (Innovations) / Lines_SilverLining Alien Skin Eye Candy 5 Impact / Glass Material Aqui Coloque as seleções na pasta "Selections" Usando outros tubes e cores é possível ir testando o blend mode e a opacidade da layer, pois pode haver diferença no resultado do efeito pedido. Escolha 4 cores de seus tubes Aqui foram escolhidas as seguintes cores 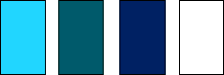
Cor 1 #26d3fb / Cor 2 #025a68 / Cor 3 #002362 / Cor 4 #ffffff Coloque no Foreground a cor 1 e no Background a cor 4 No foreground forme o gradiente: Style Linear / Angle 0 / Repeats 0 / Invert desmarcado 
Abra uma imagem de 800 x 500 pixels, transparente Pinte a layer com o gradiente Effects / Plugins / Mehdi / Wavy Lab: Style Linear / 3 / 0 / 0 / Normal / Cores 1 / 2 / 4 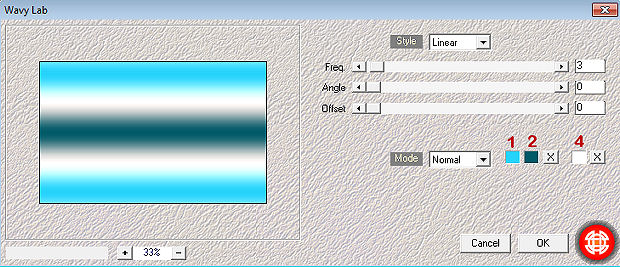
Effects / Plugins / Mehdi / Sorting Tiles Block Range 300-500 / Block 500 / plus marcado 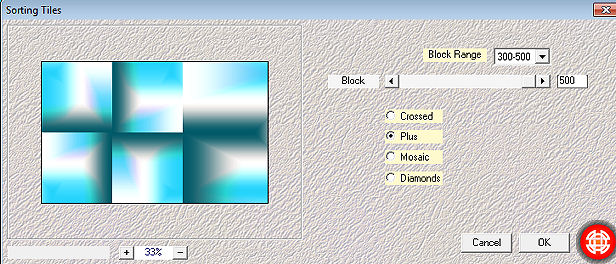
Selections / Load/save selection / Load selection from disk Aplique a seleção "SelectionMDesign Hot Couture" 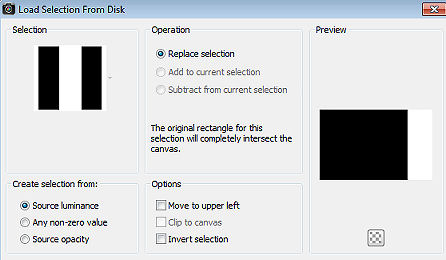
Selections / Promote Selection to Layer Adjust / Blur / Gaussian Blur / 30 Effects / Plugins / Unlimited 2.0 / Visual Manipulation / Transmission Todos os valores em 25 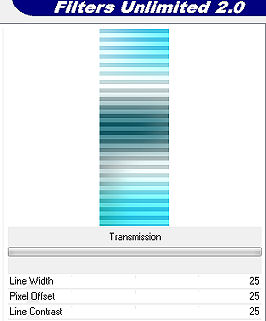
Effects / Plugins / AAA Frames / Transparent Frame: 4 / 255 Effects / 3D Effects / Drop Shadow: 5 / 5 / 50 / 10 - Preto Repita com -5 / -5 / 50 / 5 - Preto Selections / Select none Layers / merge / merge down Layers / Duplicate Image / Mirror Baixe a opacidade da layer para 50 Layers / New raster layer Pinte a layer com a cor 4 Abra a mask "Masker @" e minimize no psp Layers / New Mask Layer / From Image Aplique a mask Masker @ 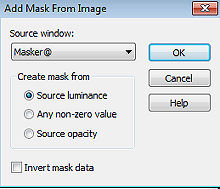
Layers / Merge / Merge group Adjust / Sharpness / Sharpen Effects / 3D Effects / Drop Shadow: 5 / 5 / 50 / 10 - Preto Layers / Arrange / Move Down Ative a layer do top Layers / New raster layer Selections / Load/save selection / Load selection from disk Aplique a seleção "SelectionMDesign Hot Couture A" 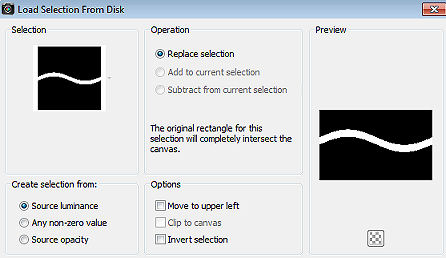
Pinte a seleção coma cor 4 Selections / Select none Effects / 3D Effects / Drop Shadow: 5 / 5 / 50 / 10 - Preto Repita com -5 / -5 / 50 / 5 - Preto Layers / New raster layer Selections / Load/save selection / Load selection from disk Aplique a seleção "SelectionMDesign Hot Couture B" 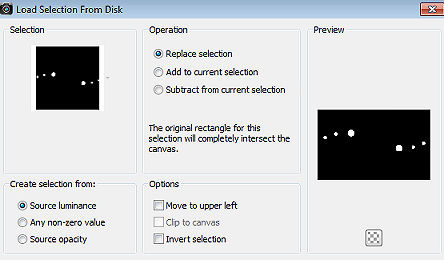
Pinte a seleção com a cor 2 Selections / Modify / Contract 4 Layers / New raster layer Pinte a seleção com a cor 1 Effects / Plugins / Alien Skin Eye Candy 5 Impact / Glass Aplique o Settings Clear 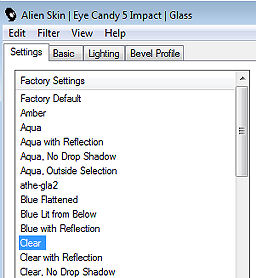
Selections / Select none Layers / merge / merge down Effects / 3D Effects / Drop Shadow: 2 / 2 / 50 / 10 - Preto Repita com -2 / -2 / 50 / 5 - Preto Layers / New raster layer Pinte com a cor 3 Abra a mask "Mask Ildiko_Desings_Created @ Mask _ & _ ildiko_kjk 1a-35b (4) e minimize no Psp Layers / New Mask Layer / From Image Aplique a mask Ildiko_Desings_Created @ Mask _ & _ ildiko_kjk 1a-35b (4) 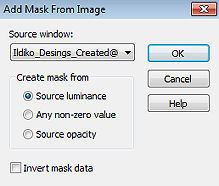
Layers / Merge / Merge group Layers / Duplicate Effects / Distortion Effects / Wind: From Left / 100 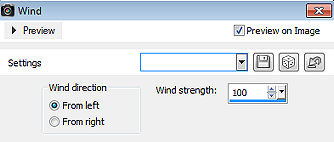 Layers / Arrange / Move Down Adjust / Add/Remove Noise / Add Noise: Gaussian / 50 / Monochrome Adjust / Sharpness / Sharpen Effects / 3D Effects / Drop Shadow: 10 / 10 / 50 / 10 - Preto Ative a layer do topo Ative a varinha mágica Clique dentro do quadrado maior à esquerda 
Selections / Modify / Contract 15 Ative a layer de fundo (Raster 1) Selections / Promote Selection to Layer Layers / Arrange / Bring to Top Effects / Plugins / Alien Skin Eye Candy 5 Impact / Glass Settings em Clear, como antes Selections / Select none Layers / merge / merge down Effects / 3D Effects / Drop Shadow: 10 / 10 / 50 / 10 - Preto Layers / New raster layer Selections / Load save selection / Load selection from disk aplique a seleção "SelectionMDesign Hot Couture C" 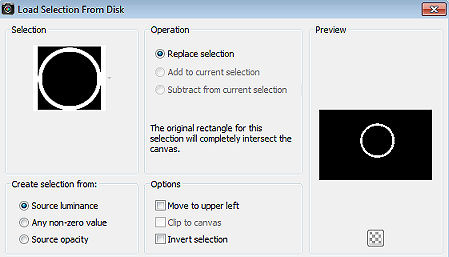
Pinte a seleção com a cor 3 Selections / Select none Effects / 3D Effects / Drop Shadow: 10 / 10 / 50 / 10 - Preto Abra o tube "Maantje @ Deco" Edit / Copy - Edit / Paste as a new layer Effects / Image Effects / Offset: Horizontal 202 / Vertical 130 / Custom e Transparent marcados Abra o tube "Maantje @ Deco 1" Edit / Copy - Edit / Paste as a new layer Effects / Image Effects / Offset Horizontal -230 / Vertical -125 / Custom e Transparent marcados Abra o tube feminino Betsie 49-2013 / ou o tube de sua escolha Edit / Copy - Edit / Paste as a new layer Resize se achar necessário Effects / 3D Effects / Drop Shadow: 5 / 5 / 50 / 10 - Preto Abra o "WA MDesign Hot Couture" Edit / Copy - Edit / Paste as a new layer Mova para a base à direita, como no modelo final Image / Add borders / symmetric: 20 pixels na cor 4 4 pixels na cor 3 2 pixels na cor 4 2 pixels na cor 1 20 pixels na cor 4 2 pixels na cor 3 Selections / Select all Selections / Modify / Contract 15 Effects / Plugins / AAA Frames / Photo Frame; 15 / 0 / 0 / 5 / 0 / 0 / 0 / 50 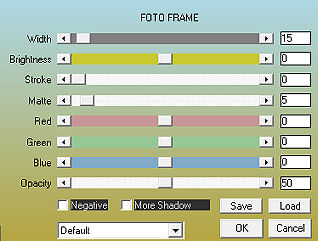
Selections / Select none Layers / New raster layer Assine Layers / Merge / Merge all layers https://maantje-psp-design.jouwweb.nl/les-87-hot-couture | 
 AimooHelpForum
Aimoo Forum List |
Ticket |
Today |
Member |
Search |
Who's On |
Chat Room | Photos | Help |
Sign In |
AimooHelpForum
Aimoo Forum List |
Ticket |
Today |
Member |
Search |
Who's On |
Chat Room | Photos | Help |
Sign In |
 |
|


