Rose 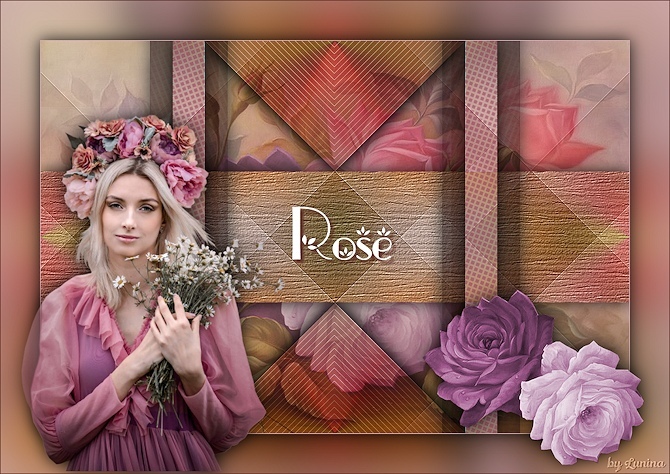
Obrigada Animabelle por autorizar a tradução  Material Aqui Este tutorial é uma criação pessoal de Animabelle Qualquer semelhança com outro é mera coincidência Plugins: Filters Unlimited 2.0 Mehdi
1. Abra todo material necessário no PSP Duplique-o e feche os originais Não esqueça de ir salvando seu trabalho 2. Escolha 3 belas cores de seus tubes, imagens, misteds... Para este tutorial foram escolhidas as seguintes cores 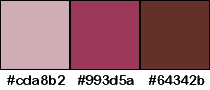
Cor1 #cda8b2 / Cor 2 #993d5a / Cor 3 #64342b Não hesite em alterar o blend mode e a opacidade da layer, se necessário. 3. Coloque a seleção na pasta "Selections" do PSP Coloque os 2 brushes na pasta "Brushes" do PSP 
4. Abra uma imagem de 900 x 600 pixel transparente Selections / Select All Copie e cole na seleção, a imagem "Image_de_base_Rose" Selections / Select None Adjust / Blur / Gaussian Blur / Radius em 30 5. Effects / Image Effect / Offset: -200 / 200 / Custom e Wrap marcados 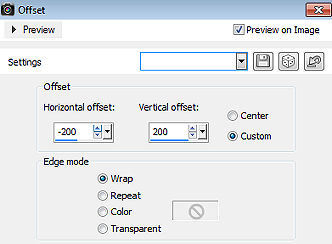
Effects / Image Effect / Seamless Tiling / Settings: Default 6. Layers / Duplicate Effects / Geometric Effects / Skew: Vertical / 45 /Wrap 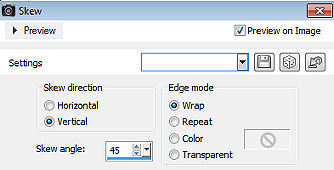
Mude o blend mode dessa layer para "Luminance" - Baixe a opacidade para 70 Layers / Merge Visible Layers 7. Layers / Duplicate Effects / Plugins / Filters Unlimited 2.0 / Tile & Mirror / Seamless Blend (vertical) Layers / Duplicate Image / Mirror Baixe a opacidade da layer para 50 Layers / Merge Visible Layers Effects / Edge Effects / Enhance More 8. Ative a ferramenta Selection / Rectangle / Custom Selection Configure: Top 200 / Left 0 / Right 900 / Bottom 400 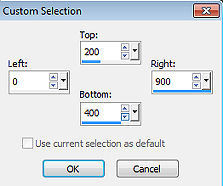
Selections / Promote Selection to Layer 9. Effects / Plugins / Filters Unlimited 2.0 / Texturize / Wood 2 / 255 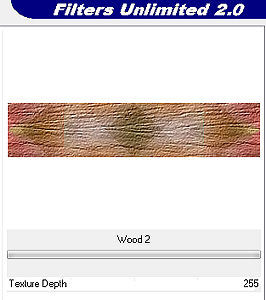
Effects / Plugins / Alien Skin Eye Candy 5: Impact / Perspective Shadow Na aba "Basic" configure como abaixo 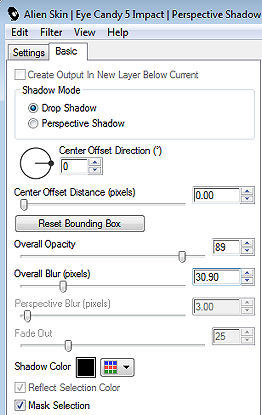
Selections / Select None 10. Ative a layer de fundo Ative a ferramenta Selection / Rectangle / Custom Selection Configure: Top 0 / Left 202 / Right 251 / Bottom 600 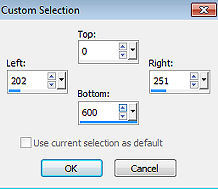
Selections / Promote Selection to Layer Layers / Arrange / Bring to top 11. Effects / Artistic Effects / Halftone Cores 2 e 1 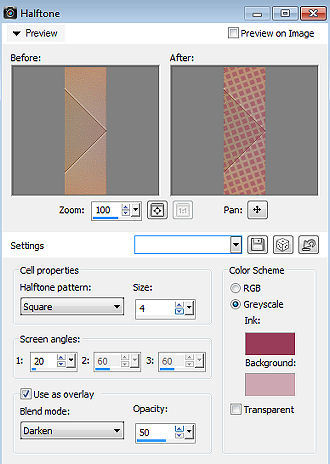
Selections / Select None Layers / Duplicate Image / Mirror Layers / Merge / Merge down Effects / Plugins / Alien Skin Eye Candy 5: Impact / Perspective Shadow - como antes 12. Layers / Duplicate Ative a layer abaixo Effects / Plugins / Toadies / What Are You?: 20 / 20 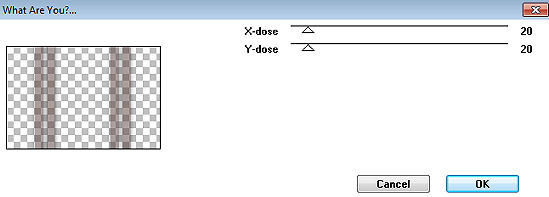
Mude o blend mode da layer para "Multiply" 13. Ative novamente a layer de fundo Selections / Load/Save Selections / Load Selection from Disk Localize e aplique a seleção "Selection1_Rose_Animabelle" 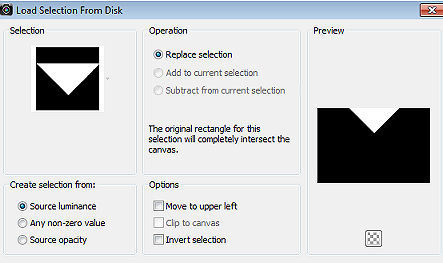
Selections / Promote Selection to Layer Effects / Plugins / AP 01 [Innovations] / Lines / SilverLining 
Mude o blend mode dessa layer para "Multiply" Effects / Plugins / Alien Skin Eye Candy 5: Impact / Perspective Shadow - como antes Selections / Select None Layers / Duplicate Image / Flip 14. Ative novamente a layer de fundo Layers / New Raster Layer Selections / Select All Copie e cole na seleção a imagem "Image_de_base_Rose" Adjust / Sharpness / Sharpen Baixe a opacidade da layer para 60 Selections / Select None Layers / Merge All (Flatten) 15. Image / Add borders / symmetric / 1 pixel, na cor 1 Selections / Select All *Edit / Copy Image / Add borders / symmetric / 60 pixels, na cor 2 Selections / Invert *Edit / Paste into selection Adjust / Blur / Gaussian Blur / Radius em 30 Selections / Invert Effects / Plugins / Alien Skin Eye Candy 5: Impact / Perspective Shadow- como antes Selections / Select None 16. Copie e cole como nova layer o tube "33_Femmes_Page9_Animabelle" Cuidadosamente remova a marca dágua com a ferramenta borracha Posicione à esquerda como no modelo final Effects / Plugins / Alien Skin Eye Candy 5: Impact / Perspective Shadow - como antes 17. Layers / New Raster Layer Ative a ferramenta Paint Brush e localize o brushe 
Aplique com a cor branca, como no modelo final Posicione melhor, se necessário Effects / 3D Effect / Drop Shadow: 5 / 5 / 100 / 5 / Cor 3 #64342b 18. Copie e cole como nova layer o tube "Roses_Animabelle" Cuidadosamente remova a marca dágua Image / Resize a 65 % - Resize all layers desmarcado Posicione à direita, como no modelo final Adjust / Sharpness / Sharpen Effects / Plugins / Alien Skin Eye Candy 5: Impact / Perspective Shadow - como antes Image / Add borders / symmetric / 1 pixel, na cor 3 #64342b 19. Layers / New Raster Layer / Assine Layers / Merge / All (flatten) File / Export / JPEG Optimizer http://animabelle.free.fr/Tutoriels_Animabelle/Page7/Rose/Rose.htm
|  |
|


