| Les 279 
Obrigada Mieke por autorizar a tradução  Material Aqui Plugins Mehdi / Sorting Tiles <I C Net Software> Filters Unlimited 2.0 / &<Bkg Kaleidoscope> <I C Net Software> Filters Unlimited 2.0> / Toadies Filter / AP 01 (Innovations)-Lines-SilverLining AAA Frames / Photo Frame Cores Coloque no Foreground a cor #cb5a4e e no Background a cor #d0867e Forme o Gradiente / Style Linear / Angle 45 / Repeats 3 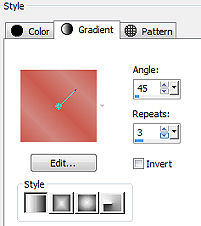
1. Abra uma imagem com Width em 900 e Height em 600, transparente. Pinte a imagem com o gradiente Selections / Select all 2. Abra o Tube vrouw-8.png Edit / Copy Edit / Paste into selection na imagem Selections / Select none 3. Adjust / Blur / Radial blur: Zoom / Strength 80 / Eliptical marcado / Horizontal offset 0 / Vertical offset 0 / Protect center 0 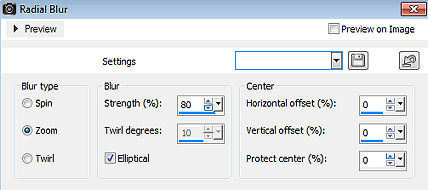
4. Effects / Edge effects / enhance more 5. Effects / Plugins / Mehdi / Sorting Tiles Block Range 150-300 / Block 230 / Crossed marcado 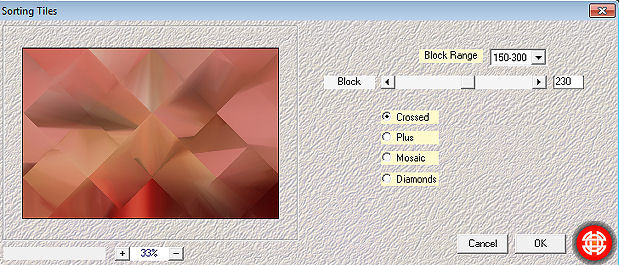
6. Selections / Load/Save Selection / Load Selection from Disk Aplique a seleção "bbbnnn" 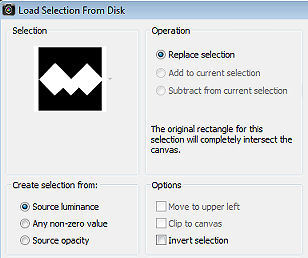
Selections / Promote Selection to Layer Selections / Select None Effects / 3D Effects / Drop Shadow: 0 / 0 / 80 / 40. Cor preta 7. Layers / Duplicate Repita o layers / duplicate 8. Ative a layer Promoted Selection. Mude o blend mode dessa layer para Hard Light Atve agora a layer Copy of Promoted Selection. 9. Effects / Plugin / <I C Net Software> Filters Unlimited 2.0 / &<Bkg Kaleidoscope> 4Q Flip ZBottemL 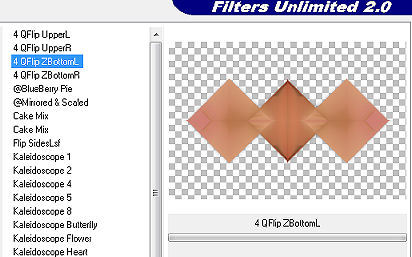
Mude o blend mode dessa layer para Screen 10. Layers / Arrange bring to top 11. Ative agora a layer Copy (2) of Promoted Selection. Effects / Plugins / <I C Net Software> Filters Unlimited 2.0> / Toadies / What Are You: 165 / 151 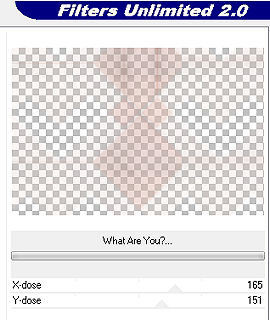
12. Layers / Duplicate 13. Effects / Distortion effects / Wave: 3 / 1 - 18 / 1 - cor preta 
14. Baixe a opacidade dessa layer para 40% 15. Ative a layer do topo Effects / Plugins / Filter AP 01 (Innovations)-Lines-SilverLining / Breaks in Fence: 10 / -1 / 10 / 255 / 255 / 255 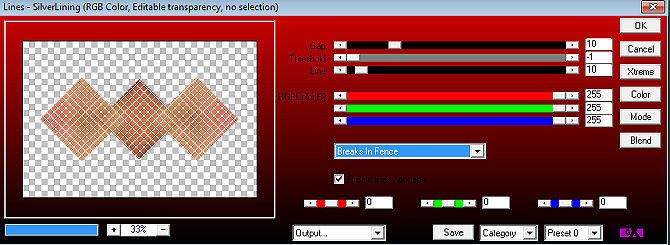
16. Baixe a opacidade dessa layer para 45% e mude o blend mode para screen 17. Image / Resize em 110 % - Resize all layers desmarcado 18. Aperte a tecla k e configure position x em -15 e position y em 128 
19. Effects / Edge Effects / Enhance. Aperte a tecla M 20. Abra o deco-1.png - Edit / copy Edit / Paste as new layer na imagem 21. Aperte a tecla k e configure position x em 588 e position y em 57 22. Mude o Blend Mode dessa layer para Luminance (LegacY) 23. Abra o deco-2.png - Edit / copy Edite / Paste as new layer na imagem 24. Configure position x em 556 e position y em 44.00 Mude o Blend Mode dessa layer para Overlay 25. Abra o deco-3.png - Edit / copy Edit / Paste as new layer na imagem Configure position x em 645 e position y em 111.00 Mude o Blend Mode dessa layer para Multiply Aperte a tecla M 26. Abra o deco-4.png - Edit / copy Edit / Paste as new layer na imagem. Não mova Image / Add borders / 1 pixel na cor do foreground Selections / Select all 27. Edit / Copy 28. Image / Add borders / 50 pixels na cor branca Selections / Invert Edit / Paste into selection Adjust / Blur / Gaussian blur / Radius 30 Selections / Invert Effects / 3D Effects / Drop Shadow: 0 / 0 / 80 / 40. Cor preta Selections / Select None Effects / Plugins /AAA Frames / Photo Frame: 8 / 0 / 0 / 1 - restante sem alterações 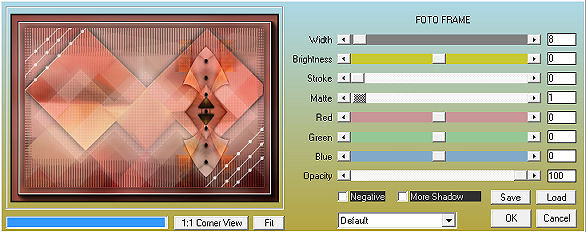
29. Abra o Tube vrouw-8.png Edit / Copy Edit / Paste as new layer na imagem Mova para a esquerda como no modelo final 30. Effects / 3D Effects / Drop Shadow: 0 / 0 / 80 / 40. Cor preta Assina Salve como jpeg. https://www.pspmieke.nl/lessen/les-279/les-279.html | 
 AimooHelpForum
Aimoo Forum List |
Ticket |
Today |
Member |
Search |
Who's On |
Chat Room | Photos | Help |
Sign In |
AimooHelpForum
Aimoo Forum List |
Ticket |
Today |
Member |
Search |
Who's On |
Chat Room | Photos | Help |
Sign In |
 |
|


