Les 274 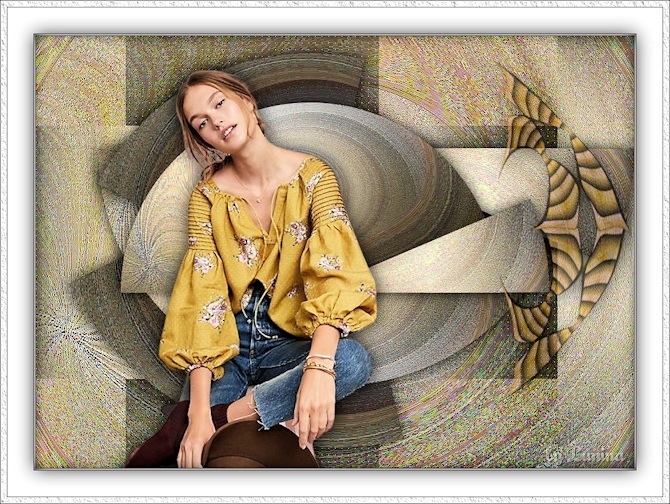
Obrigada Mieke por autorizar a tradução  Material Aqui Plugins <I C Net Software> Filters Unlimited 2.0 / Filter Factory Gallery D <I C Net Software> Filters Unlimited 2.0 / VM-1 / Web Weaver Flaming Pear / Flexify 2 AP 01 (Innovations) / lines-Silverlining AAA Frames / Texture Frame Cores: Foreground #8d7151 e Background #ffffff (branco) 1. Abra uma imagem Transparente com Width em 900 pixels e Height em 650 pixels 2. Pinte a imagem com o gradiente Style Sunburst / Repeats 0 / Invert marcado e as demais configuraçãoes todas em 50 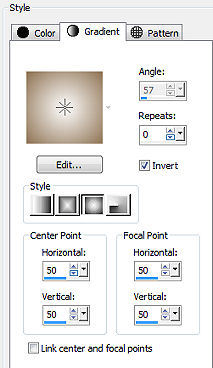
3. Selections / Select all 4. Abra o tube lady-250.png Edit / Copy Edit / Paste into selection na imagem Selections / Select none 5. Adjust / Blur / Radial Blur Twirl / Strength 75 / Rotate Degrees 35 / Horizontal Offset -35 / Vertical Offset 15 / Protect Center 0 / Eliptical marcado 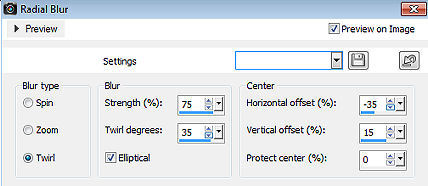
6. Effects / Edge effects / Enhance Effects / Plugins / <I C Net Software> Filters Unlimited 2.0 / Filter Factory Gallery D / Vortex: 255 / 100 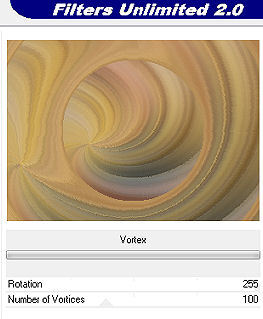
7. Effects / Edge effects / Enhance Layers / Duplicate 8. Effects / Plugins / <I C Net Software> Filters Unlimited 2.0 / VM-1 / Web Weaver / Size 255 / Transparency / Shadow Intensity 55 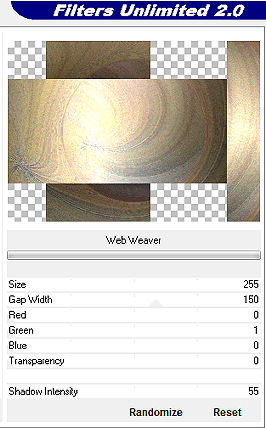
9. Layers / Duplicate 10. Effects / Plugins / Flaming Pear / Flexify 2: Input: Equirectangular / Output: Half-polar / Restante sem alterações 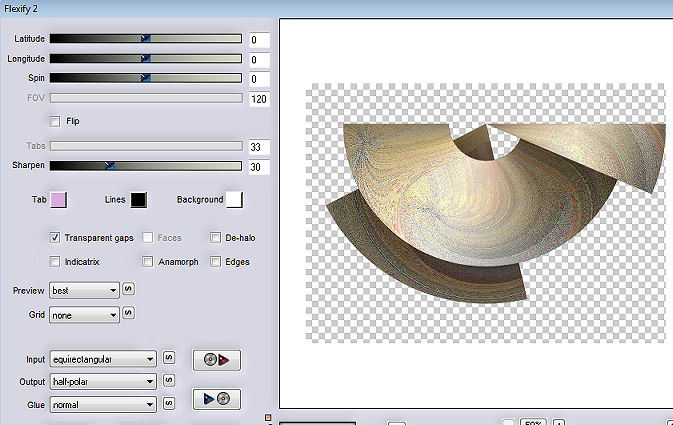
11. Effects / 3D Effects / Drop Shadow: 0 / 0 / 80 / 40,00 - Preto 12. Objects / Align / Bottom 13. Layers / Duplicate Image / Resize em 80% / Resize all layers desmarcado 14. Image / Flip (Flip / Flip Vertical) 15. Aperte a tecla K e configure Position X 53 e Position Y 2.00 
Aperte a tecla M 16. Layers / merge / merge down Ative a layer Copy of Raster 1 17. Effects / Plugins / AP 01 (Innovations)-lines-Silverlining: Dotty Grid / 10 / -1 / 10 / 3x 255 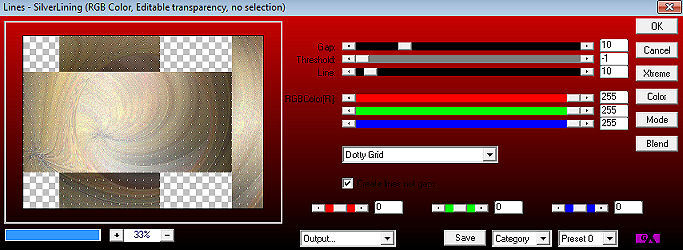
18. Abra o tube lady-250.png Edit / Copy Edit / Paste as a new layer na imagem Layers / Arrange / Brig to top Aperte a tecla K e configure Position X 133 e Position Y 52.00 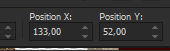
19. Effects / 3D Effects / Drop Shadow: 0 / 0 / 80 / 40,00 - Preto (ou escolha um drop shadow de seu agrado) 20. Abra o deco-25.png Edit / Copy Edit / Paste as a new layer na imagem Configure Position X 678 e Position Y 25.00 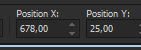
Aperte a tecla M 21. Image / Add Borders / 1 pixels com a cor escura Image / Add Borders / 2 pixels com a cor clara Image / Add Borders / 1 pixels com a cor escura Selections / Select all Image / Add Borders / 50 pixels com a cor clara Selections / Invert 22. Effects / 3D Effects / Drop Shadow: 0 / 0 / 80 / 40,00 - Preto 23. Effects / Plugins / AAA Frames / Texture Frame: 10 / 0 / 2 / 1 / 100 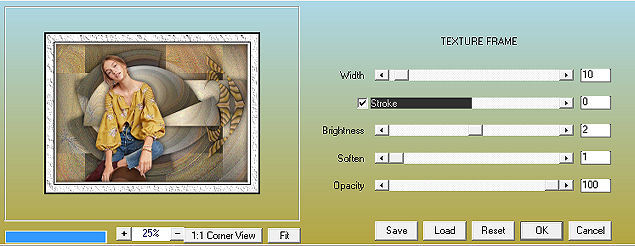
24. Selections / Invert Effects / 3D Effects / Drop Shadow: 0 / 0 / 80 / 40,00 - Preto (ou escolha um drop shadow de seu agrado) Selections / Select none. 25. Adjust / Smart Photo Fix / default. (ou outro de sua escolha) 26. Assine Salve como JPEG https://www.pspmieke.nl/lessen/les-274/les-274.html |  |
|


