| Les 273 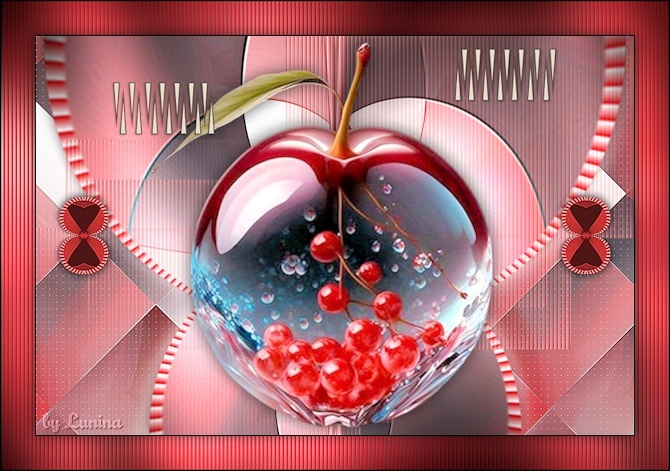
Obrigada Mieke por autorizar a tradução  Material Aqui Plugins: Mehdi / Sorting Tiles <I C Net Software> Filters Unlimited 2.0> / Simple / Diamonds. Flaming Pear / Flexify 2 <I C Net Software> Filters Unlimited 2.0 / Graphics Plus AP 01 (Innovations) / Lines / SilverLining Coloque no Foreground a cor #d10c13 e no Background a cor #ffffff Forme o Gradient / Style Linear: Angle 0 / Repeats 1 / Invert marcado 
1. Abra uma imagem transparente com Width em 900 e Height em 600. 2. Pinte a imagem com o gradiente 3. Abra o tube apple-berry..png Edit / Copy Edit / Paste as a new layer na imagem 4. Effects / Image Effects / Seamless Tiling / Settings: Default 5. Adjust / Blur / Radial Blur / Twirl: 70 / 10 / Eliptical / 0 / 100 / 0 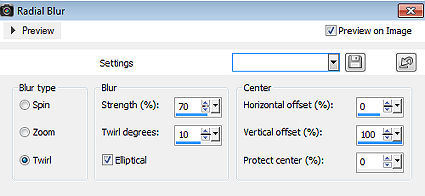
6. Layers / merge / merge down Effects / Plugins / Mehdi / Sorting Tiles Block Range 300-500 / Block 500 / Plus marcado 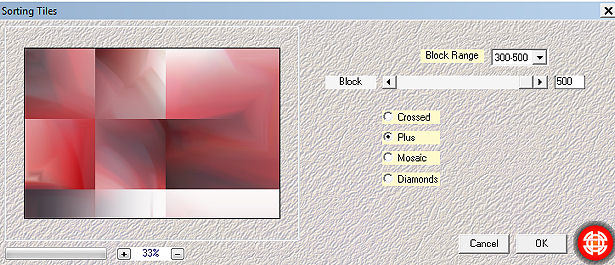
7. Effects / Plugins / <I C Net Software> Filters Unlimited 2.0> / Simple / Diamonds. 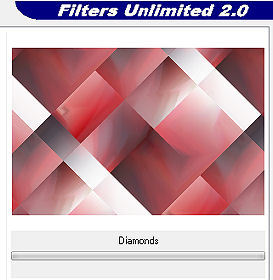
8. Effects / Edge effects / Enhance More 9. Aperte a tecla S Selections / Custom Selection: Top 195 / Left 0 / Right 900 / Bottom 405 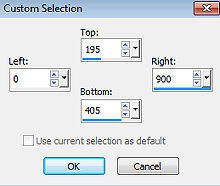
Selections / Promote selection to layer 10. Selections / Modify / Select selection borders / Border width 6 / Inside / Anti-alias marcado 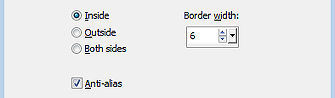
Ative o baldinho de pintura e configure Match mode em None 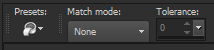
11. Pinte essa borda com a cor do Foreground (#d10c13) Effects / Texture effects / Blinds: 6 / 100 / Cor #ffffff / Light from left/top marcado 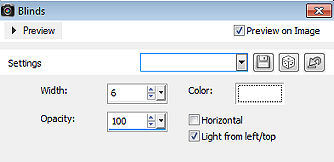
Selections / Select none 12. Effects / Plugins / Flaming Pear / Flexify 2: 60 / 0 / 0 / 95 / Input: equirectangular / Output: hyperbolic (restante sem alteração) 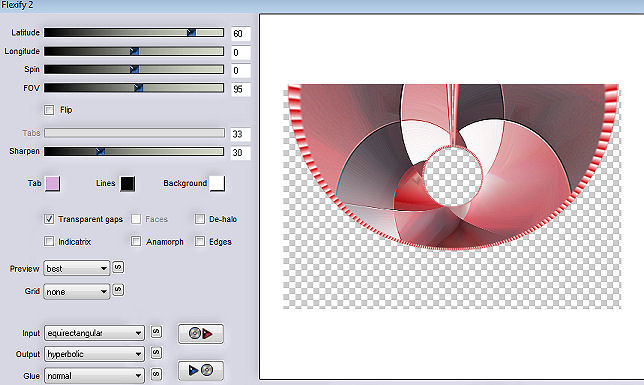
13. Layers / Duplicate Image / Resize em 80% - Resize all layers desmarcado Repita o Resize 14. Image / Flip (Flip Vertical) 15. Objects / Align / Bottom Layers / merge / merge down Effects / 3D Effects / Drop Shadow: 0 / 0 / 100 / 40 / cor preta 16. Effects / Plugins / <I C Net Software> Filters Unlimited 2.0 / Graphics Plus / Cross Shadow / Settings Default (6x50 e 2x---128) 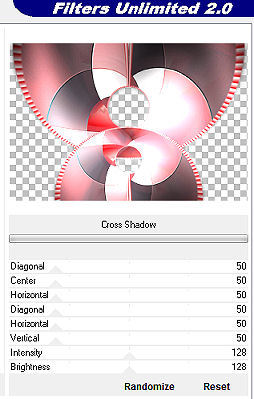
17. Layers / New raster layer e pinte a layer com a cor branca Abra a mask creation.tine_masque249.pspimage e minimize no Psp Layers / New Mask Layer / From Image / aplique a mask Creation.tine-masque249 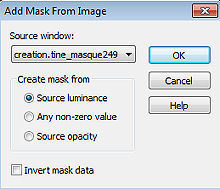
Layers / Merge / Merge group 18. Effects / Texture effects / Blinds: 6 / 100 / cor #d10c13 / Light from left/top marcado 
19. Baixe a opacidade dessa layer para 50% 20. Ative a Raster 1 Effects / Plugins / AP 01 (Innovations)-Lines-SilverLining: 10 / -1 / 10 e 3x255 / Dotty Grid 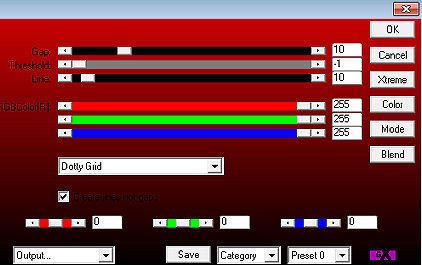
21. Abra o Tube apple-berry..png Edit / Copy Edit / Paste as a new layer na imagem Layers / Arrange / Bring to top Effects / 3D Effects / Drop Shadow: 0 / 0 / 70 / 35 - cor preta Effects / Image Effects / Offset: -20 / 0 / Custom e Transparent marcados 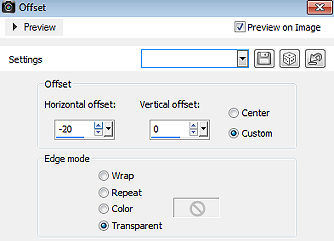
22. Abra o deco-1-red Edit / Copy Edit / Paste as a new layer na imagem 23. Abra o deco-2. Edit / Copy Edit / Paste as a new layer na imagem Effects / Image Effects / Offset: 0 / 215 / custom e Transparent marcados 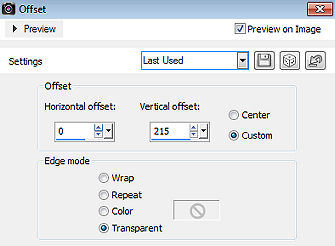
24. Image / Add Borders / 2 pixels na cor preta Edit / Copy Selections / Select-all Image / Add borders / 50 pixels de qualquer cor Selections / Invert Edit / Paste into selection Adjust / Blur / Gaussian Blur / Radius: 30 Effects / Texture Effects / Blinds: 6 / 100 / cor #d10c13 / Light from left/top marcado (como antes) 25. Effects / Plugins / <I C Net Software> Filters Unlimited 2.0 / Graphics Plus / Cross Shadow - como antes 26. Selections / Invert Effects / 3D Effects / Drop Shadow: 0 / 0 / 70 / 35 - cor preta Selections / Select none Image / Add Borders / 2 pixels na cor preta 27. Adjust / Smart Photo Fix / Default Assine Salve como JPEG https://www.pspmieke.nl/lessen/les-273/les-273.html
|  |
|


