| Les 258 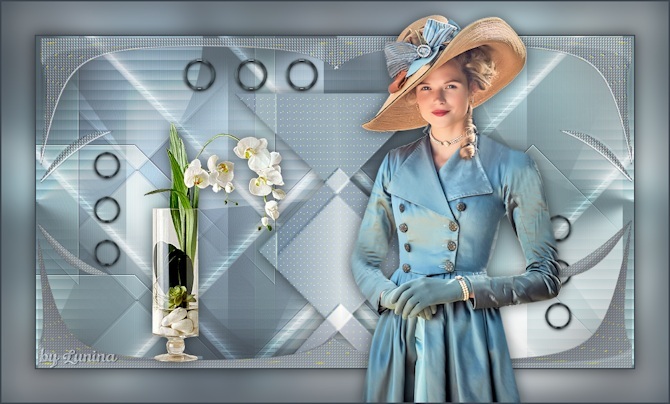
Obrigada Mieke por autorizar a tradução  Material Aqui Plugins:
Mehdi / Sorting Tiles
Andrews Filters / 1 / Blur Up
Italian Editors Effects / Effetto Fantasma Flaming Pear / Flexify 2 Cor do Foreground #94B1B4 / Cor do Background #3F4851 Atenção 1. Ao usar outras cores, os plugins podem dar resultados diferentes. 2. Os plugins podem dar resultados diferentes dos obtidos no modelo deste tutorial. Realização Forme no Foreground o gradiente Style Linear / Angle 90 / Repeats 5 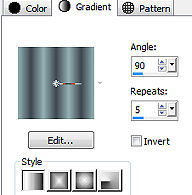
No Background coloque o gradiente White Fade Corel 06-028 
1. Abra uma imagem de 900 x 500 pixels, transparente 2. Pinte a imagem com o gradiente do foreground 3. Effects / Plugins / Mehdi / Sorting Tiles: Block Range 300-500 / Block 300 / Crossed marcado 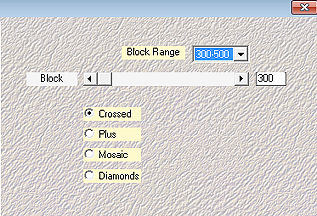
4. Effects / Plugins / <I C Net Software> Filters Unlimited 2.0 / Andrews Filters 1 / Blur Up: 135 / 61 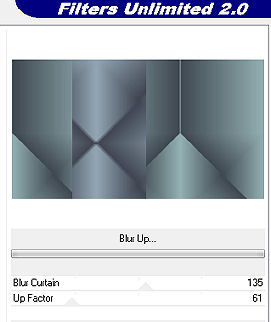
4. Effects / Plugins / <I C Net Software> Filters Unlimited 2.0> / Italian Editors Effects / Effetto Fantasma: 84 / 100. 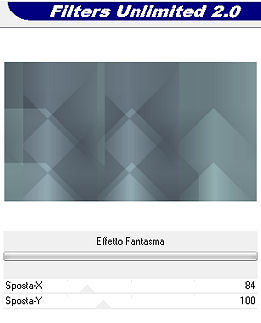
5. Effects / Edge Effects / Edge Enhance. 6. Aperte a tecla S e ative a ferramenta Selections / Custom Selection: Top 0 / Left 64 / Right 361 / Bottom 500. 
7. Layers / New Raster Layer Pinte a seleção com o gradiente do background Selections / Select none 8. Effects / Plugins / <I C Net Software> Filters Unlimited 2.0> / Italian Editors Effects / Effetto Fantasma: 41 / 41. (Default) 9. Effects / Image Effects / Seamless Tiling: Corner / Bidirectional / Horizontal Offset 0 / Vertical Offset 0 / Transition 50 / Linear. 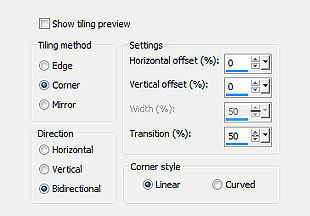
10. Mude o blend mode da layer para Overlay. 11. Layers / Duplicate 12. Effects / Plugins / Flaming Pear / Flexify 2: 89 / -107 / 6 / 120 / Input / equirectangule / Output / orthographic. 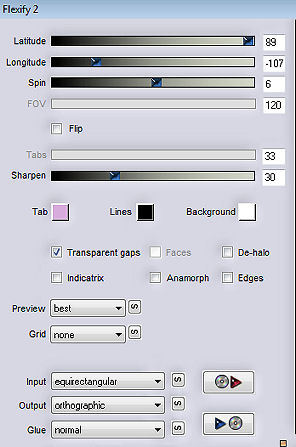
13. Effects / Image Effects / Seamless Tiling / Corner / Bidirectional / Horizontal Offset 0 / Vertical Offset 0 / Transition 50 / Linear. 14. Effects / Texture Effects / Blinds: 15 / 75 / Cor do foreground / Horizontal marcado. 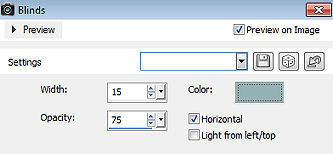
15. Mude o blend mode da layer para Overlay 16. Abra o deco-1-258.png Edit / Copy Edit / Paste as a new layer na imagem Mude o blend mode dessa layer para Overlay. 17. Abra o deco-2-258.png Edit / Copy Edit / Paste as a new layer na imagem Effects / Image Effects / Offset / -2 / -45 / Custom e Transparent marcados 
18. Effects / 3D Effects / Drop Shadow: 0 / 0 / 60 / 30 - Cor #000000 19. Abra o deco-3-258.png Edit / Copy Edit / Paste as a new layer na imagem Effects / Image Effects / Offset / -3 / 10 / Custom e Transparent marcados 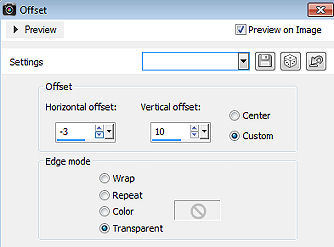
20. Abra o deco-4-258.png Edit / Copy Edit / Paste as a new layer na imagem (aqui você pode ajustar suas cores com coloração ou após adicionar as bordas) 21. Image / Add Borders / 2 pixels com a cor escura Selections / Select all. Edit / Copy Image / Add Borders / 50 pixels com a cor clara Selections / Invert Edit / Paste into selection na imagem Adjust / Blur / Gaussian Blur 20. Selections / Invert Effects / 3D Effects / Drop Shadow: 0 / 0 / 60 / 30 - Cor #000000 Selections / Select none 22. Abra o tube Kamalini-983 .png Edit / Copy Edit / Paste as a new layer na imagem Mova para a direita - Veja o modelo ( aperte a tecla k e configure X 522-Y20) / (ou Offset 180 / -6) Effects / 3D Effects / Drop Shadow: 0 / 0 / 60 / 30 - Cor #000000 23. Abra o vvs-floral0652.png (small) Edit / Copy Edit / Paste as a new layer na imagem Mova para a direita - Veja o modelo final (Offset / -180 / -60.) Effects / 3D Effects / Drop Shadow: 0 / 0 / 60 / 30 - Cor #000000 24. Image / Add Borders / 2 pixels com a cor escura Layers / New raster layer / Assine Salve como JPEG. https://www.pspmieke.nl/lessen/les-258/les-258.html |  |
|


