Kyra 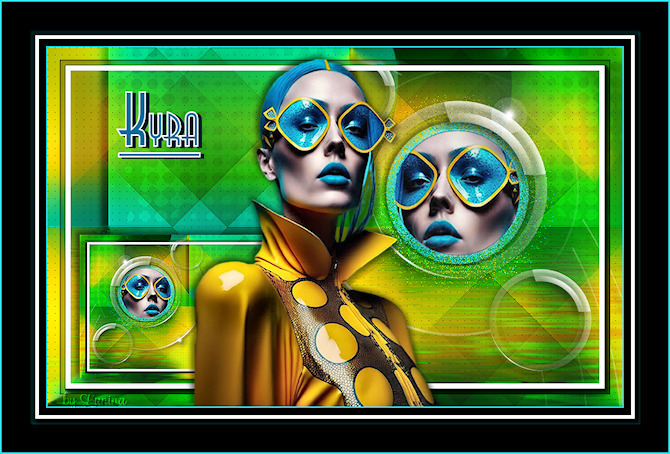
Obrigada Manuela por autorizar a tradução  Material Aqui Agradecimento aos Tubers pelos materiais: Tube Renee Masks Narahs Masks Selection SelectionMDesign Kyra wordart Decos Use o seu próprio tube personagem (feminino ou masculino) Plugins: °v° Kiwi`s Oelfilter - 3,5 Promille... Medhi - Wavy Lab Simple - Pizza Slince Mirror AP 01 (Innovations) – Lines_SilverLining Graphic Plus – Cross Shadow Flaming Pear- Flood 2 AAA Frames - Foto Frame Coloque a seleção na pasta "Selections" Está usando outras cores e tubes? Então é possível ter que alterar o blend mode e a opacidade da layer porque o efeito final pode resultar diferente Escolha 4 cores de seus tubes Neste tutorial foram usadas as seguintes cores: 
Cor 1 #2edee6 / Cor 2 #166ba8 / Cor 3 #f4b700 / Cor 4 #000000 Abra uma imagem de 800 x 500 pixels, Transparente Effects / Plugins / Medhi / Wavy Lab: Style Linear / 2 / 0 / 0 / Cores: 2, 1, 3 / Mode - Normal 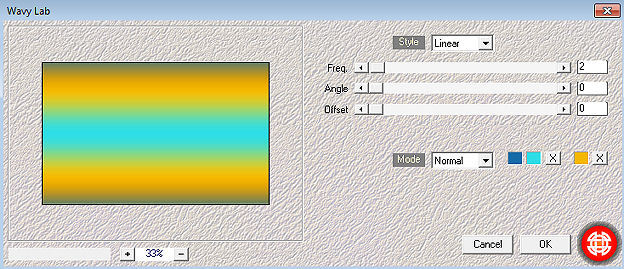
Effects / Plugins / Simple / Pizza Slince Mirror Effects / Edge Effects / Enhance Layers / Duplicate Image / Mirror Baixe a opacidade da layer para 50 Layers / merge / merge down Effects / Image Effects / Seamless Tiling / Settings: Side By Side 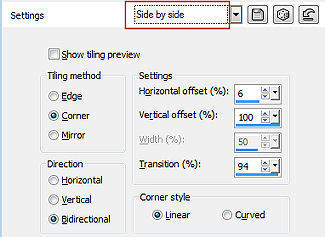
Layers / Duplicate Effects / Plugins / Unlimited 2.0 / °v° Kiwi`s Oelfilter / 3.5 Promille... setting: 128 / 128 / 0 / 0 / 175 
Mude o blend mode dessa layer para Overlay Ative a layer abaixo (Raster 1) Effects / Plugins / AP 01 (Innovations) / Lines_SilverLining settings: Dotty Grid e o restante sem alteração  Ative a layer do topo (Copy of Raster 1) Layers / New raster layer - Pinte a layer com a cor 3 Abra a mask "Narah_mask_0858" e minimize no PSP Layers / New Mask Layer / From Image Localize e aplique a mask "Narah_mask_0858" 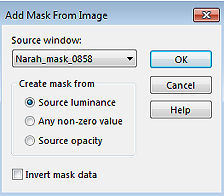
Layers / Merge / Merge Group Adjust / Sharpness / Sharpen Effects / 3D effects / Drop shadow: 20 / 20 / 50 / 10 - preto Repita o drop shadow Effects / Plugins / Graphic Plus / Cross Shadow / Default Mude o blend mode dessa layer para Multiply Layers / New raster layer - Pinte a layer com a cor 1 Abra a mask "Narah_mask_0854" e minimize no PSP Layers / New Mask Layer / From Image Localize e aplique a mask "Narah_mask_0854" 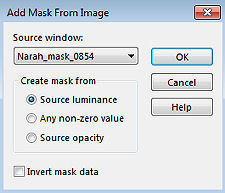
Layers / Merge / Merge Group Image / Mirror Effects / 3D effects / Drop shadow: 10 / 10 / 50 / 10 - preto Repita com -10 / -10 / 50 / 10 Mude o blend mode dessa layer para Overlay Adjust / Sharpness / Sharpen Effects / Plugins / Flaming Pear / Flood 2 / Default 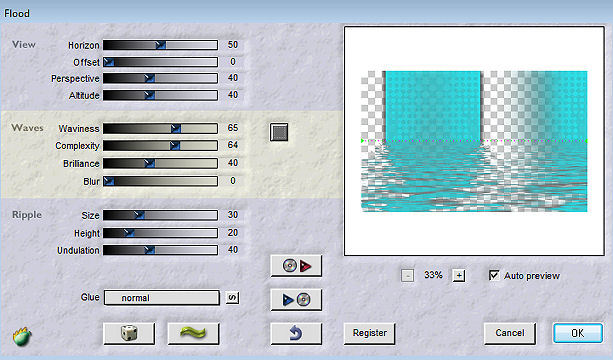
Layers / New raster layer Selections / Load/save selection / Load selection from disk Localize e aplique a seleção "SelectionMDesign Kyra" 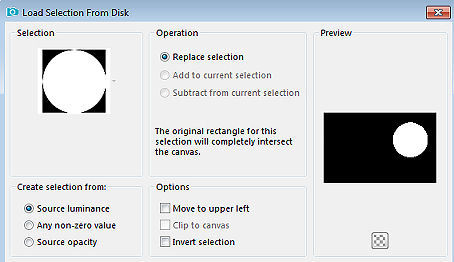
Pinte a seleção com a cor 1 Selections / Modify / Contract em 15 Selections / Modify / Select Selection Borders: Outside / Border width 15 / Anti alias marcado 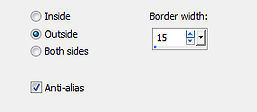 Effects / Plugins / Graphic Plus / Cross Shadow / Default Effects / Texture Effects / Mosaic Glass Grid Settings 65 - 65 / Symmetric / Mosaic Settings 100 / 100 / 4 / 40 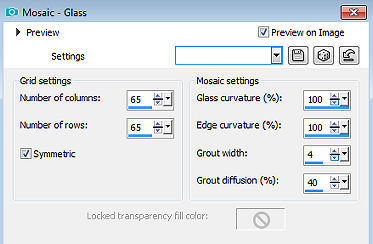
Adjust / Sharpness / Sharpen Effects / 3D effects / Drop shadow: 5 / 5 / 50 / 10 - preto repita com -5 / -5 / 50 / 10 Selections / Select none Selections / Load/save selection / Load selection from disk aplique novamente a seleção "SelectionMDesign Kyra" Selections / Modify / Contract em 16 Aperte a tecla Delete uma vez Selections / Modify / Expand em 3 Abra seu tube Edit / Copy – Edit / Paste as new layer Dê resize se necessário Mova uma parte do seu tube para dentro da seleção e verifique se o Círculo está preenchido com seu tube 
Selections / Invert Aperte a tecla Delete uma vez Selections / Select none Layers / Arrange / Move Down Ative a layer do topo Layers / merge / merge down Image / Resize em 80% - resize all layers desmarcado Layers / Duplicate Tire a visibilidade da layer do topo Ative a layer abaixo (Raster 3) 
Effects / Texture effects / Mosaic Glass (como antes) Grid settings 65 - 65 / Systematic / Mosaic settings 100 / 100 / 4 / 40
Adjust / Sharpness / Sharpen Mude o blend mode dessa layer para Dodge Volte a visibilidade da layer do topo (Copy of Raster 2) e ative essa layer Layers / New raster layer - Pinte a layer com a cor branca Abra a mask "Narahs-Masks-1560" e minimize no PSP Layers / New Mask Layer / From Image Localize e aplique a mask "Narahs-Masks-1560" 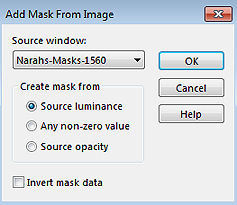
Layers / Merge / Merge Group Adjust / Sharpness / Sharpen Effects / 3D effects / Drop shadow: 5 / 5 / 50 / 10 - preto Repita o drop shadow Image / Mirror Effects / Image Effects / Offset Horizontal offset 38 / Vertical offset -18 / Custom e Transparent marcados 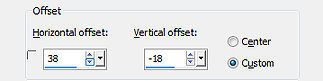 Layers / Merge / Merge all layers Selections / Select all Selections / Modify / Contract em 17 Effects / Plugins / AAA Frames / Photo Frame: setting: 7 / 0 / 0 / 7 / 0 / 0 / 0 / 100 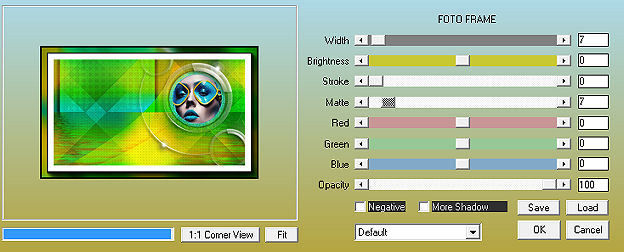
Selections / Select none Layers / Duplicate Image / Resize em 50% - resize all layers desmarcado Repita o resize em 80% Image / Mirror Effects / Image Effects / Offset setting: Horizontal Offset -195 / Vertical Offset -111 / Custom e Transparent marcados 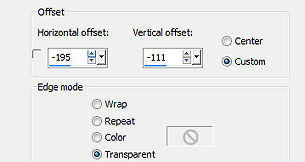 Effects / 3D effects / Drop shadow: 5 / 5 / 50 / 10 - preto repita com -5 / -5 / 50 / 10 Adjust / Sharpness / Sharpen Abra seu tube Edit / Copy – Edit / Paste as new layer Dê Resize, se necessário Mova o tube para o centro do seu trabalho (veja modelo final) Effects / 3D effects / Drop shadow: 5 / 5 / 50 / 10 - preto repita com -5 / -5 / 50 / 10 Abra o tube WAMDesign Kyra Edit / Copy – Edit / Paste as new layer Mova para a esquerda (veja modelo final) Image / Add borders / symmetric: 2 pixel na cor 1 20 pixels na cor 4 2 pixel na cor 1 40 pixels na cor 4 2 pixel na cor 1 Selections / Select all Selections / Modify / Contract em 40 Effects / Plugins / AAA Frames / Photo Frame: setting: 8 / 0 / 0 / 5 / 0 / 0 / 0 / 100 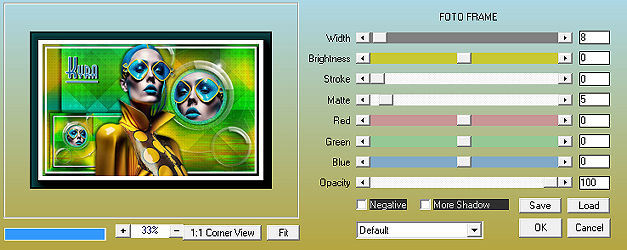
Selections / Select none Layers / New raster layer / Assine Layers / Merge / Merge All Layers https://maantje-psp-design.jouwweb.nl/kyra | 
 AimooHelpForum
Aimoo Forum List |
Ticket |
Today |
Member |
Search |
Who's On |
Chat Room | Photos | Help |
Sign In |
AimooHelpForum
Aimoo Forum List |
Ticket |
Today |
Member |
Search |
Who's On |
Chat Room | Photos | Help |
Sign In |
 |
|


