| Kerri 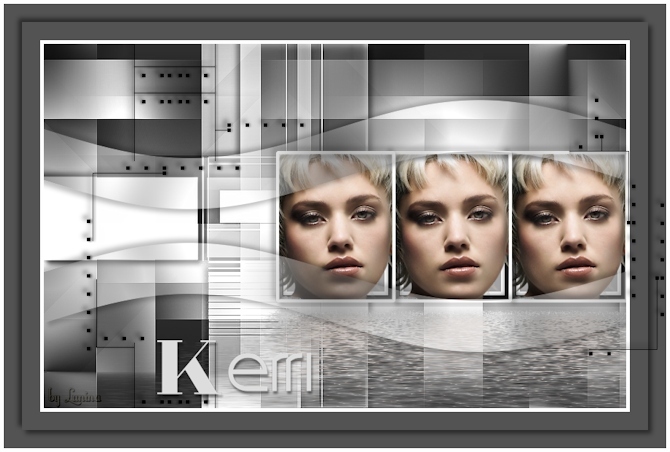
Obrigada Manuela por autorizar a tradução  Material Aqui Agradecimento aos Tubers pelos materiais: Tube MR-Maryse Mask Mask Selections SelectionMDesign Kerri Wordart WAMDesign Kerri Decos @nn Plugins: Filters Unlimited 2.0 Unlimited 2.0 / VM1 / Web Weaver Mehdi / Wavy Lab Simple / Pizza Slince Mirror Graphic Plus / Cross Shadow AAA Frames / Photo Frame Flaming Pear / Flood MuRa's Meister / Copies Coloque as seleções na pasta "Selections" Está usando outras cores e tubes? Então é possível ter que alterar o blend mode e a opacidade da layer porque o efeito final pode resultar diferente Escolha 4 cores de seus tubes Neste tutorial foram usadas as seguintes cores: Cor 1 #dddddd / Cor 2 #a3a1a2 / Cor 3 #535353 / Cor 4 # fefefe 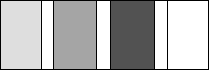
Abra uma imagem de 800 x 500 pixels, Transparente Effects / Plugins / Mehdi / Wavy Lab: Style Linear 2 / 0 / 0 - Cores: 2 / 1 / 3 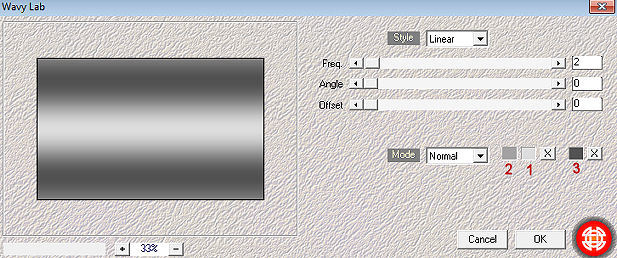
Effects / Plugins / Simple / Pizza Slince Mirror Layers / Duplicate Image / Mirror Baixe a opacidade dessa layer para 50 Layers / merge / merge down Effects / Image Effects / Seamless Tiling / Settings: Side by Side Layers / Duplicate Effects / Plugins / Unlimited 2.0 / VM1 / Web Weaver: setting: 115 / 95 / 0 / 0 / 0 /160 / 125 
Effects / Image Effects / Seamless Tiling / Settings: Stutter Diagonal Mude o blend mode dessa layer para Luminance (Legacy) Adjust / Sharpness / Sharpen Effects / Plugins / Graphic Plus / Cross Shadow / Default Layers / New raster layer / Pinte a layer com a cor 4 Abra a mask Masker que está no material Minimize no Psp Layers / New Mask Layer / From Image Aplique a mask Masker 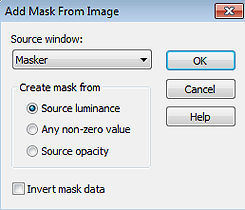
Layers / Merge / Merge Group Effects / 3D effects / Drop shadow: 5 / 5 / 50 / 10 - preto Repita com -5 / -5 / 50 / 10 Mude o blend mode dessa layer para Hard Light Selections / Load/save selection / Load selection from disk Localize e aplique a seleção "SelectionMDesign Kerri" 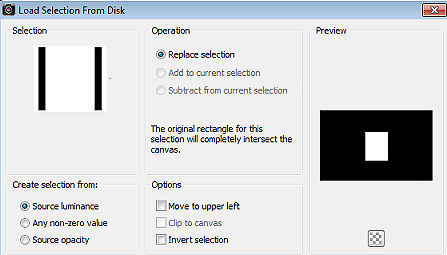
Abra o seu tube feminino / ou o tube feminino que está mo material Edit / Copy – Edit / Paste as new layer Dê resize, se necessário Mova uma parte do Tube para dentro da seleção Selections / Invert Aperte a tecla Delete uma vez Selections / Invert Layers / New raster layer / Pinte a layer com a cor 2 Effects / Plugins / AAA Frames / Photo Frame: settings: 7 / 0 / 0 / 5 / 0 / 0 / 0 / 100 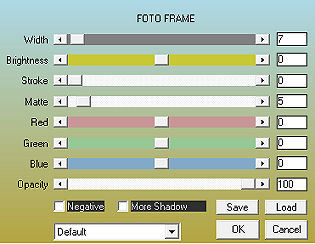
Layers / Arrange / Move Down Ative a layer do topo (Raster 2) Selections / Modify / Selection Borders / Select borders Both sides / Border width 2 / Anti alias marcado 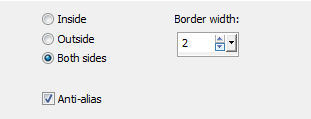 Pinte a seleção com a cor 4 Layers / merge / merge down Selections / Select none Effects / 3D effects / Drop shadow: 5 / 5 / 50 / 10 - preto Repita com -5 / -5 / 50 / 10 Effects / Plugins / Flaming Pear / Flood: setting: no top em 73/ 0 / 50 / 100 - 51 / 52 / 17 / 65 o restante sem alterações / Cor 1 / Glue: Normal 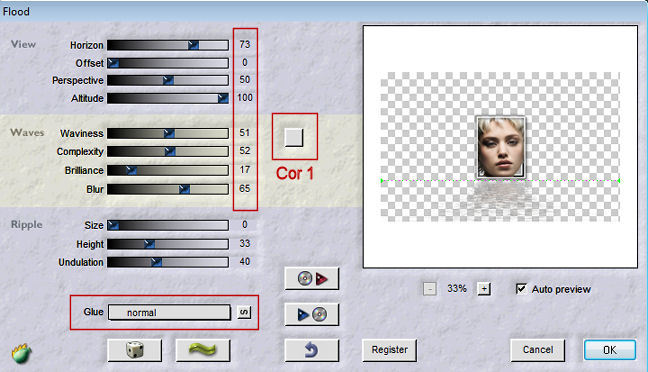
Effects / Plugins / MuRa's Meister / Copies: setting: Random (H line) / Tile mode / Behind / 5 e o restante sem alterações / BG na cor 4 / *Line 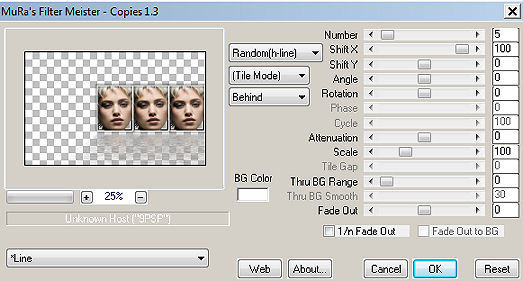
Layers / New raster layer Selections / Load/save selection / Load selection from disk Aplique a seleção "SelectionMDesign SelectionMDesign Kerri 1" 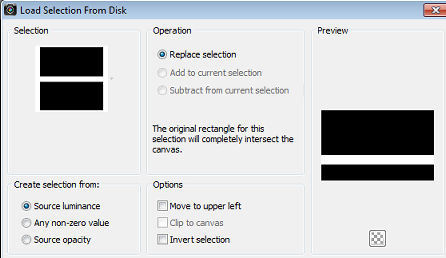
Pinte a seleção com a cor 1 Effects / Plugins / Graphic Plus / Cross Shadow / Default Selections / Select none Effects / Distortion Effects / Wave: setting: Horz. 0 - 100 / Vertic. 8 - 100 / Transparent 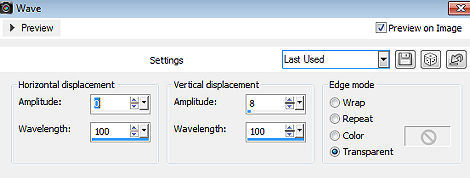
Effects / 3D effects / Drop shadow: 5 / 5 / 50 / 10 - preto Repita com -5 / -5 / 50 / 10 Baixe a opacidade da layer para 50 Layers / Duplicate Image / Flip Abra o tube @nn_070314_Deco-001 Edit / Copy – Edit / Paste as new layer Effects / Image Effects / Offset: setting: Horizontal offset -190 / Vertical offset 0 / Custom e Transparent marcados 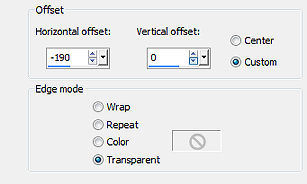 Effects / 3D effects / Drop shadow: -5 / -5 / 50 / 10 - preto Image / Add borders / symmetric: 5 pixels na cor 4 50 pixels na cor 3 Abra o tube @nn Edit / Copy – Edit / Paste as new layer Effects / Image Effects / Offset; setting: Horizontal Offset 389 / Vertical offset 0 / Custom e Transparent marcados 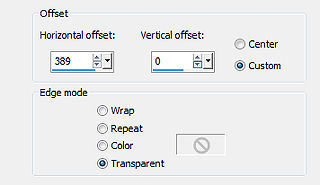 Effects / 3D effects / Drop shadow: -5 / -5 / 50 / 10 - preto Image / Add borders / symmetric: 5 pixels na cor 4 Selections / Select all Selections / Modify / Contract em 30 Effects / 3D effects / Drop shadow: 5 / 5 / 50 / 10 - preto Repita com -5 / -5 / 50 / 10 Selections / Select none Abra o tube WAMDesign Kerri Edit / Copy – Edit / Paste as new layer Posicione num local de seu agrado no trabalho Layers / New raster layer Assine Layers / Merge / Merge All Layers https://maantje-psp-design.jouwweb.nl/kerri | 
 AimooHelpForum
Aimoo Forum List |
Ticket |
Today |
Member |
Search |
Who's On |
Chat Room | Photos | Help |
Sign In |
AimooHelpForum
Aimoo Forum List |
Ticket |
Today |
Member |
Search |
Who's On |
Chat Room | Photos | Help |
Sign In |
 |
|


