Au revoir l'été 
Obrigada Animabelle por autorizar a tradução 
Material Aqui Este tutorial é uma criação pessoal de Animabelle Qualquer semelhança com outro é mera coincidência Plugins: <I.C. NET Software> Unlimited 2
FM Tile Tools
Tiles & Mirror
Photo Tools
Photo Aging Kit IMPORTANTE Abra todas as imagens no PSP incluindo a(s) mask(s). Duplique tudo e feche os originais pois trabalharemos com as cópias Sinta-se à vontade para alterar suas cores e o blend mode da layer para se adequar a seus tubes e imagens, bem como a cor das sombras (drop shadow), se necessário Realização Etapa 1 Abra a imagem background (fond_animbelle.jpg) Window / Duplicate Feche o original Effects / Plugins / IC NET Sofware / Unlimited 2 / Tiles & Mirror / Seamless Blend (Horizontal) 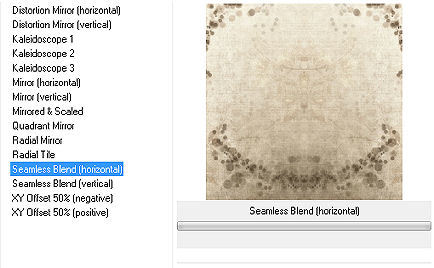
Etapa 2 Layers / New Raster Layer Selections / Select All Copie e cole na seleção o tube misted paisagem Selections / Select none Baixe a opacidade da layer para 90 Adjust / Sharpen / Sharpen More Layers / Merge Visible Layers Etapa 3 Effects / Plugins / IC NET Sofware / Unlimited 2 / Photo Tools / Gradient Sky - Compliment Dependendo de suas cores pessoais, se necessário, altere os valores de Blue / Red / Green 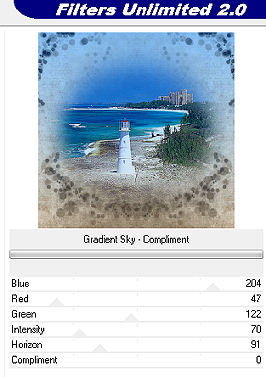
Effects / Plugins / IC NET Sofware / Unlimited 2 / Photo Aging Kit / Dust & Scratches 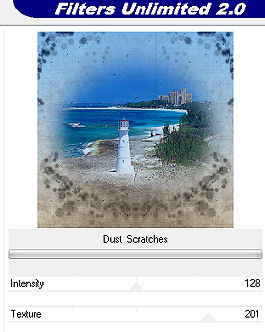
Effects / Plugins /FM Tile Tools /Blend Emboss / Default 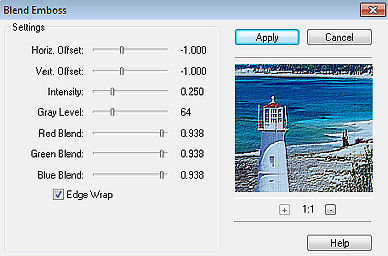
Etapa 4 Layers / New Mask Layer / From Image Aplique a mask (masque_animabelle_au_revoir_l_ete.jpg) 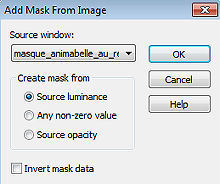
Layers / Merge / Merge Group Image / Mirror Image / Canvas Size 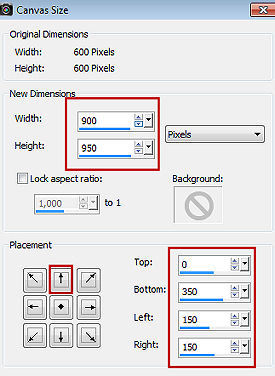
Effects / Image Effects / Offset: -150 / 0 / Custom e Transparent marcados Effects / Reflection Effect / Rotating Mirror 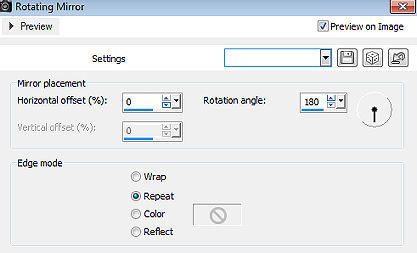
Etapa 5 Ative a ferramenta Deform (D) ou Pick View / Rulers Estique a imagem para baixo até 900 pixels 
View / Rulers (para remover a régua) Aperte a tecla M para desativar a ferramenta Deform ou Pick Etapa 6 Copie e cole como nova layer a frame tube (frame_animabelle.pspimage) Não mova, ela estará no lugar certo Copie e cole como nova layer o tube personagem de sua escolha Effects / Image Effects / Offset: 50 / 130 / Custom e Transparent marcados Etapa 7 Baixe a opacidade da layer para 40 Ative a ferramenta Selection / Laço / Point to Point / Feather em 0 Contorne a parte do tube que se sobrepõe à frame, como mostro abaixo 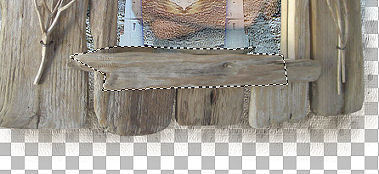 Então aperte a tecla Delete Selections / Select none Volte a opacidade do tube para 100 (see the result) 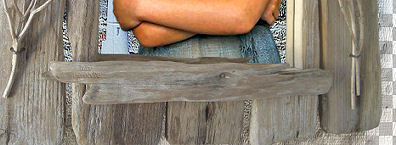
Layers / Merge / Merge down Image / Resize em 85%, resize all layers desmarcado Adjust / Sharpness / Unsharp Mask 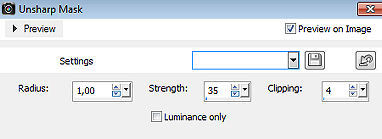
Effects / 3D Effect / Drop Shadow: -10 / 0 / 45 / 55 / Preto Etapa 8 Copie e cole os demais elementos que compõem a imagem e dê resize, se necessário (pode usar elementos de scraps) Posicione-os abaixo como no modelo final Adjust / Sharpness / Sharpen Effect / 3D Effect / Drop Shadow: -5 / 5 / 45 / 10 / preto Repita com 5 / -5 / 45 / 10 / Preto Etapa 9 Layer / Merge Visible Layers Assine e Expote como PNG. http://animabelle.free.fr/Tutoriels_Animabelle/page4/au_revoir_l_ete/au_revoir_l_ete.htm |  |
|


