Xantara 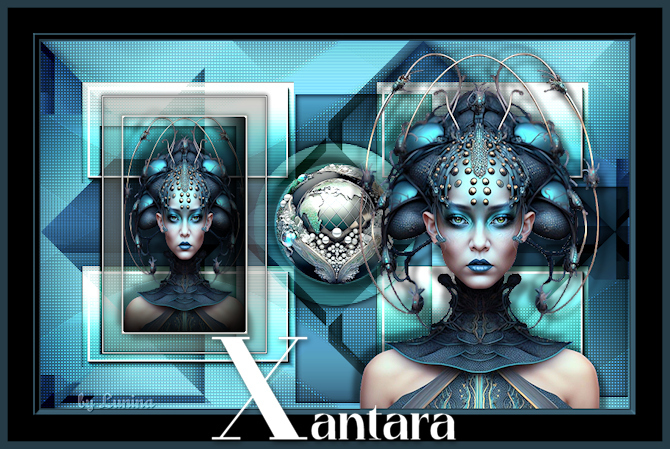
Obrigada Manuela por autorizar a tradução  Material Aqui Agradecimentos aos tubers pelos materiais: Tubes Renee Mask @nn_140712_mask_123_tdstudio Selections SelectionMDesign Xantara Wordart WAMDesign Xantara Plugins: Filters Unlimited 2.0 VM1 / Web Weaver Tile & Mirror / Mirrored & Scaled Toadies / *Sucking Toad* Bevel II.2... &<Bkg Kaleidoscope> / Cake Mix Filter Factory Gallery D / Shoutin'! Medhi / Wavy Lab Medhi / Sorting Tiles AAA Frames / Photo Frame Coloque as seleções na pasta "Selections" do Psp Está usando outras cores e tubes? Então é possível ter que alterar o blend mode e a opacidade da layer porque o efeito final pode resultar diferente Escolha 4 cores de seus tubes Aqui foram escolhidas as seguintes cores 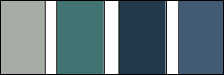
Cor 1 #a7afa3 / Cor 2 #447673 / Cor 3 #263c47 / Cor 4 #405b75 Coloque no Foreground a cor 1 e no Background a cor 3 Abra uma imagem de 800 x 500 pixels, Transparente Effects / Plugins / Medhi / Wavy Lab 1.1: Cores 2, 4, 1 e 3 / Style Linear / 2 / 0 / 0 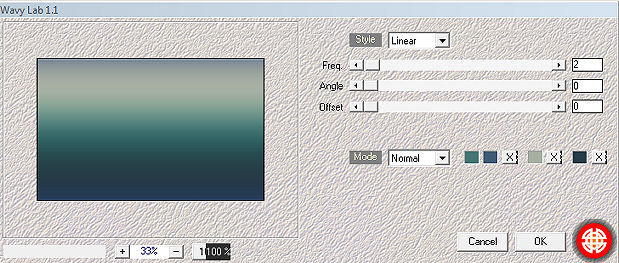
Layers / Duplicate Effects / Plugins / Unlimited 2.0 / VM1 / Web Weaver: 209 / 211 / 0 / 0 / 0 / 255 / 88 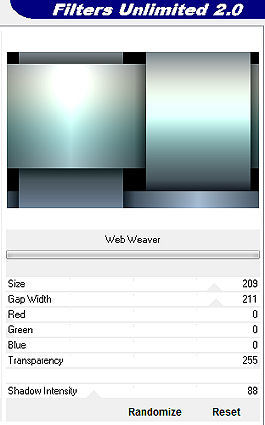
Effects / Plugins / Unlimited 2.0 / Tile & Mirror / Mirrored & Scaled Default (como abrir) Effects / Image Effects / Seamless Tiling / Settings: Stutter Vertical Mude o blend mode dessa layer para Overlay Effects / Plugins / Medhi / Sorting Tiles: Block Range 150-300 / Block 260 / Crossed marcado 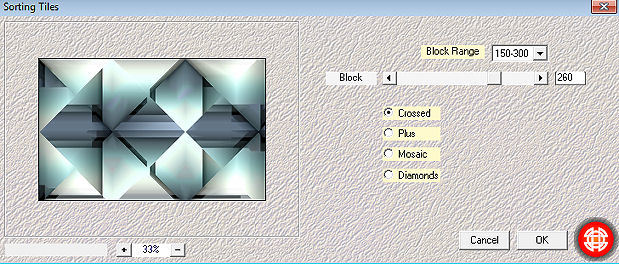
Ative a layer de fundo Effects / Plugins / Unlimited 2.0 / Toadies / *Sucking Toad* Bevel II.2... Default Selections / Load/Save selection / Load selection from disk Localize a seleção "SelectionMDesign Xantara" 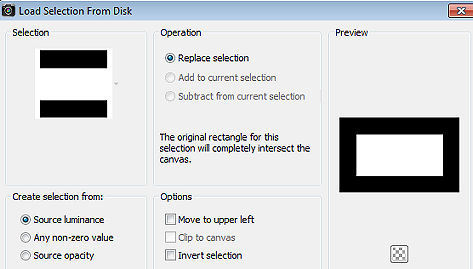
Effects / Plugins / AAA Frames / Photo Frame: settings: 15 / 0 / 0 / 5 / 0 / 0 / 0 / 100 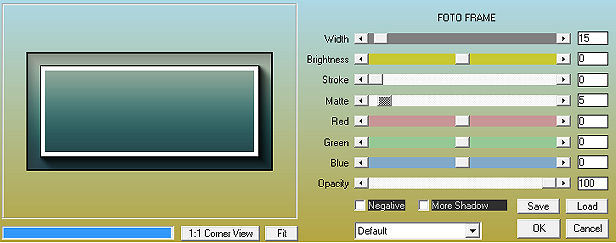
Selections / Promote Selection to layer Selections / Select none Effects / Plugins / Unlimited 2.0 / &<Bkg Kaleidoscope> / Cake Mix: settings: 156 / 60 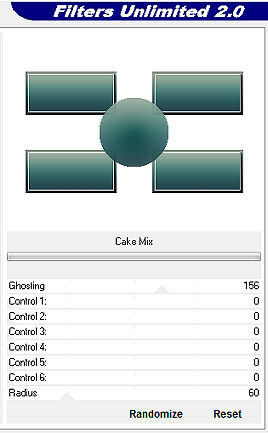
Obs.: Como pelo unlimited o fundo ficava na cor branca, apliquei o plugin diretamente pela lista de plugins, onde o fundo fica escuro e mais próximo ao que obteve a autora do tutorial 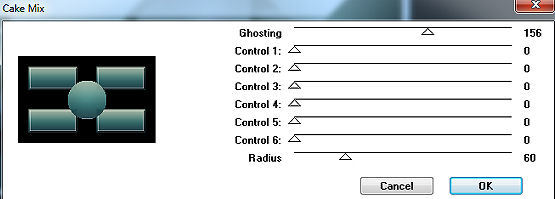
Layers / New raster layer Selections / Load/Save selection / Load selection from disk Localize a seleção "SelectionMDesign Xantara CIRCEL" 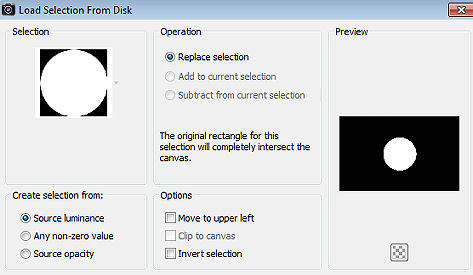
Pinte a seleção com a cor 1 Selections / Select none Effects / Plugins / Unlimited 2.0 / Filter Factory Gallery D / Shoutin'! Default Effects / 3D effects / Drop shadow: 1 / 1 / 50 / 10 - preto Repita com -1 / -1 / 50 / 10 - preto Mude o blend mode dessa layer para Overlay Effects / Texture effects / Blinds: 2 / 50 - Cor 3 - Horizontal e Light from left/top marcados 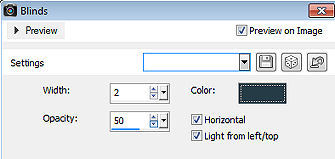
Layers / New raster layer - Pinte a layer com a cor 3 Abra a mask "@nn_140712_mask_123_tdstudio minimize no Psp Layers / New Mask Layer / From Image Aplique a mask @nn_140712_mask_123_tdstudio 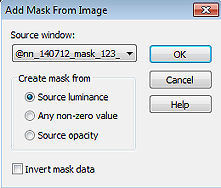
Layers / Merge / Merge Group Effects / 3D effects / Drop shadow: 5 / 5 / 50 / 10 - preto Repita com -5 / -5 / 50 / 10 - preto Effects / Edge Effects / Enhance Mude o blend mode dessa layer para Dodge Layers / Arrange / Bring to top Layers / New raster layer Selections / Load/Save selection / Load selection from disk Aplique novamente a seleção "SelectionMDesign Xantara CIRCEL" Selections / Modify / Contract em 28 Abra o tube Renee-TUBES-Juin17 / ou o tube de sua escolha Image / Resize em 80% - resize all layers desmarcado Repita o Resize 4 vezes (Verifique se o tube fica com as dimensões: 251 x 247 px) Edit / Copy – Edit / Paste into selection Effects / 3D effects / Drop shadow: 10 / 10 / 50 / 10 - preto Repita com -10 / -10 / 50 / 10 - preto Adjust / Sharpness / Sharpen Selections / Select none Layers / Arrange / Move Down Ative a layer do topo Abra o tube "frame" Edit / Copy – Edit / Paste as new layer Effects / Image Effects / Offset: Horizontal offset -204 / Vertical offset 0 / Custom e Transparent marcados Ative a varinha mágica. Tolerance e Feather em 0 e clique dentro da Frame Selections / Modify / Expand em 5 Effects / 3D effects / Cutout: Horizontal e Vertical 20 / Opacity 100 / Blur 50 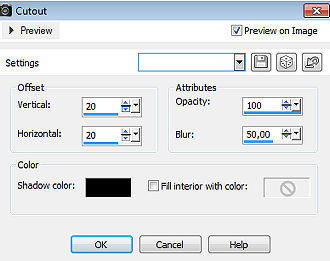
Repita com horizontal e vertical com -20 Layers / New raster layer Abra o tube woman Renee-TUBES-Juin18 / ou o de sua escolha Edit / Copy – Edit / Paste into selection Adjust / Sharpness / Sharpen Selections / Select none Effects / 3D effects / Drop shadow: 10 / 10 / 50 / 10 - preto Repita com -10 / -10 / 50 / 10 - preto Layers / Arrange / Move Down Ative a layer do topo Adjust / Sharpness / Sharpen Effects / 3D effects / Drop shadow: 0 / 0 / 50 / 10 - preto Repita o drop shadow Abra o tube woman Renee-TUBES-Juin18 / ou o de sua escolha Edit / Copy – Edit / Paste as new layer Dê Resize se necessário Mova para a direita Effects / 3D effects / Drop shadow: 10 / 10 / 50 / 10 - preto Repita com -10 / -10 / 50 / 10 - preto Image / Add borders / symmetric: 10 pixels na cor 3 Effects / 3D / Inner Bevel: Bevel 10 / Width 5 / Evenness 2 / Depth 15 / Ambience 4 / Glitter 5 / Color White / Angle 315 / Intensity 50 / Elevation 30 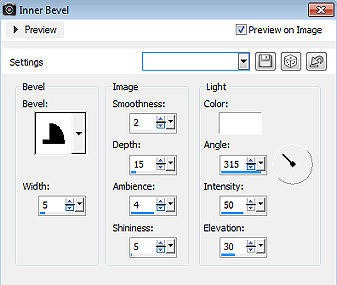
Image / Add borders / symmetric: 35 pixels na cor preta 10 pixel na cor 3 Abra o tube WAMDesign Xantara Edit / Copy – Edit / Paste as new layer Objects / Align / Bottom Layers / New raster layer Assine Layers / Merge / Merge All Layers https://maantje-psp-design.jouwweb.nl/xantara |  |
|


