| Tutorial 293 
Obrigada VaZsu por autorizar a tradução  Material Aqui 1. Abra o "Watercolor background" Effects / Plugins / Filters Unlimited / Bkg Designer sf10 II/ Hinzeberg's mirror 1: 255 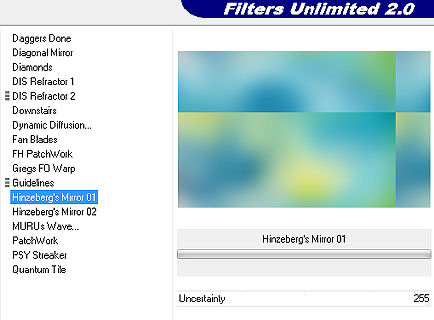
2. Layers / duplicate Permaneça na layer do topo
Effects / Plugins / Filters Unlimited / Simple / Top Left Mirror Baixe a opacidade da layer para 50%
Effects / Edge Effects / Enhance (aplique nas 2 layers)
Ative a layer do topo Layers / merge visible
3. Layers / duplicate novamente
Effects / Plugins / Filters Unlimited / Simple / Centre Tile
4. Ative a ferramenta Selection / Custom selection: Top 495 / Left 0 / Right 1200 / Bottom 630 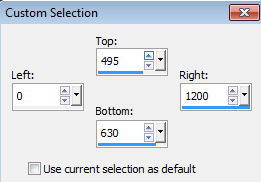
Selections / Promote selection to layer Selections / select none
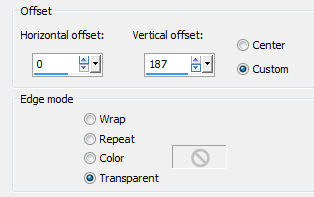
5. Tire a visibilidade da layer do meio. Permaneça na layer do topo Effects / Image effects / Offset: 0 / 187 / Custom e Transparent marcados
6. Ative a ferramenta Selection / Custom selection: Top 343 / Left 0 / Right 1200 / Bottom 410 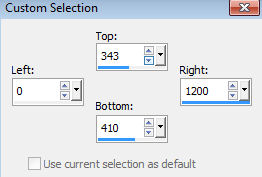
Selections / Promote selection to layer
Effects / Plugins / Ap Lines / Silverlining / Horizontal: 10 / -1 / 10 / 0 / 219 / 255 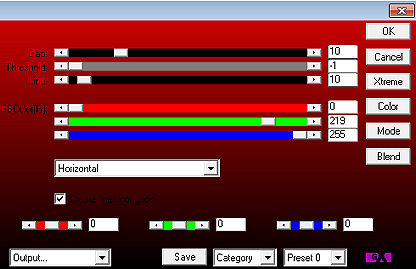
Selections / select none
7. Effects / 3D Drop Shadow: 0 / 0 / 70 / 30,00 - cor preta
8. Layers / new raster layer Selections / select all
Abra o tube "Wave 1" - Edit / copy Edit / paste into selection na imagem Selections / select none
Effects / Image effects / offset: 0 / -50 / Custom e Transparent marcados 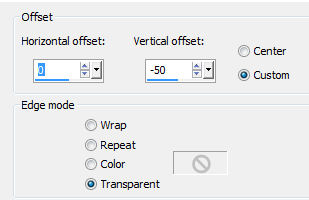
Ative a ferramenta Pick ou Deform (Mode Scale) e dê uma reduzida pelo topo e base da imagem (Vai estreitá-la), assim: 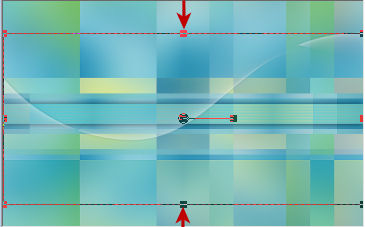
9. Abra o tube "Wave 2" - Edit / copy Edit / paste as new layer na imagem
Effects / Image effects / offset: -43 / 0 / Custom e Transparent marcados 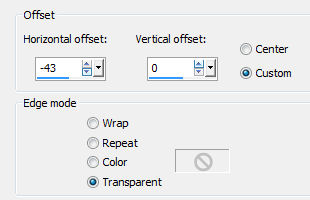
10. Abra o tube "Text" - Edit / copy Edit / paste as new layer na imagem
Effects / Image effects / Offset: -250 / 20 / Custom e Transparent marcados 
11. Abra o tube "Ocean" - Edit / copy Edit / paste as new layer na imagem Image / Resize / 90%, resize all layers desmarcado
Effects / Image effects / Offset: -90 / -20 / Custom e Transparent marcados 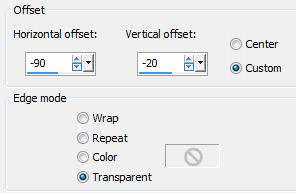
12. Abra o tube "Ocean Sun" - Edit / copy Edit / paste as new layer na imagem Image / Resize / 90%, resize all layers desmarcado
Effects / Image effects / Offset: -90 / 128 / Custom e Transparent marcados 
13. Abra o "Vazsu Decor" - Edit / copy Edit / paste as new layer na imagem Image / Resize 87%, resize all layers desmarcado
Effects / Image effects / Offset: -520 / 255 / Custom e Transparent marcados 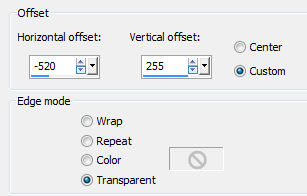
Layers / duplicate Effects / Image effects / Offset: 0 / -476 / Custom e Transparent marcados 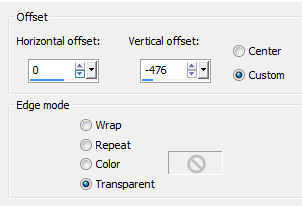
14. Abra o tube "Lines" - Edit / copy Edit / paste as new layer na imagem
Effects / Image effects / Offset: -462 / 8 / Custom e Transparent marcados 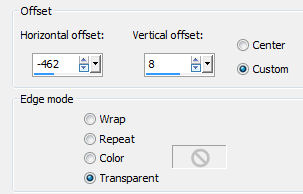
15. Abra o "Subtitle Yellow" - Edit / copy Edit / paste as new layer na imagem
Effects / Image effects / Offset: -135 / -244 / Custom e Transparent marcados 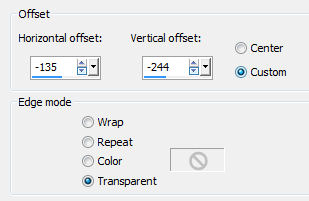
16. Abra o "Subtitle Black" - Edit / copy Edit / paste as new layer na imagem
Effects / Image effects / Offset: -8 / -210 / Custom e Transparent marcados 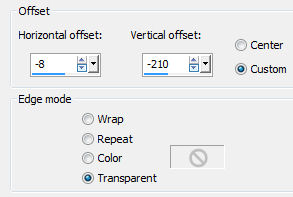
17. Image / add borders / 1 pixel na cor preta Minimize. 18. Abra uma nova imagem de 1200 x 750 pixels e pinte de branco Selections / select all Selections / Modify / Contract / 7 pixels
19. Selection / Modify / Select Selection Borders: Inside / 1 pixel / anti-alias marcado 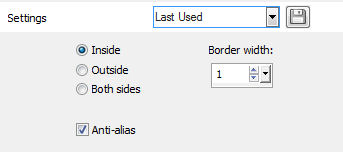
Pinte dentro da seleção com a cor #54b1c2
20. Selection / Select all
Selection / Modify / Contract / 50 pixels
21. Selection / Modify / Select Selection Borders: Inside / 4 pixel / anti-alias marcado 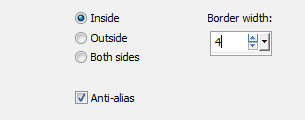
Pinte dentro da seleção com a cor #54b1c2
22. Selection / Select All
Selection / Modify / Contract 65
23. Dê Edit / copy na imagem minimizada no ítem 17 Edit / paste into selection na base branca Selections / select none
24. Abra o "smArt_1014 Tube" - Apague a marca dágua - Edit / copy Edit / paste as new layer na imagem Image / Resize 104%, resize all layers desmarcado Posicione na base e à esquerda, como no modelo final
Effects / 3D Drop Shadow: 10 / 10 / 45 / 25,00 - cor preta
25. Assine e Salve como Jpeg. https://vazsupsptutorials.weebly.com/vazsu-tutorial-293.html |  |
|


