Tutorial 292 
Obrigada VaZsu por autorizar a tradução  Material Aqui 1. Abra o "background" Adjust / Blur / Gaussian blur / Radius 40 2. Effects / Plugins / Mehdi / Sorting Tiles: Block Range 300-500 / Block 500 / Mosaic marcado 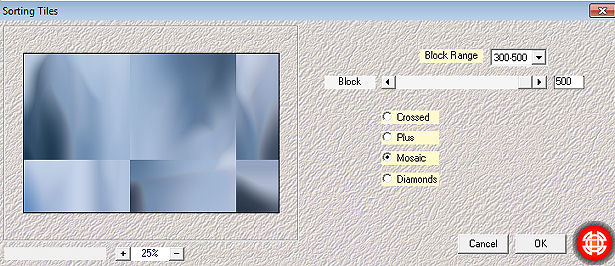
3. Effects / Plugins / Simple / Quick Tile 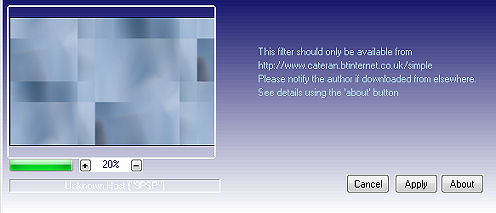
4. Effects / Plugins / Filters Unlimited / Bkg Kaleidoscope / BlueBerry Pie 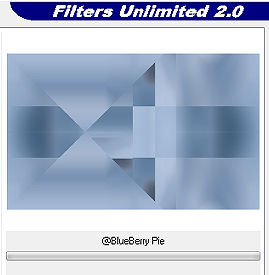
5. Effects / Edge effects / Enhance 6. Abra o "Gradient" no psp Abra a "Vazsu Mask" no psp e minimize Na imagem do gradiente, aplique a mask: Layers / new mask layer from image, com Invert mask data marcado 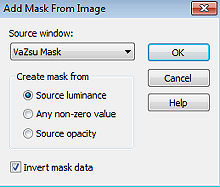
Layers / merge group Apague a marca dágua - Edit / copy 7. Volte à imagem inicial Edit / paste as new layer Effects / Image effects / Offset: 0 / 46 / Custom e Transparent marcados 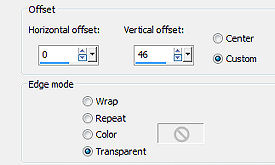
8. Layers / new raster layer, pinte com a cor branca 9. Aplique a mesma "Vazsu Mask" e apague a marca dágua. Não mova 10. Tire a visibilidade das 2 layer de cima e ative a de fundo Com a ferramenta Freehand / Select type em Point to point, trace a seguinte seleção: 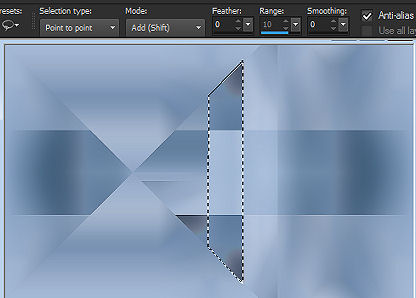
Selections / promote selection to layer Selections / Select none 11. Volte a visibilidade das 2 layers de cima Com a layer Promoted selection ativa Layers / Arrange / Bring to top Teremos isso: 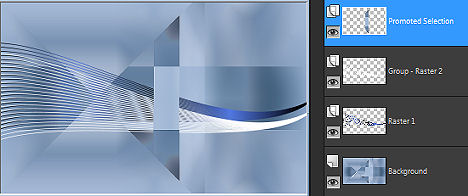
12. Abra o "Subtitle 1" - Edit / copy Edit / paste as new layer na imagem Image / Resize / 70%, resize all layers desmarcado Posicione sobre a parte central da imagem criada pela seleção anterior 
13. Abra o tube "blue iris" - Edit / copy Edit / paste as new layer na imagem Effects / Image effects / Offset: 285 / 10 / Custom e Transparent marcados 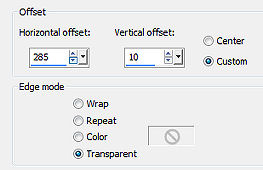
14. Abra o tube "Subtitle 2" - Edit / copy Edit / paste as new layer na imagem Effects / Image effects / Offset: 290 / -280 / Custom e Transparent marcados 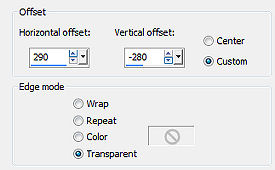
15. Abra o tube "Vazsu Decor Lines" - Edit / copy Edit / paste as new layer na imagem Effects / Image effects / Offset: 470 / 272 / Custom e Transparent marcados 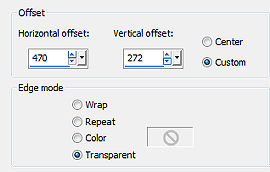
Layers / Duplicate Image / Mirror Effects / Image effects / Offset: -12 / -540 / Custom e Transparent marcados 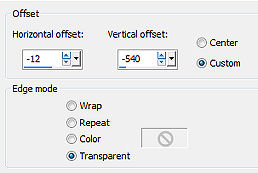
16. Abra o tube "Vazsu Buttons" - Edit / copy Edit / paste as new layer na imagem Effects / Image effects / Offset: 538 / 263 / Custom e Transparent marcados 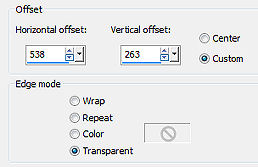
Layers / Duplicate Effects / Image effects / Offset: -1082 / -540 / Custom e Transparent marcados 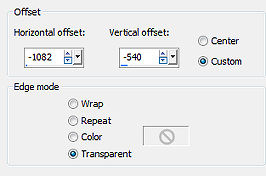
17. Image / Add borders / 1 px na cor preta Minimize. 18. Abra uma nova imagem de 1200 x 750 pixels Pinte com a cor #94abca Selections all Selections / Modify / Contract / 38 pixels 
19. Selections / Modify / Select / Selections Borders: Inside / 25 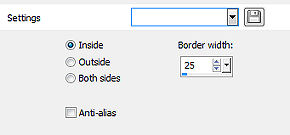
Selections / Promote selection to layer 20. Tire a visibilidade da layer de fundo Aplique na layer Promoted selection Effects / 3D Inner bevel: 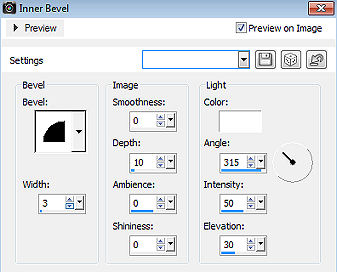
Selections / Select none 21. Layers / New raster layer Pinte com a cor branca 22. Effects / Plugins / Filters Unlimited / Photo Aging Kit / Film Grain/ 100 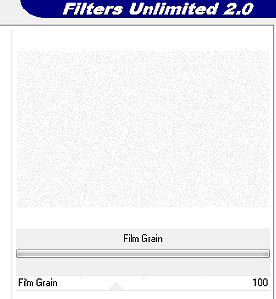
Delete a layer de fundo que estava com a visibilidade fechada 23. Ative a layer do topo (borda azul) Effects / 3D Drop Shadow: 0 / 0 / 50 / 30,00 - preto Image / Add borders / 1 px na cor preta 24. Selections all Selections / Modify / Contract / 72 px Volte à imagem principal, minimizada no ítem 17 Edit / copy Minimize novamente e volte à imagem da base 25. Edit / paste into selection Selections / Select none 26. Abra o "Isa Tube" - Apague a marca dágua Edit / copy Volte à image anterior - Edit / paste as new layer Image / resize / 116% Posicione como no modelo final Effects / 3D Drop Shadow: 15 / 20 / 50 / 30,00 - preto 27. Assine e salve como Jpeg. https://vazsupsptutorials.weebly.com/vazsu-tutorial-292.html |  |
|


