Tutorial 283 
Obrigada VaZsu por autorizar a tradução 
Material Aqui 1. Abra uma imagem de 1200 x 750 px Pinte com a cor #c0c0c0 2. Layers / new raster layer Pinte com a cor branca Tire a visibilidade da layer de fundo e mantenha ativa a de cima 3. Ative a ferramenta Selection / Custom selection: Top 450 / Left 0 / Right 1200 / Bottom 500 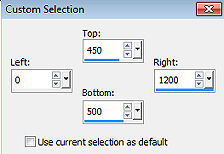
Selections / promote selection to layer Selections / select none 4. Ative novamente a layer abaixo - raster 2 Ative a ferramenta Selection / Custom selection: Top 320 / Left 0 / Right 1200 / Bottom 420 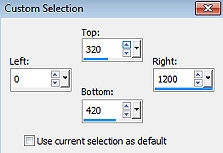
Selections / promote selection to layer Selections / select none 5. Ative a raster 2 novamente Ative a ferramenta Selection / Custom selection: Top 260 / Left 0 / Right 1200 / Bottom 300 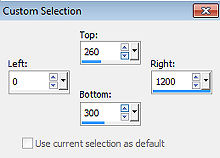
Selections / promote selection to layer Selections / select none 6. Tire a visibilidade da raster 2 e volte a da raster 1 7. Vamos alterar a opacidade das faixas: - layer promoted selection baixe a opacidade para 30% - layer promoted selection 1 baixe a opacidade para 50% - layer promoted selection 2 mantenha a opacidade em 100% 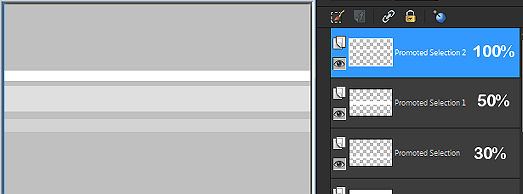
8. Ative a ferramenta Pen Tool / Line Style diamond / widht 6,00 Trace linhas como mostro 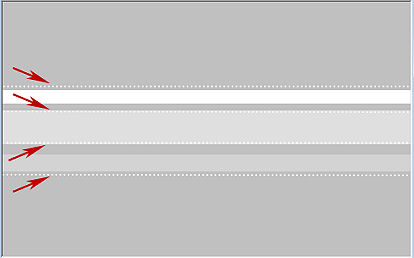
Na layer palete, convert to raster layer 9. Tire a visibilidade da layer de fundo, ative a do topo Layers / Merge visible Salve como image 1 10. Abra o "Watercolor Background" Adjust / Blur / Gaussian blur / Radius 40 11. Layers / duplicate Tire a visibilidade da layer do topo Ative a layer do fundo Effects / Plugins / Filters Unlimited / Simple / Pizza Slide Mirror 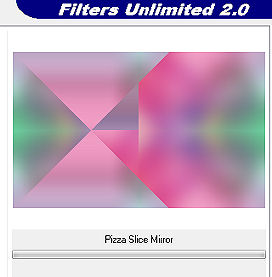
12. Ative e volte a visibilidade da layer do topo Effects / Plugins / Filters Unlimited / Simple / Diamond 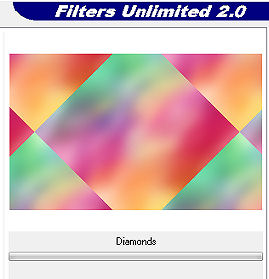
13. Baixe a opacidade dessa layer para 50% Effects / Edge effects / Enhance more - aplique nas 2 layers Mantenha ativa a do topo 14. Abra a image 1 salva - Edit / copy Volte à imagem principal - Edit / paste as new layer Ative a ferramenta Pick ou Deform e estreite um pouco a faixas assim: 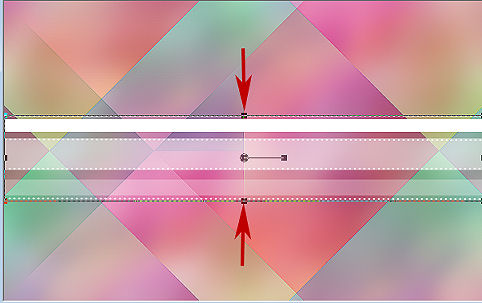
15. Image / Free Rotate / Left 45 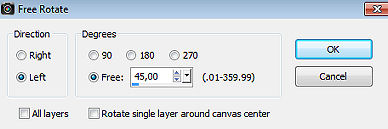
Mova para a esquerda, como mostro 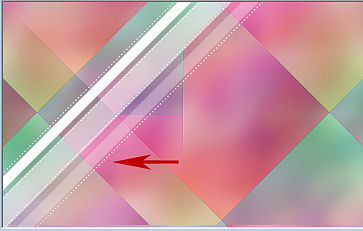
Ative a layer "copy of background" Layers / merge down Uniremos as 2 layers de baixo 16. Abra o "Vazsu Decor" - Edit / copy Ative a layer do topo Edit / paste as new layer na imagem Mova para esquerda Layers / arrange / move down Teremos isso: 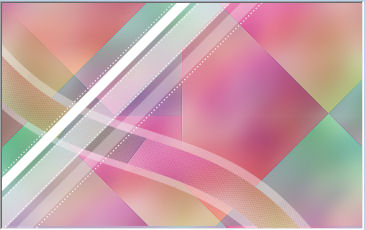
17. Ative a layer do topo e abra o tube "Butterfly Decor" Edit / copy Edit / paste as new layer na imagem Mova ligeiramente para a esquerda, assim 
18. Abra o "Flower Decor" - Edit / copy Edit / paste às new layer na imagem Image / resize 82%, resize all layer desmarcado Posicione à esquerda do Butterfly Decor 
19. Abra o "Vazsu Line decor" - Edit / copy Edit / paste as new layer Effects / Image effects / Offset: 510 / 210 / Custom e Transparent marcados 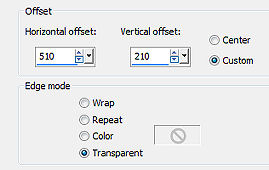
20. Abra o "Subtitle" - Edit / copy Edit / paste as new layer na imagem Effects / Image effects / Offset: -205 / -280 / Custom e Transparent marcados 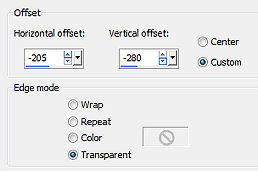
21. Image / Add borders / 1 px na cor preta Edit / copy 22. Abra a "Base Image" Selections all Selections / Modify / Contract 50 23. Edit / paste into selection Selections / select none 24. Abra o "smArt tube" - Apague a marca dágua Edit / copy Edit / paste as new layer Image / Resize / 96%, resize all layers desmarcado Posicione à direita como no modelo final Effects / 3D drop shadow: 10 / 10 / 40 / 25,00 - preto 25. Assine e Salve como Jpeg. https://vazsupsptutorials.weebly.com/vazsu-tutorial-283.html |  |
|


