Tutorial 242 
Obrigada VaZsu por autorizar a tardução  Material Aqui Plugins Mehdi Simple 1. Coloque no foreground a cor #e73a7a e no background a cor #c1c1c1 Abra uma imagem de 1200 x 750 pixels, transparente Effects / Plugins / Mehdi / Wavy Lab 1.1: Style Linear / 2 / 45 / 0 
2. Effects / Filters Unlimited / Simple / Blintz 3. Layers / Duplicate Effects / Plugins / Mehdi / Sorting Tiles: Block Range 300-500 / Block 500 / Crossed marcado 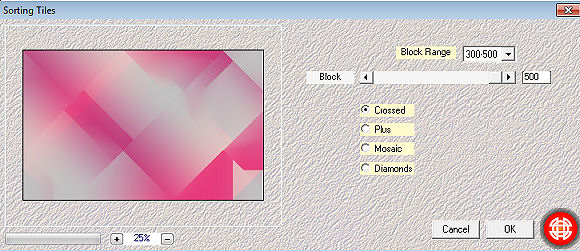
4. Baixe a opacidade da layer para 50%
Effects / Edge Effects / Enhance (aplique nas 2 layers)
5. Com a layer do topo ativa - Layers / new raster layer Pinte com a cor do foreground Layers / new raster layer Pinte com a cor do background Ative a ferrmanta Selection / Custon Selection: Top 130 / Left 160 / Right 450 / Bottom 520 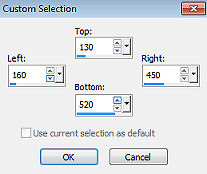
6. Selection / Modify / Select Selection Borders / Inside / 30 / Anti-alias marcado 
Selections / Promote Selection to Layer Selections / select none Ative a layer de baixo - Raster 3 (com a cor do background) e a Delete 7. Ative a 2a. layer de cima para baixo - Raster 2 (com a cor do foreground) Ative a ferrmanta Selection / Custon Selection: Top 154 / Left 184 / Right 426 / Bottom 496 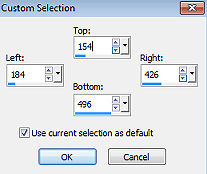
8. Selection / Modify / Select Selection Borders / Inside / 20 / Anti-alias marcado 
Selections / Promote Selection to Layer Selections / select none 9. Com a layer Promoted selection 2 ativa Layers / Arrange / Bring to top Ative a 3a. layer de cima para baixo - Raster 2 (com a cor do fore) e a Delete 10. Ative a layer do topo Effects / Texture effects / Texture Aplique a texture Fine canvas 
11. Effects / 3D Effects / Inner Bevel 
12. Ative a layer abaixo - Promoted Selection e aplique o mesmo Inner Bevel Ative a layer do topo Layers / Merge / merge down 13. Abra o "VaZsu Decor 1" - Edit / copy Ative a 2a. layer de baixo para cima Edit / paste as new layer na imagem Effects / Image effects / Offset: 470 / 0 / Custom e Transparent marcados 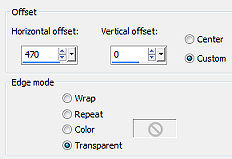
14. Abra o "VaZsu Decor 2" - Edit / copy Edit / paste as new layer na imagem Effects / Image effects / Offset: 0 / -90 / Custom e Transparent marcados 
15. Abra o "Vazsu Decor 3" - Edit / copy Edit / paste as new layer na imagem. Não mova 16. Abra o "Vazsu Decor 4" - Edit / copy Edit / paste as new layer na imagem. Não mova 17. Ative a layer do topo (Frames) 18. Effects / Image effects / Offset: -10 / 57 / Custom e Transparent marcados 
19. Abra o tube "Pink Flower" - Edit / copy Edit / paste as new layer na imagem Effects / Image effects / Offset: -250 / 34 / Custom e Transparent marcados 
20. Abra o tube "Button" - Edit / copy Edit / paste as new layer na imagem Image / Resize / 15 %, resize all layers desmarcado Duplique 2 vezes e os posicione à direita como mostro 
Aplique nos 3 - Effects 3D Drop shadow: 5 / 5 / 50 / 15,00 - preto 21. Abra o "Subtitle" - Edit / copy Edit / paste as new layer na imagem Effects / Image effects / Offset: -220 / -280 / Custom e Transparent marcados 
22. Image / Add borders / 1 px na cor branca Edit / copy 23. Abra a "Base Image" Selections / select all Selections / modify / contract 42 px. Edit / paste into selection Selections / select none 24. Abra o "Cady Tube" - Apague a marca dágua Edit / copy Edit / paste as new layer na imagem Effects / Image effects / Offset: 100 / -10 / Custom e Transparent marcados 
Effects 3D Drop shadow: 7 / 16 / 50 / 25,00 - preto 25. Assine e Salve como Jpeg. https://vazsupsptutorials.weebly.com/vazsu-tutorial-242.html
|  |
|


