Tutorial 240 
Obrigada VaZsu por autorizar a tradução  Material Aqui Plugins: Unlimited VM Distortion Mehdi Two Moon Simple Filter Factory A 1. Coloque no foreground a cor #192a5e e no background a cor #cd2dd Abra uma imagem de 1200 x 750 px, transparente Effects / Plugins / Mehdi / Wavy Lab: Style Radial / 2 / 90 / 0 
2. Effects / Plugins / Filters Unlimited / VM Distortion / Vision Impossible: 43 / 72 / 35 / 34 / 42 /183 
Effects / Edge Effects / Enhance 3. Effects / Plugins / Filters Unlimited / Filter Factory A / Mirror Mirror: 77 / 79 / 173 / 74 / 80 /163 / 166 /172 
4. Layers / duplicate
Effects / Plugins / Simple / Quick Tile Baixe a opacidade da layer para 50% Layers / merge down 5. Ative a ferramenta Selection / Custom selection e configure Top 0 / Left 237 / Right 340 / Bottom 750 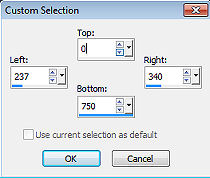
Selections / Promote selection to layer Selections / select none 6. Layers / Duplicate Tire a visibilidade da layer do topo e ative a de baixo (Promoted selection)
Effects / Plugins / Filters Unlimited / Two Moon / Paper fold: 0 / 0 / 15 / 16 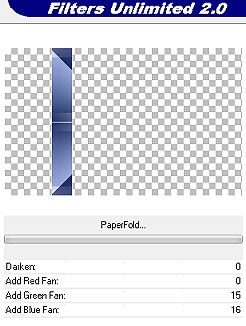
7. Volte a visibilidade da layer de cima e a ative
Effects / Plugins / Filters Unlimited / Two Moon / Wish It would Rain... 69 / 243 / 64 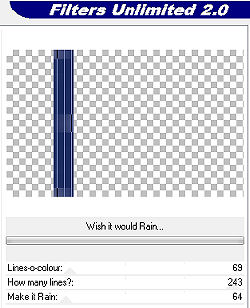
Effects / Image effects / Offset: 100 / 0 / Custom e Transparent marcados 
8. Abra o tube "Still Life Image" - Edit / Copy Edit / paste as new layer na imagem Effects / Image effects / Offset: 80 / 130 / Custom e Transparent marcados 
9. Abra a "VaZsu Frame" - Edit / Copy Edit / paste as new layer na magem Effects / Image effects / Offset: -150 / 94 / Custom e Transparent marcados 
10. Layers / Duplicate Effects / Image effects / Offset: 230 / 0 / Custom e Transparent marcados 
11. Layers / Duplicate Repita o mesmo Offset anterior Layers / Merge down - 2 vezes (Unir as 3 frames) 12. Ative a layer "Copy of Promoted selection" (a 3a de cima para baixo) Abra a "Line Decor" - Edit / Copy Edit / paste as new layer na imagem Effects / Image effects / Offset: 167 / 100 / Custom e Transparent marcados 
13. Ative a layer do topo Abra a "VaZsu Decor 1" - Edit / copy Edit / paste as new layer na imagem Effects / Image effects / Offset: -489 / -20 / Custom e Transparent marcados 
14. Abra o "Long Button" - Edit / Copy Edit / paste as new layer na imagem Effects / Image effects / Offset: -47 / -18 / Custom e Transparent marcados Layers / duplicate Effects / Image effects / Offset: 230 / 0 / Custom e Transparent marcados Layers / Merge dowm Layers / duplicate Effects / Image effects / Offset: 0 / 246 / Custom e Transparent marcados 15. Abra o "Subtitle" - Edit / Copy Edit / paste as new layer na imagem Effects / Image effects / Offset: -29 / -228 / Custom e Transparent marcados Sua imagem estará assim: 
16. Image / Add Borders / 1 px na cor branca Edit / Copy 17. Abra a "Base Image" Selections / select all Selection / Modify / Contract / 42 px Edit / paste into selection Selections / select none 17. Abra o "Cady Tube" - Edit / copy Edit / paste as new layer na imagem Image / Resize / 75%, resize all layers desmarcado Mova para a direita como no modelo Effects / 3D drop shadow / 7 / 22 / 70 / 25,00 - preto 18. Assine e Salve como Jpeg. https://vazsupsptutorials.weebly.com/vazsu-tutorial-240.html
|  |
|


