Tutorial 238 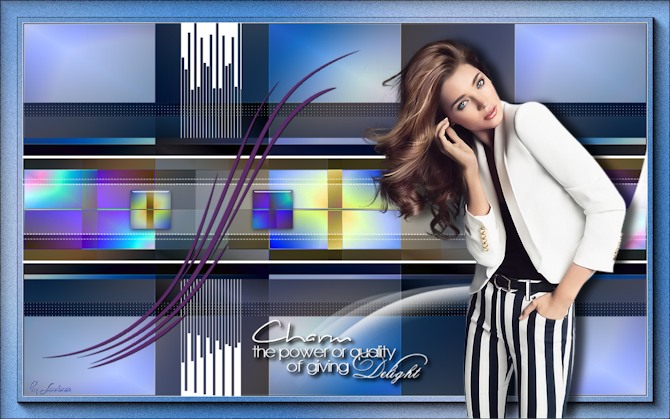
Obrigada VaZsu por autorizar a tradução  Material Aqui Plugins: Unlimited VM Extravaganza Mehdi Kiwi Oelfilter VM Distortion Carolaine and Sensibility EyeCandy 5 Impact Agradecimentos a LB, criadora do tube 1. Abra uma imagem de 1200 x 750 pixels transparente Coloque no foreground a cor #124f90 e no background a cor #7e8ccb Effects / Plugins / Mehdi / Wavy Lab 1.1: Style Linear / 3 / 45 / 0 - coloque a 3a cor #bab2b7 
2. Effects / Plugins / Filters Unlimited / Vm Extravaganza / Transmission: 128 / 0 / 40 
3. Effects / Plugins / Filters Unlimited / Kiwi / Videowand: 100 / 0 / 0 
4. Layers / duplicate
Image / Mirror
Image / Flip
Baixe a opacidade da layer para 50%
Effects / Edge Effects / Enhance (aplique nas 2 layers)
Com a layer do topo ativa, dê Layers / Merge Down 5. Ative a ferramenta Selection / Custom selection: Top 272 / Left 0 / Right 1200 / Bottom 478 
Selections / Promote selection to layer Selections / select none 6. Effects / Plugins / Filters Unlimited / Vm Distortion / Edge Burner: 30 / 72 / 56 / 255 / 255 / 255 7. Ative a ferramenta Selection / Custom selection: Top 231 / Left 0 / Right 1200 / Bottom 515 
Selections / Promote selection to layer Selections / select none 8. Delete a layer do meio 9. Ative a layer de fundo e com a ferramenta Selection / rectangle, trace 2 seleções como mostro abaixo: 
Effects / Plugins / Caroline and Sensibility / Cs Dots: 255 / 3 / 2 
Selections / select none 10. Mantenha ativa a layer de fundo Ative a ferramenta Selection / Custom selection: Top 0 / Left 304 / Right 420 / Bottom 750 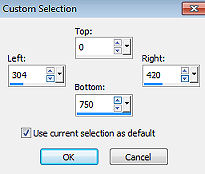
Effects / Plugins / Filters Unlimited / Vm Extravaganza / Shoutin'l: 15 / 64 / 47 / 46 / 44 / 51 / 255 / 255 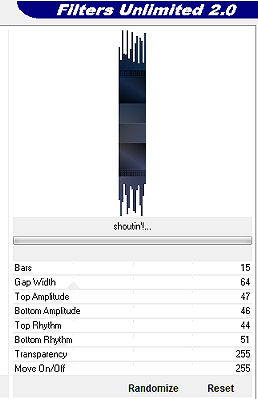
Selections / select none 11. Ative a layer do topo e com a ferramenta Selection / rectangle, trace 2 seleções como mostro abaixo: 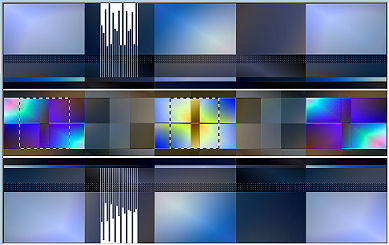
Selections / Promote selection to layer 12. Effects / Plugins / Alien Skin / Eye Candy / Impact / Glass: 16.03 / 29.03 / 0 / 11 / 50 / 100 / 75 / 75 / 30.00 / 0 
Selections / select none 13. Image / Resize / 50 %, resize all layers desmarcado Image / mirror Adjust / Sharpness / Sharpen Effects / Image effects / Offset: -355 / 0 / Custom e Transparent marcados 
Obs.: Esses valores do Offset, podem variar, conforme as seleções traçadas no ítem 11. Se preferir, use a ferramenta "Move" 14. Abra o "VaZsu Decor 1" - Edit / Copy Edit / paste as new layer na imagem Layers / Arrange / Move Down 15. Ative a layer do topo Abra o "VaZsu Decor 2" - Edit / Copy Edit / paste as new layer na imagem Effects / Image effects / Offset: -258 / 0 / Custom e Transparent marcados 
15. Abra o "VaZsu Decor 3" - Edit / Copy Edit / paste as new layer na imagem Effects / Image effects / Offset: 241 / -115 / Custom e Transparent marcados 
16. Abra o texto "Subtitle" - Edit / Copy Edit / paste as new layer na imagem Effects / Image effects / Offset: 15 / -290 / Custom e Transparent marcados 
17. Image / Add borders / 1 px / cor branca Edit / copy 18. Abra a "Base Image" Selections / select all Selections / Modify / Contract / 40 px Edit / paste into selection Selections / select none 19. Abra o "LB Tube" - Edit / Copy Edit / paste as new layer na imagem Mova para a direita, como no modelo Effects / 3D Drop shadow: 1 / 18 / 70 / 20,00 - preto 20. Assine e Salve como Jpeg.
https://vazsupsptutorials.weebly.com/vazsu-tutorial-238.html
|  |
|


