| Roxy 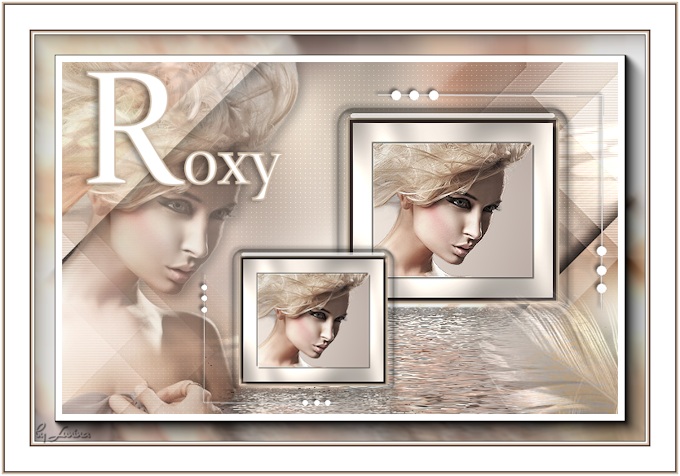
Obrigada Maantje por autorizar a tradução 
Material Aqui Tubes
Mask
Selections
MDesign Deco
WA-Roxy
Plugins
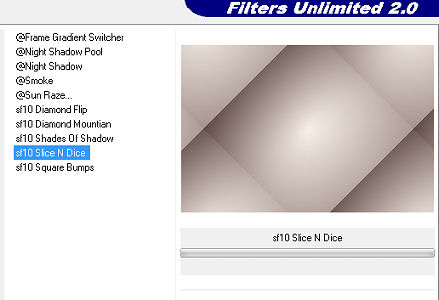
Unlimited 2.0 / & <Background Designers IV> sf 10 Slice N Dice
Unlimited 2.0 / Render Clouds (Fore / Background Collor)
Unlimited 2.0 / RCS Filter Pack 10 / RCS TripleExposure
Alien Skin Eye Candy 5: Impact / Glass
Carolaine and Sensibility filter / CS_lDots
Flaming Pear / Flood
Graphics Plus / Cross Shadow
AAA Frames / Photo Frame
Italian @ Editors Effect / Effetto Fantasma
Coloque as seleções na pasta de seleções do Psp
Usando outras cores pode alterar o blend mode ou a opacidade da layer
Escolha uma cor clara do tube para o foreground e uma escura para o background
Aqui foram usadas essas cores:
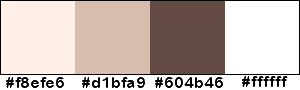
Foreground cor 1 e Background cor 3
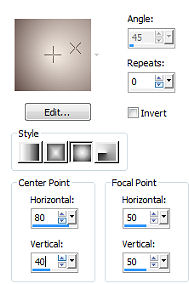
No foreground forme o gradiente Style Sunburst / Repeat: 0 / Invert desmarcado / Center Point: H 80 - V 40 / Focal point H 50 - V 50
Abra uma imagem de 750 x 500 Transparente
Pinte com o gradiente
Effects / Plugins / Unlimited 2.0 / & <Background Designers IV> / sf 10 Slice N Dice
Layers / New raster layer
Selections / Select all
Abra o Tube ildiko @ create0010_images_tube ou o tube de sua escolha,
apague a marca dágua
Edit / Copy - Edit / Paste into selection
Selections / Select none
Effects / Image effects / Seamless tiling / Default
Adjust / Blur / Gaussian blur / Radius 25
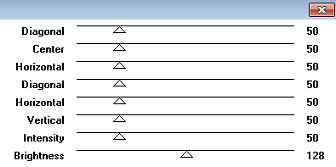
Effects / Plugins / Graphics Plus / Cross Shadow:
todos os valores em 50 e só o último em 128
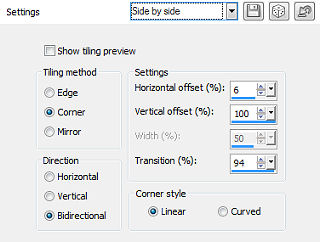
Effects / Image effects / Seamless tiling / Setting Side by side
Effects / Edge effects / Enhance
Effects / Plugins / Carolaine and Sensibility filter / CS_lDots / Default
Coloque no foreground a cor 2 e no background a cor 3
Layers / New raster layer
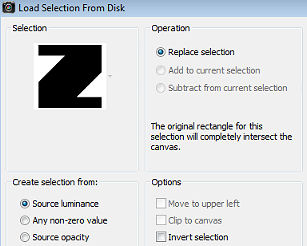
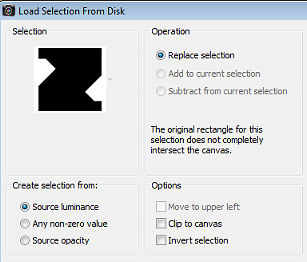
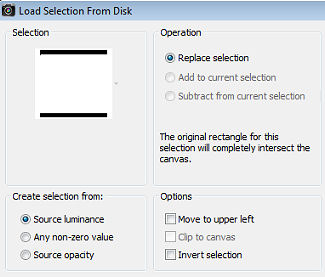
Selections / Load/save selection / Load selection from disk - aplique a selection MDesignRoxy
Pinte a seleção com a cor do foreground (cor 2)
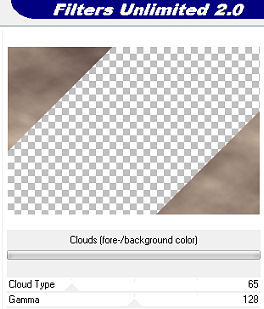
Effects / Plugins / Unlimited 2.0 / Render / Clouds (Fore / Background Color) / Default
Selections / Select none
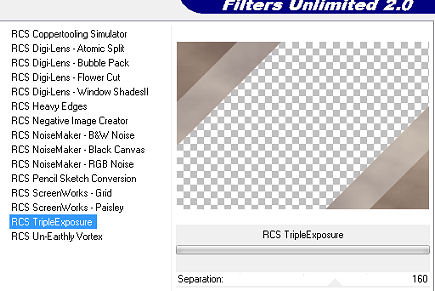
Effects / Plugins / Unlimited 2.0 / RCS Filter Pack 1.0 / RCS TripleExposure: 160
Effects / 3D effects / Drop shadow: 5 / 5 / 50 / 20 - preto
Repita com H e V= -5
Mude o blend mode da layer para Hard Light
Coloque no foreground a cor 1
Layers / New raster layer
Selections / Load/save selection / Load selection from disk - aplique a selection MdesignRoxy 1
Pinte a seleção com a cor do foreground (cor 1)
Selections / Select none
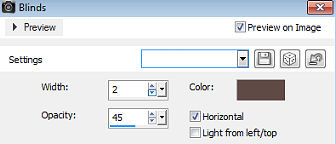
Effects / Texture effect / Blinds: 2 / 45 - Horizontal marcado / cor 3
Effects / Plugins / Italian @ Editors Effect / Effetto Fantasma / Default
Effects / 3D effects / Drop shadow: 10 / 10 / 50 / 10 - preto
Adjust / Sharpness / Sharpen more
Image / Mirror
Mude o blend mode da layer para Overlay
Layers / New raster layer
Pinte com a cor do foreground (cor 1)
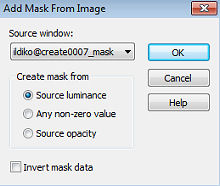
Abra a mask ildiko @ create0007_mask, minimize no psp
Layers / New mask layer / From image - localize e aplique a mask ildiko @ create0007_
Layers / Merge / Merge group
Adjust / Sharpness / Sharpen
Effects / 3D effects / Drop shadow: 2 / 2 / 25 / 10 - preto
Effects / Image effects / Seamless Tiling / Default
Mude o blend mode para Dodge e baixe a opacidade para 40
Abra o Tube ildiko @ create0010_images_tube ou o tube de sua escolha com tamanho de 701 x 500 px
Apague a marca dágua
Edit / Copy - Edit / Paste as a new layer
Posicione à esquerda como no modelo
Effects / 3D effects / Drop shadow: 5 / 5 / 50 / 20 - preto
Baixe a opacidade para 60
Coloque no foreground a cor 2
Layers / New raster layer
Selections / Load/save selection / Load selection from disk - aplique selection MdesignRoxy 2
Pinte a seleção com a cor do foreground (cor 2)
Selections / Modify / Contract 4
Layers / New raster layer
Pinte a seleção com a cor 3, do background
Selections / Modify / Contract 4
Coloque no foreground a cor 1
Layers / New raster layer
Pinte a seleção com a cor do foreground (cor 1)
Selections / Modify / Contract 25
Aperte a tecla Delete
Ative a layer da base (Raster 1)
Selections / Promote selection to layer
Layers / Arrange / Bring to top
Adjust / Blur / Gaussian blur / Radius 15
Abra o Tube ildiko @ create0010_images_tube or own Tube
Apague a marca dágua
Edit / Copy - Edit / Paste as a new layer
Image / Resize 70%. resize all layers desmarcado (dependendo do seu tube)
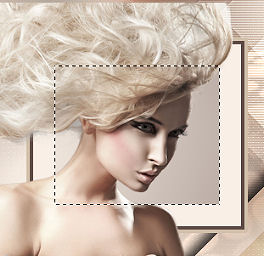
Posicione o tube dentro da seleção, como mostro
Move the tube into the selection
Selections / Invert
Aperte a tecla Delete
Selections / Select none
Adjust / Sharpness / Sharpen
Ative a layer debaixo (Promoted selection)
Effects / 3D effects / Drop shadow: 2 / 2 / 50 / 2 - preto Repita com H e V= -2
Ative a layer abaixo (raster 7)
Selections / Select all
Selections / Floating
Selections / Defloat
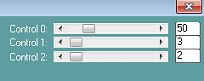
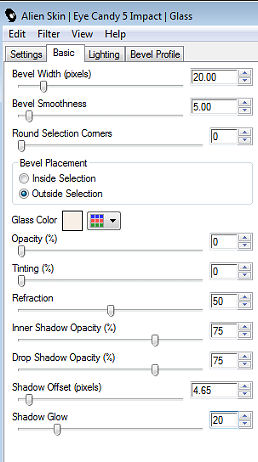
Effects / Plugins / Alien Skin Eye Candy 5: Impact / Glass
Aba BACIC com as seguites configurações: 20 / 5 / 0 / Outsite Selection / Glass Color / Foreground Color / 0 / 0 / 50 / 75 / 75 / 4.65 / 20
Effects / Plugins / Graphics Plus / Cross Shadow: todos os valores em 50, só o último em 128
Selections / Select none
Effects / 3D effects / Drop shadow: 5 / 5 / 50 / 5 - preto
Repita com H e V= -5
Ative a layer do topo (raster 8)
Layers / Merge / Merge down / 3 vezes
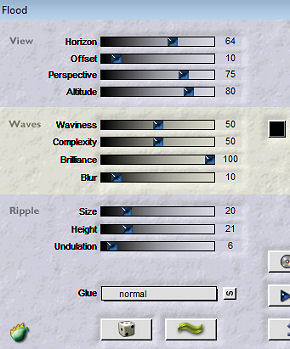
Effects / Plugins / Flaming Pear / Flood: 64 / 10 / 75 / 80 / 50 / 50 / 100 / 10 / 20 / 21 / 6
Adjust / Sharpness / Sharpen
Layers / Duplicate
Image / resize em 70%, resize all layers desmarcado
Effects / Image effects / Offset: Horizontal= -130 / Vertical= -125 /
Custom e Transparent marcados
Abra o tube MDesign Deco
Edit / Copy - Edit / Paste as a new layer
Effects / Image effects / Offset: Horizontal= 76 / Vertical= -10 /
Custom e Transparent marcados
Abra o tube cal-guis-plume1-3112008
Edit / Copy - Edit / Paste as a new layer
Posicione à direita embaixo como no modelo
Effects / Plugins / Graphics Plus / Cross Shadow, como antes
Mude o blend mode para Luminance(Legacy)
Abra o WA MDesign Roxy or your own text
Edit / Copy - Edit / Paste as a new layer
Effects / Image effects / Offset: Horizontal= -195 / Vertical= 125 /
Custom e Transparent marcados
Image / Add borders / symmetric:
2 px na cor branca
2 px na cor 2
2 px na cor 3
30 px na cor branca
2 px na cor 3
2 px na cor 2
2 px na cor branca
Selections / Select all
Selections / Modify / Contract 42
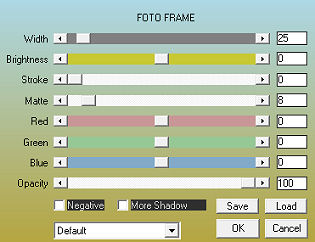
Effects / Plugins / AAA Frames / Photo Frame:
25 - 0 - 0 - 8 - 0 - 0 - 0 - 100
Selections / Select none
Layers / New raster layer
Assine
Layers / Merge / Merge all layers
Salve como Jpeg
https://www.maantjepspdesign.nl/roxy |  |
|


