Magnificent Blue 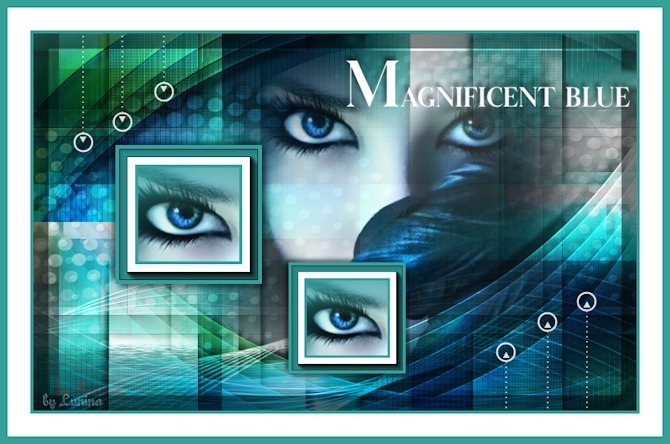
Obrigada Manuela por autorizar a tradução  Material Aqui Agradecimentos aos Tubers pelos materiais: Tube Mary 0612-8 Masks masque70-noisette Narah_mask_Abstract63 Selections SelectionMDesign Magnificent Blue Wordart WAMDesign Magnificent Blue Deco 2 - 10 by psp Stuff by Marja Plugins: Filters Unlimited 2.0 VM1 - Web Weaver Medhi - Wavy Lab 1.1 Mehdi - Sorting Tiles Penta.com - Color Dot AP 01 (Innovations) – Lines_SilverLining Tramages – Tow The Line AAA Frames - Photo Frame Flaming Pear - Flood FM Tile Tools - Blend Emboss Coloque as seleções na pasta "Selections" Está usando outras cores e tubes? Então é possível ter que alterar o blend mode e a opacidade da layer porque o efeito final pode resultar diferente Escolha 3 cores de seus tubes Aqui foram usadas as seguintes cores  Cor 1 #ffffff / Cor 2 #133859 / Cor 3 #63a19f Coloque no Foreground a cor 1 e no Background a cor 3 Abra uma imagem de 800 x 500 pixels transparente Effects / Plugins / Medhi / Wavy Lab 1.1: Style Linear / 3 / 0 / 0 / Cores 3, 3, 2, 1 / Mode Normal 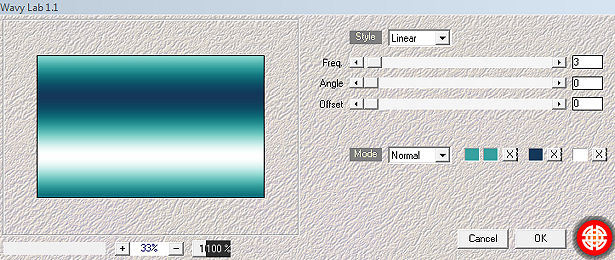
Effects / Plugins / Mehdi / Sorting Tiles Block range 300-500 / Block 500 / Plus marcado 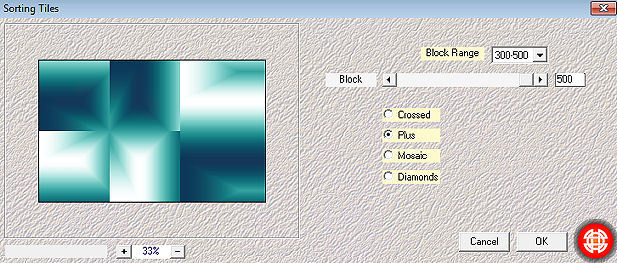
Selections / Load/Save Selection / Load Selection from Disk Aplique a seleção "SelectionMDesign Magnificent Blue" 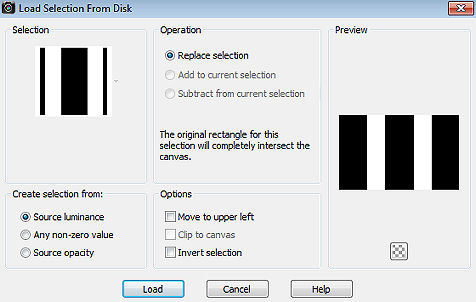
Selections / Promote Selection to layer Selections / Select none Effects / Plugins / Penta.com / Color Dot: 90 / 2 / 255 / 255 / 255 Effects / 3D effects / Drop shadow: 5 / 5 / 50 / 10 - preto Repita com -5 / -5 / 50 / 10 - preto Effects / Image Effects / Seamless Tiling / Default Layers / New Raster Layer Selections / Load/Save Selection / Load Selection from Disk Aplique a seleção "SelectionMDesign Magnificent Blue 1" 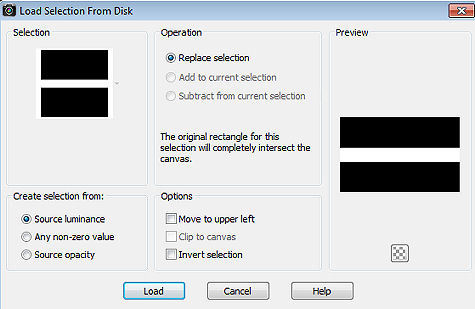
Pinte a seleção com a cor 1 Effects / Plugins / AP 01 (Innovations) / Lines_SilverLining: Dotty Grid / o restante sem alterações 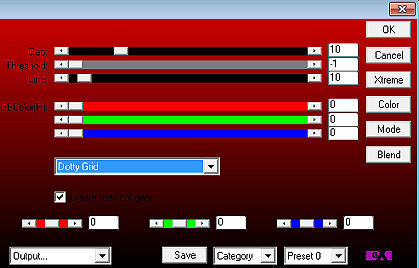
Selections / Select none Effects / 3D effects / Drop shadow: 5 / 5 / 50 / 10 - preto Repita com -5 / -5 / 50 / 10 - preto Mude o blend mode da layer para dodge e baixe a opacidade para 50 Layers / New Raster Layer Pinte a layer com a cor 3 Abra a mask "masque70-noisette" e minimize no Psp Layers / New Mask Layer / From Image Aplique a masque70-noisette 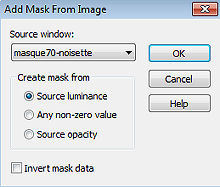
Layers / Merge / Merge Group Adjust / Sharpness / Sharpen Effects / 3D effects / Drop shadow: 5 / 5 / 50 / 10 - preto Repita com -5 / -5 / 50 / 10 - preto Mude o blend mode da layer para Overlay e baixe a opacidade para 50 Effects / Plugins / Tramages / Tow The Line / Default Layers / Merge / Merge Visible Layers Layers / Duplicate Image / Resize em 90% - resize all layers desmarcado Effects / Plugins / Unlimited 2.0 / VM1 / Web Weaver: 180 / 140 / 0 / 0 / 0 / 50 / 65 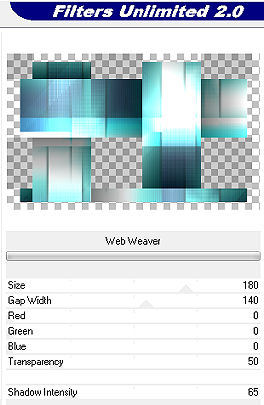
Mude o blend mode da layer para Multiply, baixe a opacidade para 60 Effects / 3D effects / Drop shadow: 10 / 10 / 50 / 10 - preto Repita com -10 / -10 / 50 / 10 - preto Effects / Image Effects / Seamless Tiling / Default Layers / New Raster Layer Pinte a layer com a cor 1 Abra a mask "Mask Narah_mask_Abstract63" e minimze no Psp Layers / New Mask Layer / From Image Aplique a mask Narah_mask_Abstract63 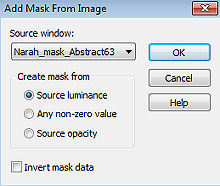
Layers / Merge / Merge Group Effects / 3D effects / Drop shadow: 5 / 5 / 50 / 10 - preto Repita com -5 / -5 / 50 / 10 - preto Mude o blend mode da layer para Overlay Layers / New Raster Layer Selections / Load/Save Selection / Load Selection from Disk Aplique a seleção "SelectionMDesign Magnificent Blue 2" 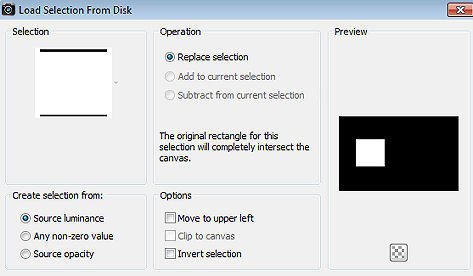
Pinte a seleção com a cor 3 Selections / Modify / Contract em 5 Effects / Plugins / AAA Frames / Photo Frame: 10 / 0 / 0 / 10 / 0 / 0 / 0 / 100 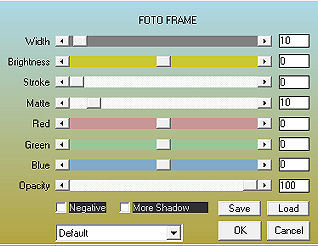
Selections / Modify / Contract em 25 Abra do material o tube feminino / ou o de sua escolha Edit / Copy – Edit / Paste as New Layer Image / Resize em 80%, resize all layers desmarcado Dependendo do tube Mova parte do Tube para dentro da seleção Selections / Invert Aperte a tecla Delete Selections / Select none Layers / merge / merge down Effects / 3D effects / Drop shadow: 5 / 5 / 50 / 10 - preto Repita com -5 / -5 / 50 / 10 - preto Layers / Duplicate Image / Resize em 80% - resize all layers desmarcado Effects / Image Effects / Offset: Horizontal 170 / Vertical -135 / Custom e Transparent marcados Ative a segunda layer de baixo para cima (Group - Raster 1) Layers / New Raster Layer Selections / Load/Save Selection / Load Selection from Disk Aplique a seleção "SelectionMDesign Magnificent Blue 3" 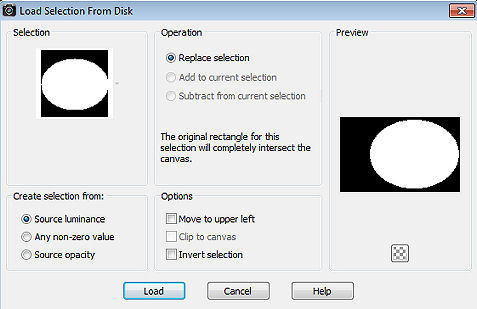
Abra o tube feminino / ou o de sua escolha Edit / Copy – Edit / Paste into Selection Selections / Select none Baixe a opacidade da layer para 85 Ative a layer abaixo (Group - Raster 1) Selections / Load/Save Selection / Load Selection from Disk Aplique a seleção "SelectionMDesign Magnificent Blue 4" 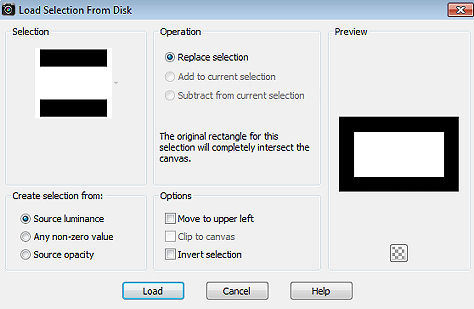
Selections / Promote Selection to layer Effects / Plugins / AAA Frames / Photo Frame: 25 / 0 / 0 / 10 / 0 / 0 / 0 / 100 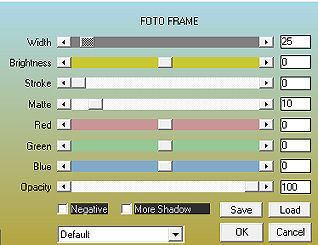
Selections / Select none Effects / 3D effects / Drop shadow: 5 / 5 / 50 / 10 - preto Repita com -5 / -5 / 50 / 10 - preto Effects / Image Effects / Seamless Tiling / Settings: Side by Side Effects / Plugins / Flaming Pear / Flood: 80 / 15 / 50 / 50 / 50 / 51 / 10 / 10 / 45 / 50 / 40 / Glue Normal 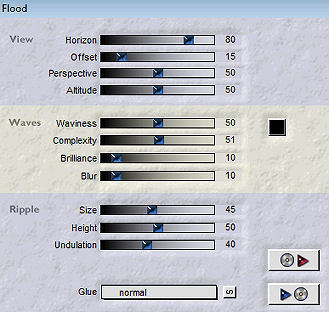
Effects / Plugins / FM Tile Tools / Blend Emboss Mude o blend mode da layer para Luminance e baixe a opacidade para 40 Ative a layer acima (Raster 2) Abra o tube 2 Edit / Copy – Edit / Paste as New Layer Mude o blend mode para Overlay Effects / 3D effects / Drop shadow: 10 / 10 / 50 / 10 - preto Repita com -10 / -10 / 50 / 10 - preto Effects / Plugins / FM Tile Tools / Blend Emboss Ative a layer do topo (Copy of Raster 1) Layers / Merge / Merge Visible Layers Layers / New Raster Layer Selections / Select all Selections / Modify / Select Selection Borders: Inside / Border 20 / Anti-alias marcado 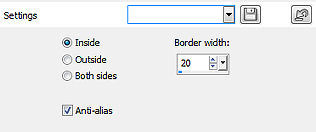
Pinte a seleção com a cor 3 Selections / Select none Effects / 3D Effects / CutOut Vertical / Horizontal 50 / Opacity 70 / Fade 10 / Shadow color preto Repita com -50 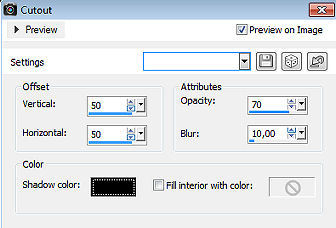
Abra o tube 10 (psp Stuff by Marja) Edit / Copy – Edit / Paste as New Layer Image / Mirror Effects / Image Effects / Offset: Horizontal -280 / Vertical 204 / Custom e Transparent marcados Layers / Duplicate Image / Mirror Image / Flip Layers / merge / merge down Effects / 3D effects / Drop shadow: 5 / 5 / 50 / 10 - preto Repita com -5 / -5 / 50 / 10 - preto Abra o tube WAMDesign Magnificent Blue Edit / Copy – Edit / Paste as New Layer Posicione como no modelo final Image / Add Borders / symmetric: 4 pixels na cor 3 30 pixels na cor 1 10 pixels na cor 3 Layers / New Raster Layer Assine Layers / Merge / Merge All Layers Salve como JPEG https://maantje-psp-design.jouwweb.nl/magnificent-blue |  |
|


