| Lilies 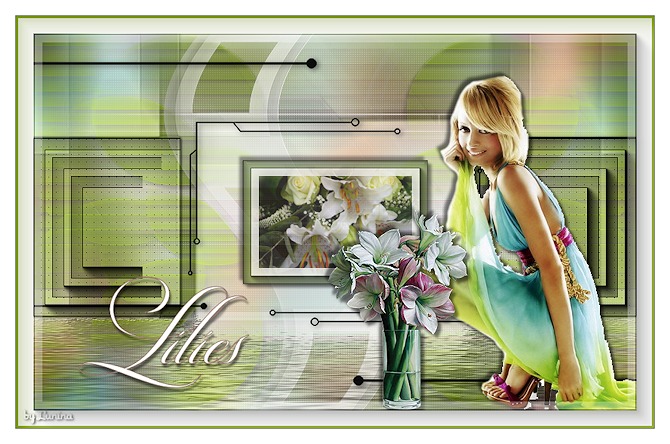
Obrigada Maantje por autorizar a tradução  Material Aqui Agradecimentos aos criadores dos tubes e masks: JVDE Tube usado nessa tradução(D.A) masks Mpd © Designs - Ildiko - edith SelectionsMDesignLilies O tube personagem não está no material Plugins: Unlimited 2.0 / [AFS import] - sqborder2 Alien Skin Eye Candy 5 Impact / Glass FM Tile Tools / Blend Emboss AAA Frames / Photo Frame Flaming Pear/ Flood Graphic Plus / Cross Shadow AP 01 (Innovations) / Lines_SilverLining Coloque as seleções na pasta "Selection" do Psp Usando outros tubes e cores é possível alterar o blend mode e a opacidade da layer porque pode dar diferença no efeito final Escolha 4 cores de seus tubes Aqui foram usadas as seguintes cores 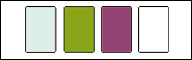
Cor 1 #d9ede2 / Cor 2 #88a61f / Cor 3 #924776 / Cor 4 #ffffff Coloque no Foreground a cor 1 e no Background a cor 2 Forme no foreground o gradiente: Style Radial / Angle 50 / Repet 4 / Invert desmarcado 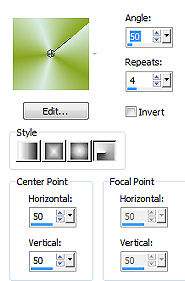
Abra uma imagem de 800 x 500 transparente Pinte a layer com o gradiente Adjust / Blur / Gaussian Blur / 45 Layers / New raster layer Selections / Select all Abra um tube feminino de sua escolha Edit / Copy - Edit / Paste into selection Selections / Select none Effects / Image Effects / Seamless Tiling / Setting em Default Adjust / Blur / Gaussian Blur / 20 Layers / New raster layer Pinte com a cor 4 Abra a mask "Mask105Mpd © Designs" e minimize no psp Layers / New mask layer / From image Aplique a mask "Mask105Mpd © Designs" 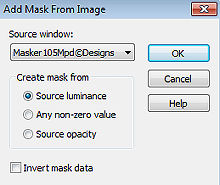
Layers / Merge / Merge group Layers / Duplicate Ative a layer abaixo (Group - Raster 3) Effects / Plugins / FM Tile Tools / Blend Emboss Effects / 3D effects / Drop shadow: 20 / 20 / 50 / 5 - preto Effects / Texture Effects / Weave: Gape size 2 / Width 1 / Opacity 1 / Cor 4 / Fill gap marcado 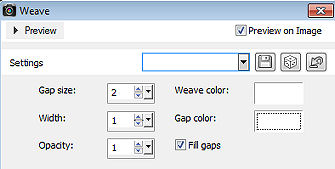 Layers / merge / merge down Ative a layer do topo Effects / Plugins / Unlimited 2.0 [AFS IMPORT] / sqborder2 / Default Mude o blend mode da layer para Multiply Effects / Texture Effects / Blinds Width 20 / Opacity 25 / Cor 3 / Horizontal marcado 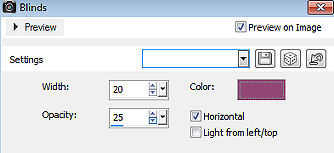 Effects / Plugins / FM Tile Tools / Blend Emboss Effects / 3D effects / Drop shadow: 5 / 5 / 50 / 5 - preto Layers / New raster layer Pinte com a cor 2 Abra a mask "mask42-mpd © designs", minimize no psp Layers / New mask layer / From image Aplique a mask "mask42-mpd © designs" 
Layers / Merge / Merge group Adjust / Sharpness / Sharpen Effects / 3D effects / Drop shadow: 5 / 5 / 50 / 5 - preto Layers / Duplicate Image / mirror Layers / New raster layer Pinte com a cor 4 Abra a mask "mask edith 28" e minimize no psp Layers / New mask layer / From image Aplique a mask "mask mask edith 28" 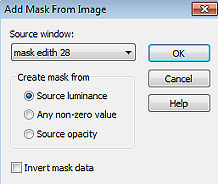
Layers / Merge / Merge group Image / Resize / 80%, resize all layers desmarcado Image / Free Rotate: Right / 90 degrees. Nada mais marcado Effects / Distortion Effects / Wave: 10 / 100 - 0 / 1 - Transparent 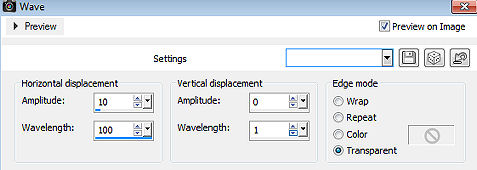
Adjust / Sharpness / Sharpen Effects / 3D effects / Drop shadow: 5 / 5 / 50 / 5 - preto Repita com: -5 / -5 / 50 / 5 - preto Mude o blend mode dessa layer para Lighteen e baixe a opacidade para 60 Layers / New raster layer Pinte com a cor 1 Abra a mask "ildiko @ create0036_mask" e minimize no psp Layers / New mask layer / From image Aplique a mask "ildiko @ create0036_mask" 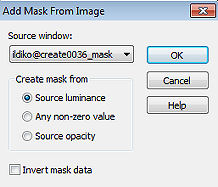
Layers / Merge / Merge group Selections / Load/save selection / Load selection from disk Localize e aplique a seleção "SelectionsMDesignLilies" 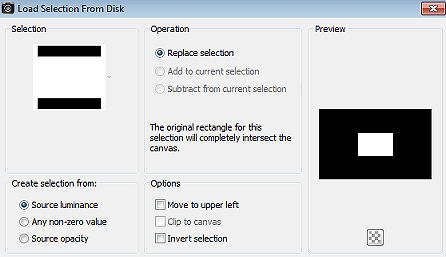
Ative a layer de fundo Selections / Promote Selection to Layer Layers / Arrange / Bring To Top Abra o tube JVDE_Misted_Flower 13 / ou o tube de sua escolha Edit / Copy - Edit / Paste into selection Effects / Plugins / Alien Skin Eye Candy 5 Impact / Glass Aplique o Setting "Clear" Effects / Plugins / AAA Frames / Foto Frame: 10 / 0 / 0 / 10 / 0 / 0 / 0 / 80 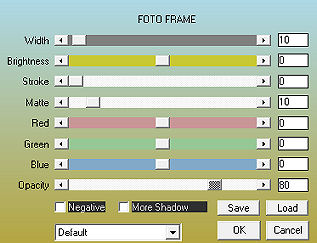 Effects / 3D effects / Drop shadow: 5 / 5 / 50 / 5 - preto Repita com: -5 / -5 / 50 / 5 - preto Selections / Select none Baixe a opacidade da layer para 75 Ative a layer abaixo (Group - Raster 2) Effects / Plugins / Flaming Pear / Flood Passe "Horizont" para 75, o restante sem mexer Effects / 3D effects / Drop shadow: 0 / 0 / 50 / 5 - preto Repite o drop shadow Effects / Plugins / FM Tile Tools / Blend Emboss Effects / Plugins / Graphic Plus / Cross Shadow (default) Mude o blend mode da layer para Luminance (Legacy) - Baixe a opacidade para 60 Selections / Load/save selection / Load selection from disk localize a aplique a "SelectionsMDesignLilies 1" 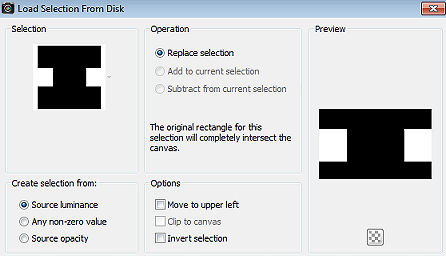
Layers / New raster layer Pinte a seleção com a cor 4 Effects / Plugins / AAA Frames / Foto Frame: 15 / 0 / 0 / 0 / 0 / 0 / 0 / 100 Selections / Modify / Contract / 25 Effects / Plugins / AAA Frames / Foto Frame: 15/ 0 / 0 / 0 / 0 / 0 / 0 / 100 Selections / Modify / Contract / 25 Effects / Plugins / AAA Frames / Foto Frame: 15/ 0 / 0 / 0 / 0 / 0 / 0 / 100 Selections / Select none Mude o blend mode dessa layer para Multiply Effects / 3D effects / Drop shadow: 0 / 0 / 50 / 5 - preto Repite o drop shadow Effects / Plugins / AP 01 (Innovations) / Lines_SilverLining 10 / - 1 / 10 / 0 / 0 / 0 / Dotty Grid 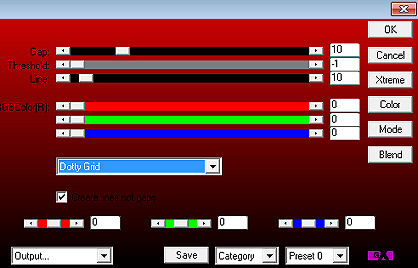
Ative a layer do topo Abra o tube "MDesignDecoLilies" Edit / Copy - Edit / Paste as a new layer Não mova Effects / 3D Effects / Drop Shadow: 2 / 2 / 50 / 10 - preto Abra o tube feminino (personagem) Edit / Copy - Edit / Paste as a new layer Resize, se necessário, com resize all layers desmarcado Effects / 3D effects / Drop shadow: 5 / 5 / 50 / 5 - preto Repita com: -5 / -5 / 50 / 5 - preto Posicione o tube à direita da imagem Abra o texto "WAMDesignLilies" Edit / Copy - Edit / Paste as a new layer Posicione na imagem Image / Add borders / symmetric: 20 pixels com a cor 4 4 pixels com a cor 2 20 pixels com a cor 4 Selections / Select all Selections / Modify / Contract with 20 Effects / Plugins - AAA Frames - Foto Frame: 25 / 0 / 0 / 10 / 0 / 0 / 0 / 30 Selections / Select none Layers / New raster layer Assine Layers / Merge / Merge all layers Salve como Jpeg. https://maantje-psp-design.jouwweb.nl/lilies |  |
|


