| Papillons 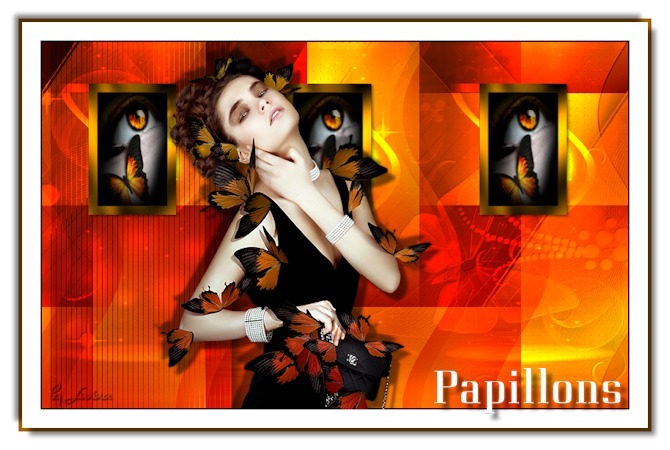
Obrigada Manuela por autorizar a tradução  Material Aqui Agradecimentos aos Tubers pelos materiais Tube Mary - LF Masks @nn_230213_mask_249_tdstudio - creation.tine_masque144 - Ildiko_Desings_Created@Mask_&_ildiko_kjk 1a-35b (7) Selections SelectionMDesign Papillons Wordart Papillons Plugins: Filters Unlimited 2.0 – VM1 / Web Weaver Graphic Plus / Panel Stripes Graphic Plus / Cross Shadow AP 01 (Innovations) – Lines_SilverLining - Dotty Grit Tramages - Tow The Line MuRa's Meister – Copies Coloque as seleções na pasta "Selections" Está usando outras cores e tubes? Então é possível ter que alterar o blend mode e a opacidade da layer porque o efeito final pode resultar diferente Escolha 4 cores de seus tubes Aqui foram escolhidas as seguintes cores 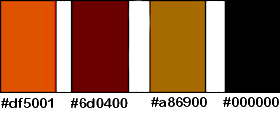
Coloque no Foreground a cor 1 e no Background a cor 3 No Foreground forme o gradiente Style Linear / Angle 0 / Repeats 0 / Invert desmarcado 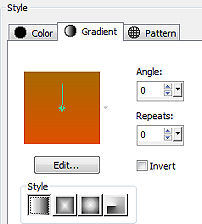
Abra uma imagem de 800 x 500 pixels, Transparente Pinte a imagem com o gradiente Layers / New raster layer Selections / Select all Abra seu tube feminino / ou aquele que está no material Edit / Copy – Edit / Paste into selection Selections / Select none Effects / Image Effects / Seamless Tiling / Settings: Default Adjust / Blur / Gaussian Blur / Radius 40 Layers / merge / merge down Effects / Plugins / Unlimited 2.0 / VM1 / Web Weaver: setting 149/ 135 / 0 / 0 / 0 / 189 / 90 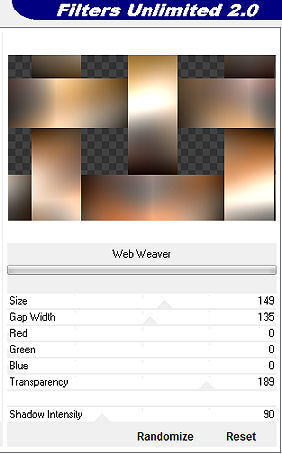
Layers / New raster layer / Pinte a layer com o gradiente Layers / Arrange / Send to Bottom Ative a layer do topo Layers / Duplicate Effects / Plugins / Graphic Plus / Planel Stripes: setting 85 / 174 / 48 
Ative a layer abaixo (Raster 1) Mude o blend mode dela para Overlay Ative a layer do topo (Copy of Raster 1) Effects / Distortion Effects / Wave: 5 / 80 - 0 / 1 - Transparent 
Effects / Plugins / AP 01 (Innovations) / Lines_SilverLining: Dotty Grid / da forma que abrir 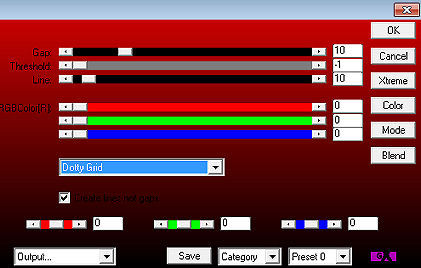
Mude o blend mode dessa layer para Overlay e baixe a opacidade para 50 Layers / New raster layer / Pinte a layer com a cor 1 Abra a Mask @nn_230213_mask_249_tdstudio minimize no PSP Layers / New Mask Layer / From Image aplique a mask @nn_230213_mask_249_tdstudio 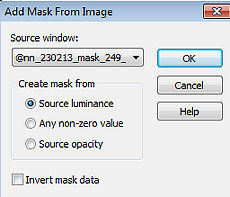
Layers / Merge / Merge Group Effects / 3D effects / Drop shadow: -40 / 20 / 65 / 40 - preto Com o Foreground com a cor 1 e o Background com a cor 3 Forme no foreground o gradiente: Style Linear / Angle 0 / Repeats 0 - como no início Layers / New raster layer Selections / Load/save selection / Load selection from disk localize e aplique a seleção "SelectionMDesign Papillons" 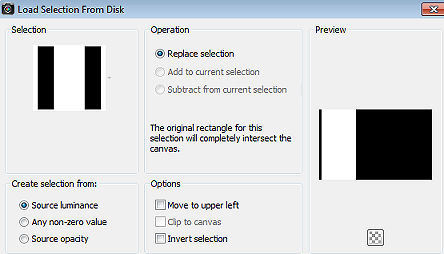
Pinte a seleção com o gradiente Effects / Plugins / Tramages / Tow The Line / Default Mude o blend mode dessa layer para Multiply e baixe a opacidade para 75 Effects / 3D effects / Drop shadow: 10 / 10 / 50 / 20 - preto Selections / Select none Layers / New raster layer - Pinte a layer com a cor 3 Abra a Mask creation.tine_masque144 minimize no PSP Layers / New Mask Layer / From Image aplique a mask creation.tine_masque144 
Layers / Merge / Merge Group Mude o blend mode dessa layer para Dodge e baixe a opacidade para 90 Effects / 3D effects / Drop shadow: 10 / 10 / 50 / 20 - preto Layers / New raster layer Selections / Load/save selection / Load selection from disk aplique a seleção "SelectionMDesign Papillons 1" 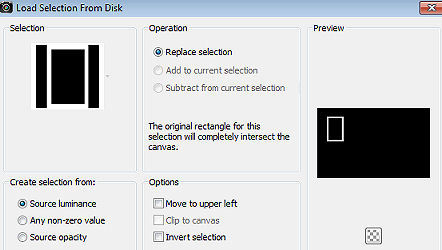
Pinte a seleção com a cor 3 Effects / Plugins / Graphic Plus / Cross Shadow / Default Selections / Select none Com a ferrmenta varinha mágica, clique dentro da frame Selections / Modify / Expand em 6 Layers / New raster layer Pinte a seleção com a cor 4 Layers / New raster layer Abra do material o tube LF-Eye-2-18022013 (apague a marca dágua) ou pegue um tube de sua escolha Edit / Copy – Edit / Paste into selection Selections / Select none Layers / merge / merge down Layers / Arrange / Move Down Ative a layer do topo (Raster 4) Layers / merge / merge down Effects / 3D effects / Drop shadow: 2 / 2 / 50 / 5 - preto Effects / Plugins / MuRa's Meister / Copies: * Line / Line - (Tile Mode) - Normal / Number 3 e os demais sem alteração / BG color 3 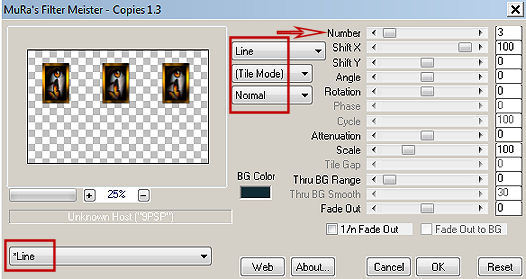
Layers / Duplicate Ative a layer abaixo (Raster 5) Effects / Distortion Effects / Wave: 5 / 47 - 0 / 1 - Transparent 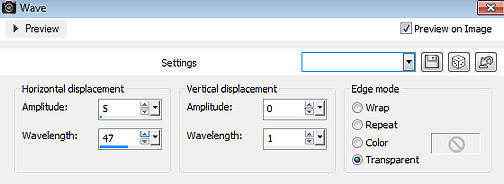
Mude o blend mode dessa layer para Dodge Layers / New raster layer - Pinte a layer com a cor 1 Abra a Mask Ildiko_Desings_Created@Mask_&_ildiko_kjk 1a-35b (7) minimize no PSP Layers / New Mask Layer / From Image aplique a mask Ildiko_Desings_Created@Mask_&_ildiko_kjk 1a -35b (7) 
Layers / Merge / Merge Group Mude o blend mode dessa layer para Dodge Effects / 3D effects / Drop shadow: 10 / 10 / 50 / 5 - preto Ative a layer do topo (Copy of Raster 5) Image / Add borders / symmetric marcado / 2 pixel na cor 4 Abra o tube feminino / ou o de sua escolha (Apague a marca dágua) Edit / Copy – Edit / Paste as new layer Resize o tube se necessário Effects / 3D effects / Drop shadow: 10 / 10 / 50 / 5 - preto Repita com -10 / -10 / 50 / 5 - preto Image / Add borders / symmetric marcado: 25 pixels na cor branca 5 pixels na cor 3 25 pixels na cor branca Selections / Select all Selections / Modify / Contract em 30 Effects / 3D effects / Drop shadow: 10 / 10 / 50 / 10 - preto Repita com -10 / -10 / 50 / 10 - preto Selections / Select none Abra o tube WAMDesign Papillons Edit / Copy – Edit / Paste as new layer Mova para a base à direita como no modelo final Layers / New raster layer Assine Layers / Merge / Merge All Layers https://maantje-psp-design.jouwweb.nl/papillon |  |
|


