| Les 278 
Obrigada Mieke por autorizar a tradução  Material Aqui Plugins Mehdi / Sorting Tiles Flaming Pear / Flexify 2 AP 01 (Innovations) / Lines-SilverLining Carolaine and Sensibility / CS-Linear-H Mura`s Meister / Perspective Tiling AAA Frames / Photo Frame Cores usadas: Foreground cor #556e9d e Background cor #ffffff Forme o gradiente Style Linear / Angle 45 / Repeats 3 / Invert desmarcado 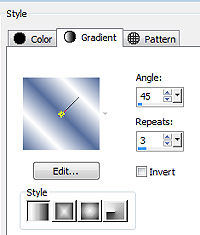
1. Abra uma imagem transparente com Width 900 e Height 600 Pinte a imagem com o gradiente 2. Selections / Select all 3. Abra o tube vrouw-68ead.png Edit / Copy Edit / Paste into selection na imagem Selections / Select none 4. Effects / Image Effects / Seamless Tiling: Borner / Bidirectional / 0 / 0 / Transition em 100 / Linear marcado 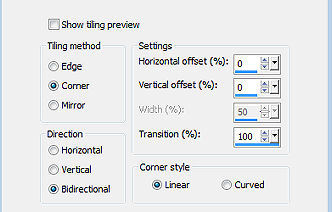
5. Effects / Plugins / Mehdi / Sorting Tiles: Block Range 300-500 / block 460 / PLus marcado 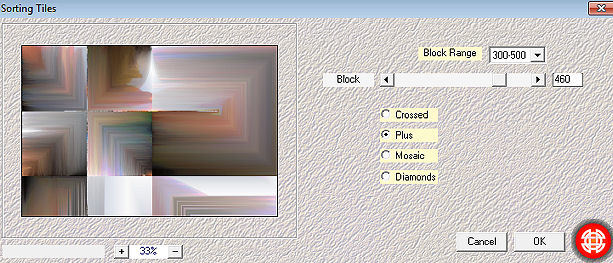
.................................................. 6. Agora nós iremos fazer o deco Este Deco também está inculuso no material de quiser usá-lo. Se o utilizar, pule para depois do ítem 32 deste tutorial. 7. Selections / Load/save selection / Load selection from disk Aplique a seleção "mgg-1" 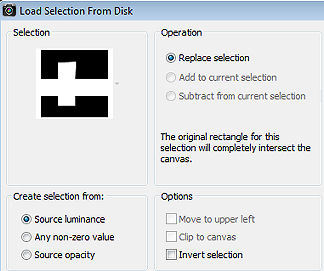
Selections / Promote selection to layer Selections / Select none Effects / 3D Effects / Drop Shadow: 0 / 0 / 80 / 40. Cor preta 8. Effects / Plugins / Flaming Pear / Flexify 2: Input- equirectangular / Output- half-polar / restante sem alterações 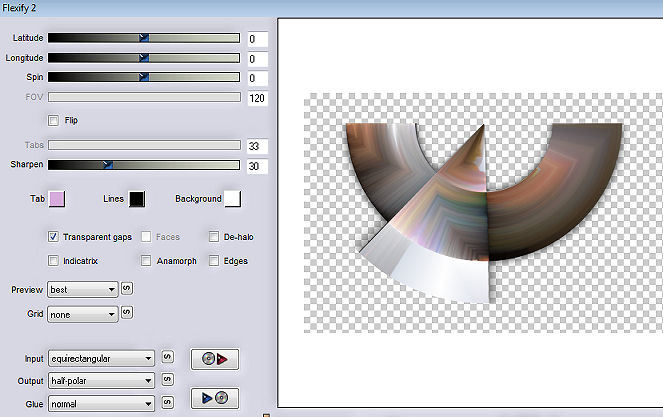
9. Image / Resize em 80% - Resize all layers desmarcado 10. Aperte a tecla k e configure position X 90 e position Y 228 
Aperte a tecla M 11. Layers / Duplicate Image / Mirror (Mirror / Flip Horizontal) Image / Flip (Flip Vertical) 12. Image / Resize 80% - Resize all layers desmarcado Image / Resize 78% - Resize all layers desmarcado 13. Aperte a tecla k e configure position X 227 e position Y 8 
Aperte a tecla M 14. Layers / merge / merge down Effects / 3D Effects / Drop Shadow: 0 / 0 / 40 / 80. Cor preta 15. Ative a layer de fundo (raster 1) Selections / Load/save selection / Load selection from disk Aplique a seleção mgg-2 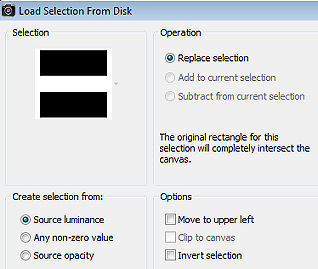
Selections / Promote selection to layer Selections / Select none 16. Layers / Duplicate 17 Effects / Plugins / Carolaine and Sensibility / CS-Linear-H: 75 / 25 / 0 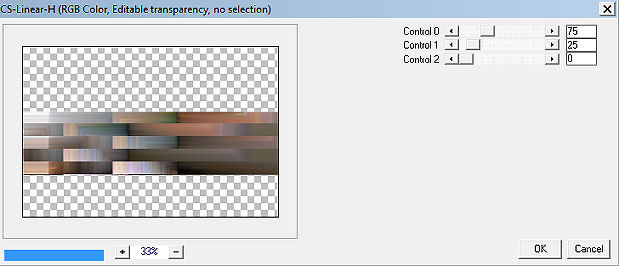
18. Image / Free Rotate / 90% / left 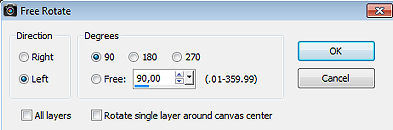
19. Layers / Arrange / Bring to top 20. Repita o Plugin / Flaming Pear / Flexify 2 / Input- equirectangular / Output- half-polar / restante sem alterações 21. Repita o Flexify 2 Image / Free Rotate / 90% / left (como antes) 22. Aperte a tecla k e configure position X 509 e position Y -18 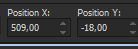
Aperte a tecla M Layers / Duplicate Image / Mirror (Mirror-Flip Horizontal) 23. Layers / merge / merge down Effects / 3D Effects / Drop Shadow: 0 / 0 / 40 / 80. Cor preta 24. Ative a layer "Promoted Selection 1 Image / Free Rotate / 90% left (como antes) 25. Effects / Distortion Effects / Polar Coordinates / Rectangular to Polar / Transparent. 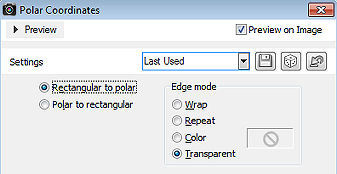
26. Repita o Plugin / Flaming Pear / Flexify 2: Input- equirectangular / Output- half-polar / Restante sem alterações Aperte a tecla K e configure position X -1 e position y 140 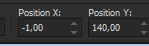
Aperte a tecla M 27. Layers / Duplicate Image / Flip (Flip Vertical) 28. Aperte a tecla K e configure position X 0 e position y 0 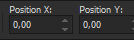
Aperte a tecla M 29. Effects / Plugins / AP 01 (Innovations)-Lines-SilverLining / V-shaped 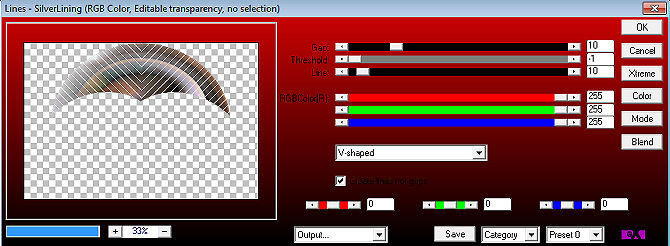
Layers / merge / merge down. Baixe a opacidade dessa layer para 70 30. Ative a layer acima dessa (Promoted selection) 31. Effects / Plugins / AP 01 (Innovations)-Lines-SilverLining / Dotty Grid 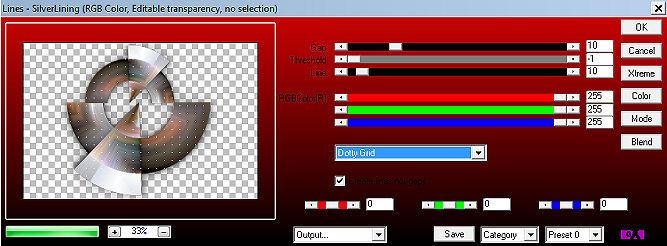
32. Repita o Drop Shadow Encerramos o Deco ................................................... Se usou o Deco do material (deco-1) Edit / copy Edit / Paste as new layer na imagem e aplique o drop shadow de sua escolha ....................................................... Ative a layer de fundo Layers / New raster layer / pinte com a cor branca (#ffffff) 34. Layers / New Mask Layer / From Image Aplique a mask "mask_hazal5.jpg" só source luminance marcado 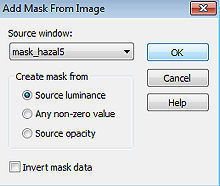
Layers / Duplicate Layers / Merge / Merge Group 35. Ative a layer de fundo novamente Layers / Duplicate Effects / Plugins / Mura`s Meister / Perspective Tiling 1.1: 80 / 0 / 0 / 25 / 0 / 0 / 100 / 255 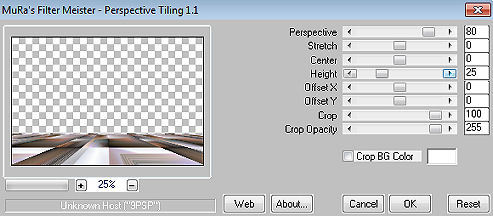
36. Ative a ferramenta varinha mágica / Mode em replace / Feather em 60 e clique na parte superior 
Aperte a tecla Delete 3x Selections / Select none. 37. Effects / Reflection Effects / Rotating Mirror: 0 / 180 / Reflect 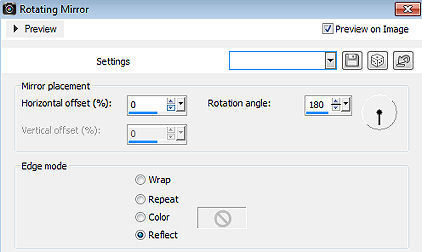
38. Baixe a opacidade dessa layer para 70 Repita o Drop Shadow. 39. Ative novamente a layer de fundo (raster 1) Effects / Plugins <I C Net Software> Filters Unlimited 2.0> / Paper Textures / Wall Paper Fine: 128 / 110 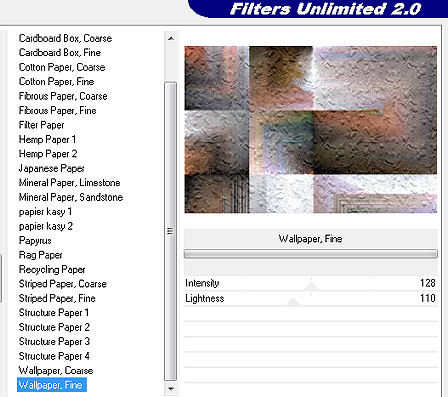
40. Layers / Merge / Merge all layers. Adjust / Hue and Saturation / Hue/Saturation/Brightness: 153 / 58 / -13 Ou escolha suas cores 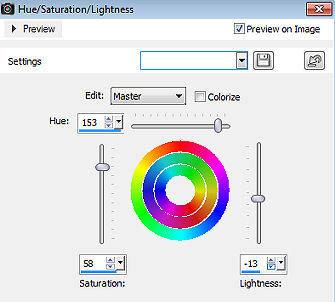
41. Image / Add borders / 1 pixel na cor preta Selections / Select all. Image / Add borders / 50 pixels na cor branca Effects / Image effects / Seamless Tiling (como antes) Selections / Invert 42 Adjust / Blur / Radial Blur: Twirl / 60 / 30 / 0 / 0 / 0 / Eliptical marcado 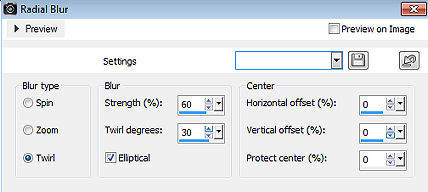
43. Effects / Plugins <I C Net Software> Filters Unlimited 2.0> / Paper Textures / Wall Paper Fine - como antes Effects / Plugins / AAA Frames / Photo Frame 8 / 0 / 0 / 1 / 0 / 0 / 0 / 100 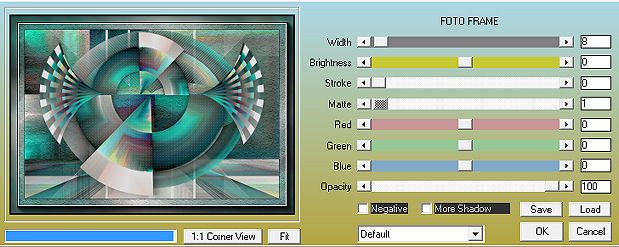
44. Repita o Photo Frame Selections / Invert Repita o Photo frame mas altere Width para 4 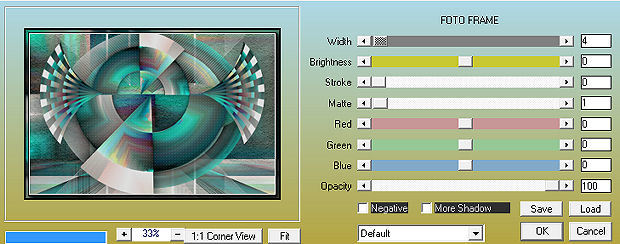
Selections / Select none 45. Abra o tube vrouw-68ead.png Edit / Copy Edit / Paste as a new layer na imagem Image / Resize em 90% - Resize all layers desmarcado Posicione à direita como no modelo Repita o drop shadow Assine Salve como JPEG https://www.pspmieke.nl/lessen/les-278/les-278.html |  |
|


