| Les 270 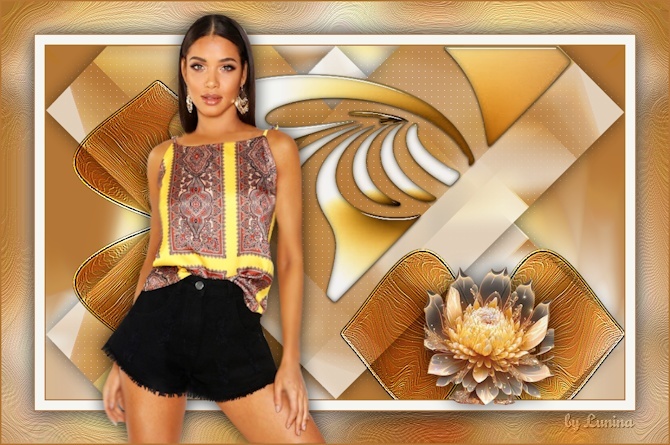
Obrigada Mieke por autorizar a tradução 
Material Aqui PLugins:
Mehdi / Sorting Tiles
AP 01 (Innovations) / Lines / SilverLining
Alien Skin Eye Candy 5: Impact / Glass Cores: Foreground #b47636 / backgraound #f5f5f2 1. Abra uma imagem transparente de Width 900 e Height 550 pixels. 2. Pinte a imagem com a cor do foreground #b47636 3. Selections / Select All Layers / New raster layer 4. Abra o tube 579.png Edit / Copy Edit / Paste into selection na imagem. Selections / Select none Effects / Image Effects / Seamless Tiling / Settings: Default 5. Effects / Edge Effects / Enhance. 6. Layers / merge / merge down 7. Adjust / Blur / Gaussian Blur / Radius: 10 8 Effects / Plugins / Mehdi / Sorting Tiles: Block Range 300-500 / Block 450 / Crossed marcado 
9. Selections / Load/Save Selection / Load Selection from Disk Localize e aplique a seleção "les-mb-270-1.PspSelection" 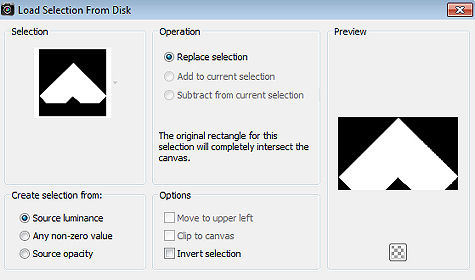
10. Selections / Promote Selection to Layer Selections / Select none 11. Effects / Plugins / Mehdi / Sorting Tiles: Block Range 300-500 / Block 300 / Crossed marcado (nota: background na cor #f5f5f2) Você verá pedaços em preto no visor do plugin, porém ao clicar ok e executar o plugin eles não aparecerão na imagem. 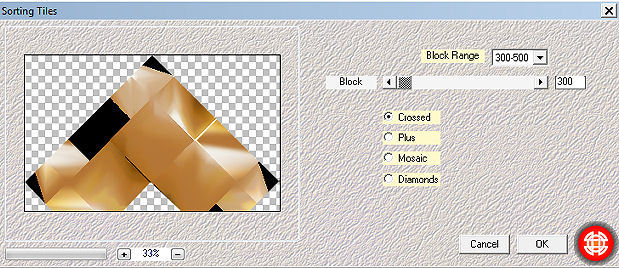
12. Effects / 3D Effects / Drop Shadow: 0 / 0 / 80 / 40. Cor preta. 13. Effects / Plugins / AP 01 (Innovations) / Lines-SilverLining: 10 / -1 / 10 e 3x255 / Dotty Grid. 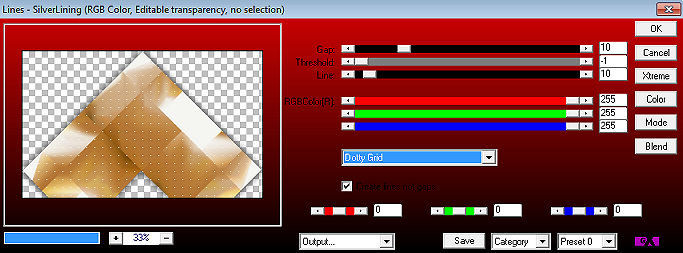
14. Layers / Duplicate Image / Flip (Flip / Flip Vertical) Layers / merge / merge down 15. Baixe a opacidade dessa layer para 70. 16. Layers / New raster layer Selections / Load/save selection / Load selection from disk Aplique agora a seleção "les-mb-270-2.PspSelection" 17. Abra o tube 579c.png Edit / Copy Edit / Paste into selection na imagem. Selections / Select none 18. Effects / Plugins / Alien Skin Eye Candy 5: Impact / Glass / Settings: Clear. 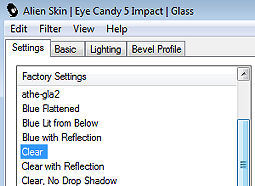
19. Abra o tube deco-1-270.png Edit / Copy Edit / Paste as new layer na imagem Mude o blend mode dessa layer para Hard Light. Aperte a tecla K e configure Position X 42 e Position Y 53 
20. Layers / Duplicate Image / Free Rotate / 90% / Right. 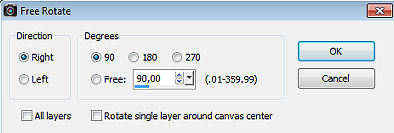
21. Configure agora Position X 458 e Position Y 316 22. Image / Add Borders / 2 pixels com a cor escura Edit / Copy Image / Add Borders / 15 pixels com a cor clara Image / Add Borders / 2 pixels com a cor escura Selections / Select All Image / Add Borders / 50 pixels com a cor clara Selections / Invert Edit / Paste into selection. (ainda na memória) Adjust / Blur / Gaussian Blur / Radius: 10 23. Effects / Plugins / Artistic Effects / Enamel: 70 / 100 / 90 / 350 / Cor branca 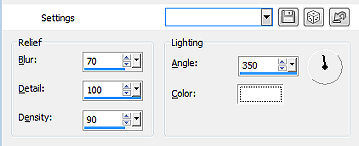
Repita o efeito: Effects / Plugins / Artistic Effects / Enamel: 70 / 100 / 90 / 350 / Cor branca Selections / Invert 24. Effects / 3D Effects / Drop Shadow: 0 / 0 / 80 / 40. Cor preta. Selections / Select none 25. Abra o Tube kamalini-1054.png Edit / Copy Edit / Paste as a new layer na imagem Mova para a esquerda como no modelo 26. Abra o Tube deco-2-270..png Edit / Copy Edit / Paste as a new layer na imagem Mova para a base á direita como no modelo Image / Add Borders / 2 pixels com a cor escura Assine Salve como JPEG https://www.pspmieke.nl/lessen/les-270/les-270.html |  |
|


