| Les 263 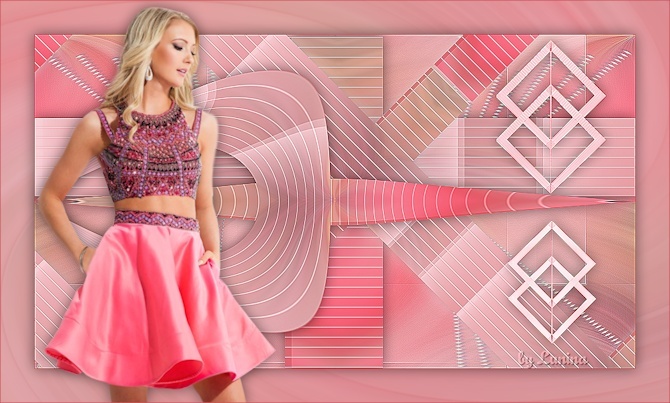
Obrigada Mieke por autorizar a tradução  Material Aqui Plugins Carolaine and Sensibility / cs texture Flaming Pear / Flexify 2 Unlimited 2.0> / Simple / Diamonds Cores Foreground cor #fad4db / Background cor #d0525a Forme o gradiente Style Sunburst / Repeats 1 / Invert marcado 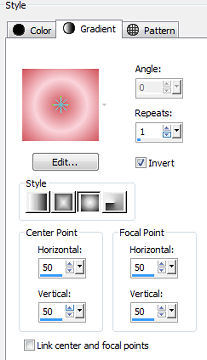
1. Abra uma imagem transparente com Width 900 e Height 500. 2. Pinte a imagem com o gradiente 3. Selections / Select All 4. Abra o tube Kamalini-1014.png 5. Edit / Copy Edit / Paste into selection na imagem Selections / Select none 6. Adjust / Blur / Radial Blur Twirl / 75 / 35 / Eliptical marcado / 0 / 0 / 0 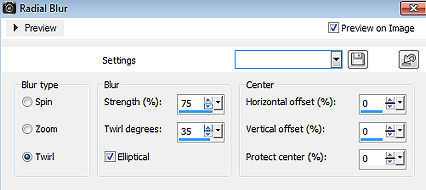
7. Effects / Reflection Effects / Rotating Mirror 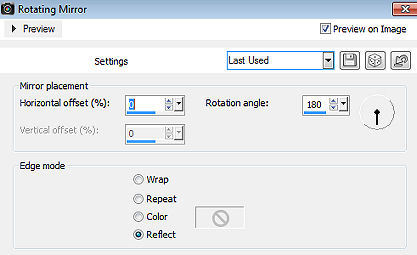
8. Effects / Texture Effects / Weave 258 / 118 / 100 / Weave Colorr #fad4db / Fill Gaps desmarcado 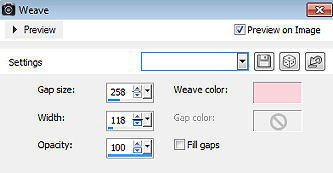
9. Selections / Load/save selection / Load selection from disk Aplique a seleção "sel.mb-263-1" 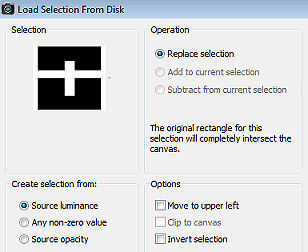
Selections / Promote selection to layer Selections / Select none 10. Effects / Plugins / Carolaine and Sensibility / cs texture: 150 / 0 / 175 / 10 
11. Layers / Duplicate 12. Effects / Plugins / Flaming Pear / Flexify 2 Input / polar - Output / trecunx - demais sem alterações 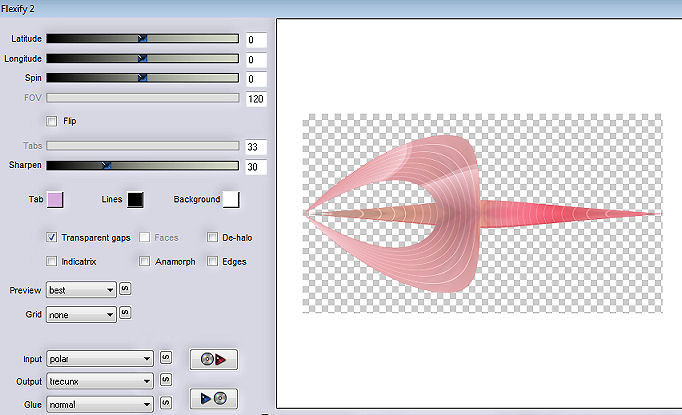
13. Effects / 3D Effects / Drop Shadow: 0 / 0 / 50 / 30 - Preto 14. Ative a layer abaixo (Promoted selection) Effects / 3D Effects / Drop Shadow: 0 / 0 / 50 / 30 - Preto 15. Layers / Duplicate Plugin / <I C Net Software> Filters Unlimited 2.0> / Simple / Diamonds 
16. Ative a layer de fundo (Raster 1) 17. Effects / Image Effects / Seamless Tiling Corner / Bidirectional: 0 / 0 / Transition 100 / Linear 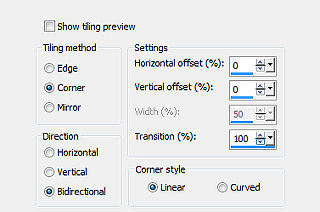
18. Effects / Edge Effects / Enhance. 19. Abra o Deco - 2. Edit / Copy Edit / Paste as a new layer na imagem 20. Abra o Deco - 1 Edit / Copy Edit / Paste as a new layer na imagem Layers / Arrange / Bring to top Effects / Image Effects / Offset: 325 / 14 / custom e Transparent marcados 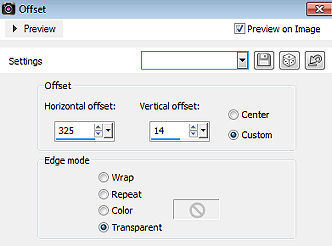
Adjust / Hue and Saturation / Colorize: 248 / 203 21. Effects / 3D Effects / Drop Shadow: 0 / 0 / 50 / 30 - Preto 22. Image / Add borders / 1 pixel na cor escura 23. Edit / Copy 24. Selections / Select All 25. Image / Add Borders / 50 pixels na cor branca Selections / Invert. Edit / Paste into selection Adjust / Blur / Radial Blur - como antes Selections / Invert 26. Effects / 3D Effects / Drop Shadow: 0 / 0 / 50 / 30 - Preto 27. Effects / Edge Effects / Enhance. 28. Selections / Select none 29. Abra o tube kamalini----1014-klein.png Edit / Copy Edit / Paste as a new layer na imagem Mova para a esquerda como no modelo final Aplique um Drop Shadow de sua escolha 30. Image / Add borders / 1 pixels na cor escura Assine Salve como jpeg. https://www.pspmieke.nl/lessen/les-263/les-263.html |  |
|


