Les 247 
Obrigada Mieke por autorizar a tradução  Material Aqui Plugins Filters Unlimited 2.0 / <Bkg Kaleidoscope / Kaleidoscope 2 Cores Foreground cor #427c57 e Background cor #192e65 Forme o gradiente Style Sunburst / Repeats 3 / Invert desmarcado / Center Point 50 / 50 
Abra uma imagem de 900 x 550 pixels, transparente 1. Pinte a imagem com o gradiente 2. Layers / Duplicate 3. Adjust / Blur / Radial Blur: Twirl / Strength 60 / Twirl degrees 0 / Eliptical marcado / Horizontal shift 0 / Vertical shift 0 / Center protect 0. 
4. Effects / Texture Effects / Weave: 5 / 85 / 85 / Weave Color #ffffff / Gap Color #000000 / Fill gaps marcado 
5. Effects / Plugins / <I C Net Software> Filters Unlimited 2.0 / &<Bkg Kaleidoscope / Kaleidoscope 2: 48 / 192 
6. Mude o blend mode da layer para Overlay e baixe a opacidade para 40% 7. Adjust / Sharpness / Sharpen Aperte a tecla S Selections / Custom Selection Top 0 / Left 143 / Right 368 / Bottom 550 
8. Ative a layer de fundo (raster 1) 9. Selections / Promote selection to layer. Layers / Arrange / Bring to top 10. Effects / Texture Effects / Blinds: 15 / 50 / Cor Preta / Horizontal e Light from left/top marcados. 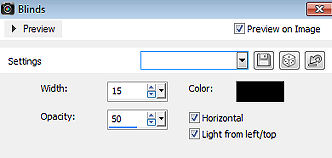
11. Selections / Select none. 12. Layers / New raster layer 13. Pinte a layer com a cor #ffffff 14. Layers / New Mask Layer / From Image Aplique a mask CxDFw. Source luminance marcado. 
15. Layers / Merge / Merge group 16. Mude o blend mode da layer para Soft light 17. Layers / Duplicate Image / Resize 80% / Resize all layers desmarcado. 18. Image / Free rotate / 45% Left Rotate single layer around canvas center marcado. 
19. Effects / Image Effects / Seamless Tiling: Corner / Horizontal / Horizontal shift 0 / Vertical shift 0 / Transition 50 
20. Abra o tube blooming_yucca_by_lilipilyspirit-d4zfzhm.png Edit / Copy Edit / Paste as a new layer na imagem 21. Layers / Duplicate Layers / merge / merge down 22. Image / Resize 80% / Resize all layers desmarcado Repita mais uma vez 23. Effects / Image effects / Offset: -400 / 20 / Custom e Transparent marcados 
24. Abra o tube text Edit / Copy Edit / Paste as a new layer na imagem 25. Effects / Image Effects / Offset: 375 / 0 / Custom e Transparent marcados 
26. Image / Add Borders / 1 pixel / cor do Foreground Image / Add Borders / 3 Pixels / cor do Background Image / Add Borders / 1 pixel / cor do Foreground Selections / Select all. Image / Add Borders / 50 pixels / Cor #fffffff Effects / 3D Effects / Drop Shadow: 0 / 0 / 40 / 40 - Cor preta Selections / Select none. 27. Abra o Tube Kamalini-216 Edit / Copy Edit / Paste as a new layer na imagem Mova o tube para onde achar melhor Effects / 3D Effects / Drop Shadow: 0 / 0 / 40 / 40 - Cor preta Image / Add Borders / 1 Pixel / Cor #000000 Assine. Salve com JPEG https://www.pspmieke.nl/lessen/les-247/les247.html |  |
|


