| Julia 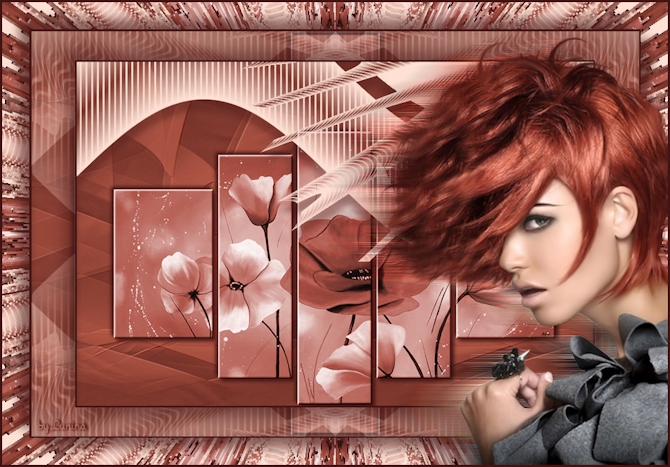
Obrigada Animabelle por autorizar a tradução  Este tutorial é uma criação pessoal de Animabelle Qualquer semelhança com outro é mera coincidência Material Aqui Plugins: Mura's Seamless
Déformation
Unlimited2 / Tile et Mirror IMPORTANTE Abra todo material, inclusive as masks no PSP Duplique-o e feche os originais Dê 2 cliques no presets para importá-lo automaticamente ao plugin correspondente Coloque a(s) seleção(ões) na pasta "Selections" do PSP Cores: 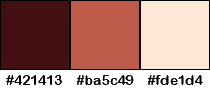
#421413 / #ba5c49 / #fde1d4 Realização Etapa 1 Abra uma imagem transparente de 900 x 600 pixels Pinte a imagem com a cor 1 Layer / New raster layer Pinte a layer com a cor 2 Layer / New mask layer / From image Aplique a mask "masque_julia" 
Layer / Merge group Effect / 3D effect / Drop shadow: 0 / 0 / 100 / 0,50 - cor 2 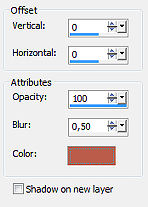
Layers / Duplicate Image / Mirror Layer / Merge / Merge down Effect / Plugins / Mura's Seamless / Emboss at Alpha / Settings: Default Etapa 2 Layer / New raster layer Pinte com a cor 3 Layer / New mask layer / From image Aplique a mask "1250181742_nikita_masques3, com "Invert mask data" marcado 
Layer / Merge group Effect / Image effect / Offset: 0 / 200 / Custom e Transparent marcados 
Etapa 3 Layer / New raster layer Selection / Load/ save selection / Load selection from disk Aplique a seleção "julia1_animabelle" 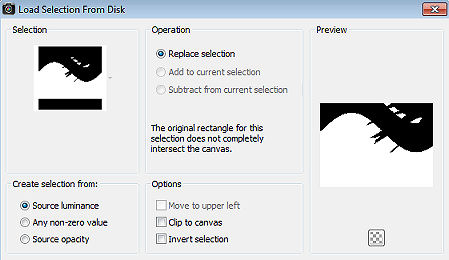
Effect / 3D Effect / Cutout: 20 / 0 - 35 / 15 - cor 1 
Selections / Select none Layer / Merge / Merge down Etapa 4 Ative a layer abaixo (Group - raster 2) Copie e cole como nova layer o tube tablado "tubeclaudiaviza-mix220" Image / Resize em 90% (resize all layers desmarcado) Effect / Image effect / Offset: 0 / -60 / Custom e Transparent marcados Adjust / Hue and saturation / Colorize: 5 / 106 
Effect / Plugins / Mura's Seamless / Emboss at Alpha / Settings: Default Effect / 3D effect / Drop shadow: 5 / 5 / 40 / 9 / Cor 1 Repita com -5 / -5 Etapa 5 Image / Add borders / 3 pixels - cor 1 Layer / Promote background to layer Layers / Duplicate Image / Resize em 85% (resize all layers desmarcado) Effect / 3D effect / Drop shadow: 15 / 15 / 50 / 30 / Cor 1 Repita com -15 / -15 Etapa 6 Ative a layer abaixo Effect / Plugins / Deformation / Bulging Edge Average: 0 
Etapa 7 Image / Add borders / 40 pixels - cor 3 Selecione essa borda com a varinha mágica Effect / Plugins / Unlimited 2 / Tile and Mirror / Kaleidoscope 1: 50 / 33 
Selections / Invert Effect / 3D effect / Drop shadow: 15 / 15 / 60 / 22 / Cor 1 Repita com -15 / -15 Selections / Select none Etapa 8 Copie e cole como nova layer o tube Personagem "Gerry-faces 218 -19 januari 201" Posicione na base à direito, como no modelo final Layers / Duplicate Ative a layer abaixo (a original) Effect / Distortion Effect / Wind: From right / 100 
Effect / Edge effect / Enhance more Image / Add borders / 3 pixels - cor 1 Image / Resize em 900 pixels widht Assine e Salve com Jpeg Optimizer http://animabelle.free.fr/Tutoriels_Animabelle/page2/julia/julia.htm |  |
|


