Gushy
Obrigada Animabelle por autorizar a tradução

Material Aqui
Este tutorial é uma criação pessoal de Animabelle. Qualquer semelhança com outro é pura coincidência. Plugins Filters Unlimited 2.0
PhotoEffex
Graphics Plus
Alien Skin Eye Candy 5: Impact
Simple
Mura's Meister
AAA Frames 1.
Abra todo material necessário no Psp.
Duplique-os e feche os originais
Não esqueça de ir salvando seu trabalho.
2.
Escolha 5 cores de seus tubes, images, misteds ...
Aqui foram escolhidas as seguintes cores:
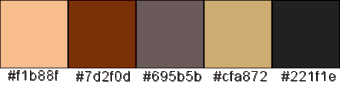
Cor 1 #f1b88f / Cor 2 #7d2f0d / Cor 3 #695b5b / Cor 4 #cfa872 / Cor 5 #221f1e
Fique à vontade para mudar o blend mode e a opacidade da layer, se necessário
3.
Coloque a seleção na pasta "Selections" do PSP
Dê 2 cliques no preset "Glass1_Animabelle"; ele irá automaticamente para o plugin apropriado
Coloque o gradiente "Corel_06_03555.PspGradient" na pasta "Gradients" do PSP.
4.
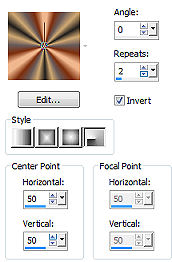
Abra uma imagem transparente de 900 x 550 pixels
Pinte a imagem com o gradiente que está no material, configurado em Style Radial / Angle 0 / Repeat 2 / Invert marcado / Center Point 50 / 50.
Veja AQUI como criar gradiente com suas próprias cores
5.
Effects / Distortion effect / Twirl / Degrees 285
Effects / Plugins / Filters Unlimited 2.0 / It @ lian Editors Effect /
Effetto Fantasma: 75/75
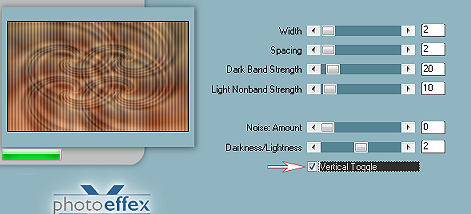
Effects / Plugins / PhotoEffex / Scanlines: 2 / 2 / 20 / 10 / 0 / 2 - Vertical Toggle marcado
Effects / Plugins / Scribe / 4way mirror :128/128 (default)
Adjust / Sharpness / Sharpen
6.
Copie e cole como nova layer, o tube misted "21_Page5_Paysages_Animabelle"
Remova antes a marca dágua.
Com a ferramenta Move posicione no centro da imagem
7.
Layers / New Raster Layer
Pinte com a cor branca
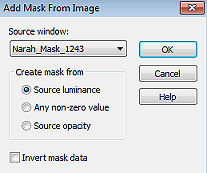
Layers / New mask layer / From an image - aplique a mask "Narah_Mask_1243"
Layers / Merge Group
Effects / Reflection effect / Rotating mirror:
0 / 180 / Reflection: marcado
Effects / Geometric effect / Spherize / Strength em 75 - Elipse marcado
Mude o blend mode da layer para "Overlay" - Baxe a opacidade para 70
Layers / Arrange / Move Down 8.
Ative a layer de fundo - "Raster 1"
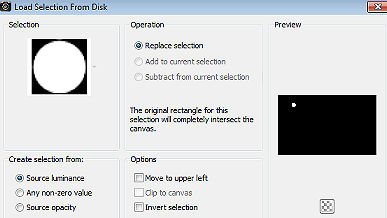
Selections / Load/Save Selection / Load Selection from Disk - aplique a seleção "Sel1_Gushy_Animabelle"
Selections / Promote selection to layer
Layers / Arrange / Bring to top
9.
Effects / Plugins / Graphics Plus / Cross Shadow / Setting em Default
Effects / Plugins / Alien Skin Eye Candy 5: Impact / Glass - aplique o
preset "Glass1_Animabelle"
Selections / Select none
Effects / 3D Effect / Drop Shadow: 0 / 0 / 80 / 10 / Preto
Effects / Plugins / Simple / Top Left Mirror
Mude o blend mode para "Multiply"
10.
Ative a layer de fundo - "Raster 1"
Layers / New Raster Layer
Pinte com o gradiente inicial
Adjust / Blur / Gaussian Blur / Radius 30
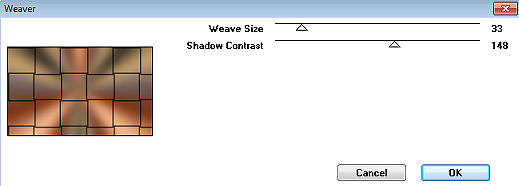
Effects / Plugins / Graphics Plus / Weaver: 33 / 148
11.
Adjust / Blur / Motion Blur: Angle / 90 / Strength 100
Repita o Motion blur
Effects / Reflection effect / Rotating mirror - como antes
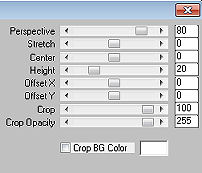
Effects / Plugins / Mura's Meister / Perspective Tiling: 80 / 0 / 0 / 20 / 0 / 0 / 100 / 255
12.
Selecione a parte transparente de cima, com a varinha mágica, Feather em 60
Aperte a tecla "Delete" várias vezes
Selections / Select none
Adjust / Sharpness / Sharpen
Layers / Duplicate
Mude o blend mode da layer para "Overlay" - baixe a opacidade para 35
13.
Layers / Merge Visible Layers
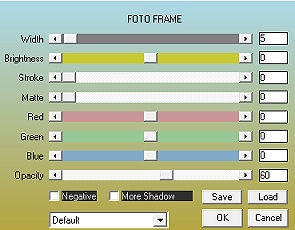
Effects / Plugins / AAA Frames / Foto Frame: 5 / 0 / 0 / 0 / 0 / 0 / 0 / 60
14.
Image / Add borders / symmetric / 40 pixels, na cor 1
Selecione essa borda com a varinha mágica, Feather em 0
Pinte com o gradiente inicial
Adjust / Blur / Gaussian Blur / Radius 30
Effects / Plugins / Filters Unlimited 2.0 / Tile and Mirror / Mirror (vertical)
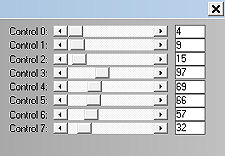
Effects / Plugins / L in K / L in K's - Zitah:
4 / 9 / 15 / 97 / 69 / 66 / 57 / 32
15.
Selections / Select All
Selections / Modify / Contract / 15 pixels
Effects / 3D Effect / Drop Shadow: 0 / 0 / 60 / 20 / Preto
Selections / Select none
16.
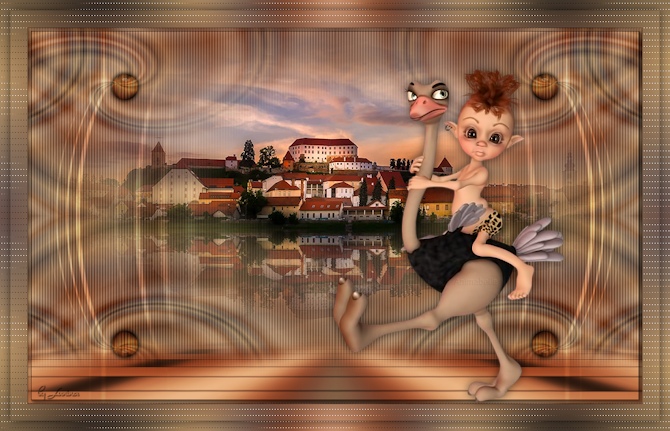
Copie e cole como nova layer o tube "182_tubes_enfantin_animabelle". Antes remova a marca dágua.
Aplique uma sombra de seu agrado.
Posicione à direita como no modelo.
17.
Layers / New Raster Layer
Assine
Layers / Merge All (Flatten)
File / Export / JPEG Optimizer. http://animabelle.free.fr/Tutoriels_Animabelle/page4/Gushy/Gushy.htm |  |
|


