| D'Amour et d'eau Fraiche 
Obrigada Animabelle por autorizar a tradução  Material Aqui Este tutorial é uma criação pessoal de Animabelle Qualquer semelhançacom outro é mera coincidência Plugins:
<I.C.NET Software> Filters Unlimited 2.0
DCspecial
Déformation
L en K's
Mura's Seamless
VanDerLee
AlphaWorks (dans le matériel à placer dans votre Unlimited 2)
AAA Frame Fique à vontade para alterar o blend mode e a opacidade da layer, dependendo dos tubes e cores. Salve seu trabalho com frequência Sempre trabalhe com cópias dos tubes, misteds e Alpha Layer Abra tudo que precisa no PSP Escolha 2 cores harmoniosas com seu tube Cor 1 (foreground) clara / Cor 2 (background) cor escura Cor 3 para a borda final Neste tutorial foram usadas as seguintes cores 
Cor 1 #ffffff / Cor 2 #d8b8fe / Cor 3#bb905d / Cor 4 #532702 / Cor 5 #8693b2 / Cor 6#8e8e8e 1 No material tem o preset (AlphaWorks - v_Photo WhiteOut.ffx) para ser importado pelo Unlimited 2 Abra a Alpha layer (Alpha_Tuto_Fevrier2015_Animabelle.pspimage) Window / Duplicate Feche a original e volte à layer duplicada Foreground com a cor clara e background com a cor mais forte e intensa e em sintonia com seus tubes e misteds 2 Selections / Load/save selection / Load selection from alpha layer Aplique a selection #1 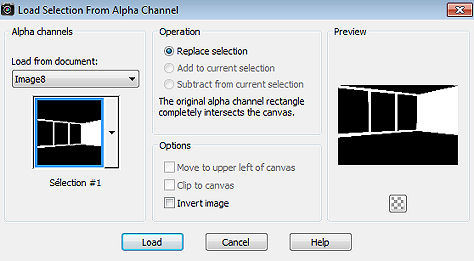
Pinte a seleção com o gradiente Style Linear: Angle 90 / Repeats 0 / Invert desmarcado 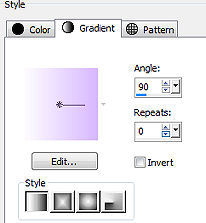
3 Layers / Duplicate Effects / Plugins / <I.C.NET Software> Filters Unlimited 2.0 / DCspecial / Psych 
Mude o blend mode da layer para Luminance (Legacy) 4 Layers / Duplicate Effects / Plugins / <I.C.NET Software> Filters Unlimited 2.0 / Deformation / Alias Blur 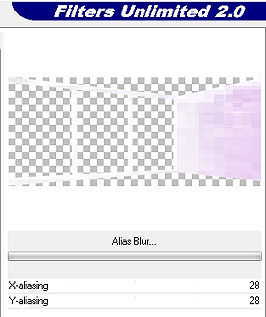
Adjust / Sharpness / Sharpen Baixe a opacidade da layer para 35 e mude o blend mode para Luminance(Legacy) 5 Selections / Select None Layers / Merge Visible Layers Effects / 3D effect / Inner bevel 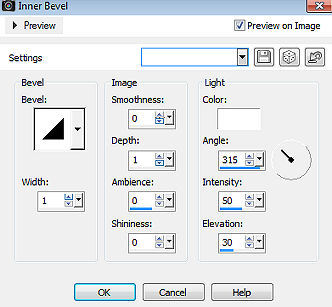
6 Coloque no foreground a cor 3 e no background a cor 4 
Com a varinha mágica / Tolerance e Feather em 0 Selecione a parte transparent inferior Selections / Modify / Expand 2 pixels Layers / New Raster Layer Pinte com o gradiente Style Linear na mesma configuração anterior 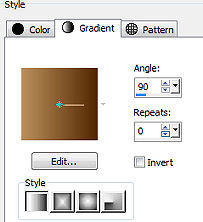 7 Selections / Select None Effect / Plugins / L en K's / Frederiek 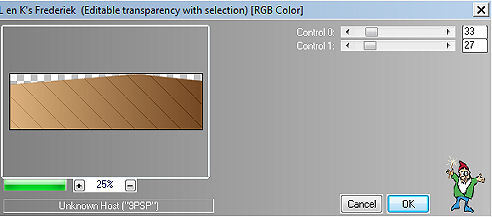
8 Selections / Load/save selection / Load selection from alpha layer Aplique a selection 2 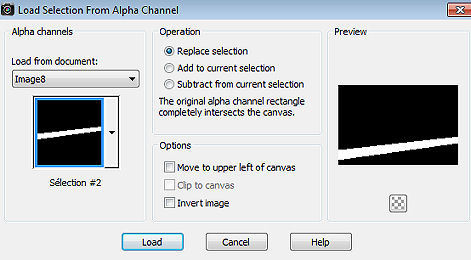
Pinte a seleção com o mesmo gradiente usado acima 9 Effects / 3D Effect / Drop Shadow: 2 / 0 / 50 / 5 / Preto Selections / Select None Layers / Arrange / Move Down 10 Ative a layer do topo (Merged) Selecione a parte superior transparente, com a varinha mágica Tolerance e Feather 0 Selections / Modify / Expand 1 pixel Layers / New Raster Layer Pinte com a cor branca Selections / Select None 11 Effects / Plugins / Texture / Texturizer 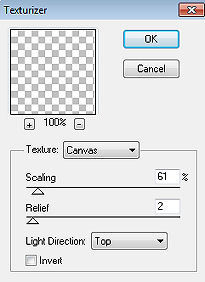
Effects / 3D Effect / Drop Shadow: 1 / 0 / 30 / 3 / Preto 12 Atite a layer abaixo (Merged) Effects / 3D Effect / Drop Shadow: 1 / 9 / 50 / 15 / Preto 13 Layers / New Raster Layer Layers / Arrange / Send to bottom Pinte com uma cor lisa de sua escolha e que harmonize com seu misted Aqui foi usada cor #8693b2 14 Copie e cole como nova layer o tube misted da paisagem Usando a ferramenta Move, posicione a imagem no centro das 3 janelas à esquerda Layers / Duplicate Layer / Merge Visible Layers 15 Selections / Load/save selection / Load selection from alpha layer Aplique a selection 3 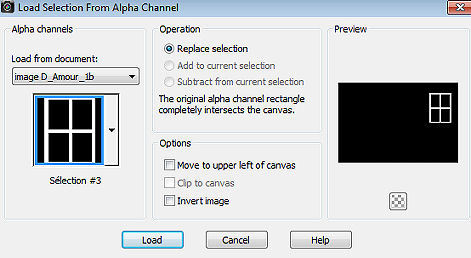
Layers / New Raster Layer Pinte a seleção com a cor branca Selections / Select None 16 Effects / Plugins / <I.C.NET Software> Filters Unlimited 2.0 / Mura's Seamless / Emboss at Alpha / Default 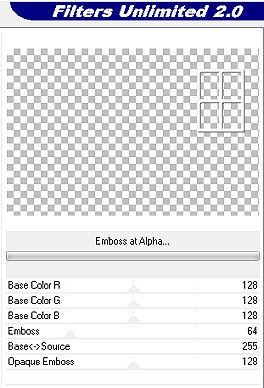
17 Selecione a área vazia ao redor da janela com a varinha mágica Selections / Invert Selections / Modify / Contract em 5 pixels Ative a layer abaixo (merged) 18 Layers / New Raster Layer Pinte com a mesma cor usada no ítem 13 Copie e cole como nova layer novamente o tube misted paisagem Posicione adequadamente com a ferramenta Move Selections / Invert (novamente) Edit / Cut 19 Selections / Invert (novamente) Layers / New Raster Layer Effect / 3D Effect / Cutout 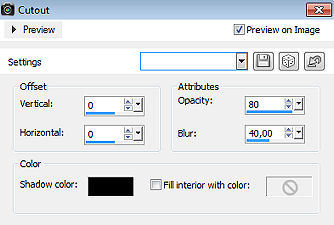
Selections / Select None 20 Tire a visibilidade da layer de fundo e mantenha ativa uma das de cima 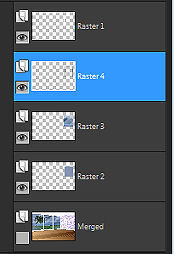
Layers / Merge Visible Layer Volte a visibilidade da layer de fundo 21 Ative a ferramenta Selection / Custom Selection Top 64 / Left 672 / Right 856 / Bottom 310 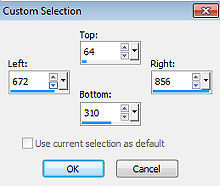 22 Effects / Plugins / VanDerLee / UnPlugged-X / Jalusi Coloque a cor 2 em Custom>>> (ou outra) / Cor #d8b8fe 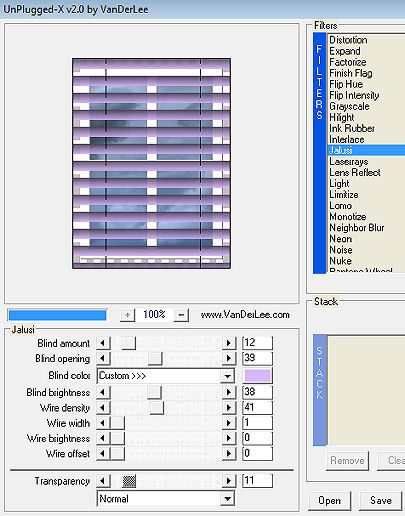
23 Selections / Select None Ative a ferramenta Pick ou aperte a tecla K Escolha o mode "Perspective" 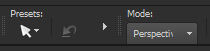
Empurre delicadamente do canto inferior esquerdo para o canto superior esquerdo 
Até conseguir isso 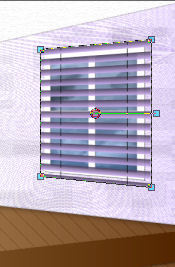
24 Adjust / Sharpness / Sharpen Effects / 3D Effect / Drop Shadow: 6 / 9 / 50 / 15 / Preto 25 Selections / Load/save selection / Load selection from alpha layer Aplique a selection 4 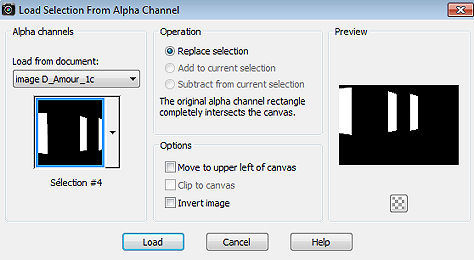
Layers / New Raster Layer Pinte a layer com a cor branca 26 Effects / Plugins / <I.C.NET Software> Filters Unlimited 2.0 / AlphaWorks / Photo WhiteOut... / Default Se o plugin não funcionar corretamente, baixe a opacidade da layer em torno de 45 27 Effects / Texture Effect / Weave / Cor #8592b1 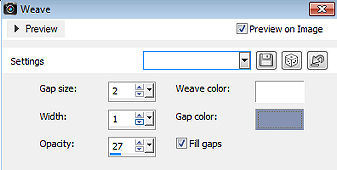
28 Selections / Modify / Select Selection Borders 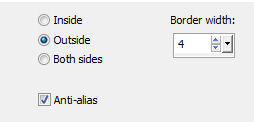
Selections / Promote selection to layer Pinte a seleção com a cor branca Selections / Select None 29 Effects / Plugins / <I.C.NET Software> Filters Unlimited 2.0 / Mura's Seamless / Emboss at Alpha / Default (como no ítem 16) Effects / 3D Effect / Drop Shadow: 0 / 9 / 50 / 15 / Preto 30 Layers / New Raster Layer Selections / Load/save selection / Load selection from alpha layer Aplique a selection 5 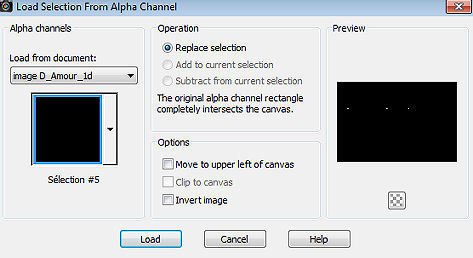
31 Pinte a seleção com a cor branca Effects / 3D effect / Inner bevel 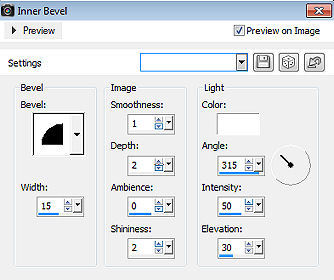
Selections / Select None Effects / 3D Effect / Drop Shadow: 0 / 4 / 40 / 9 / Preto 32 Copie e cole como nova layer o tube spot que está no material Image / Resize em 10% (resize all layers desmarcado) Adjust / Sharpness / Sharpen Effects / Image Effect / Offset: 145 / 260 / Custom e Transparent marcados 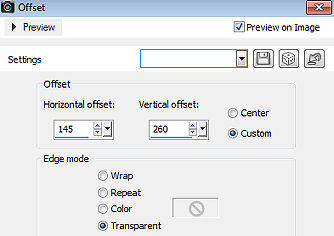
Effects / 3D Effect / Drop Shadow: 5 / 0 / 40 / 5 / Preto 33 Layers / Merge Visible Layers Effects / Ilumination Effect / Lights Se necessário, mova o valor de "Horizontal" para baixo de centro do spot Os parâmetros do tutorial original são esses 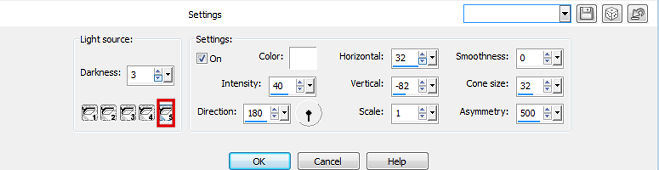
Se não funcionar corretamente, desmarque a opção "On" e vá testando os valores Na minha execução alterei os parâmetros 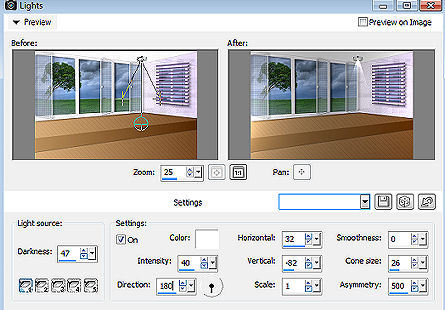
NOTA Se mesmo assim não funcionar direito siga os passos abaixo: Layers / New Raster Layer Ative a ferramenta laço / Point to Point / Feather 50 Forme um triângulo assim 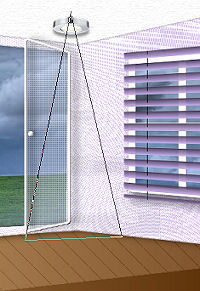
Quando ativar a seleção a imagem ficará semelhante a essa 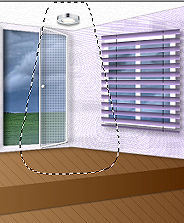
Pinte a seleção com a cor branca Baixe a opacidade da layer para 20 Layers / Arrange / Move Down Ative a layer do topo 34 Copie e cole como nova layer o tube principal e os demais tubes Effects / 3D Effect / Drop Shadow: -15 / 0 / 40 / 30 / Preto 35 Layer / Merge All (Flatten) Effects / Plugins / AAA Frame / Foto frame 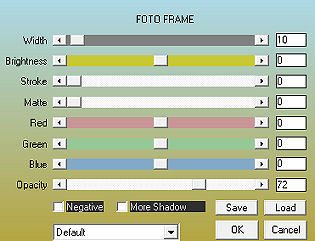
Assine e Exporte como JPEG Optimizer ou Png http://animabelle.free.fr/Tutoriels_Animabelle/page4/Damour_et_deau_fraiche/D_amour_et_d_eau_fraiche.htm
|  |
|


