Audrey 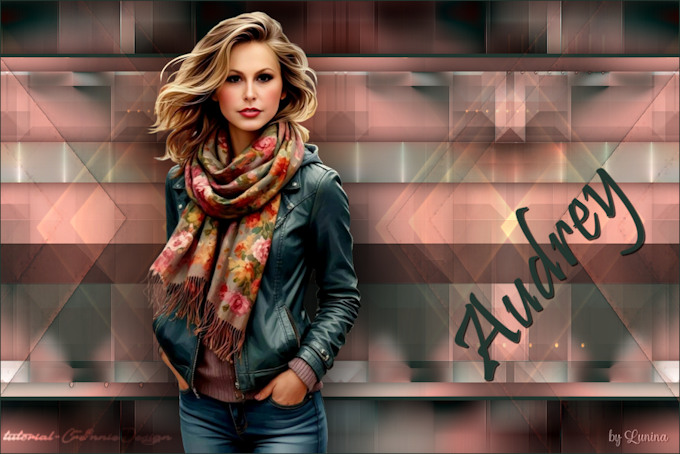
Obrigada Annie por autorizar a tradução  Material Aqui Fazer tubes é muito trabalhoso, portanto, deixe-os sempre intactos Importante preservar os direitos autorais do artista original Dê o crédito ao seu criador Agradecimentos as criadoras do tube e da mask: Lana e Narah Plugins: *Podem ser importados pelo Filters Unlimited AP [lines]* Graphics Plus* Mehdi Simple* Abra os tubes e a mask no PSP Coloque as seleções na pasta “Selections” Se usar um tube diferente, esse pode causar um resultado diferente nos efeitos Abra uma imagem de 650 x 500 pixels – transparente Coloque no foreground a cor clara 1 #eea59a e no background a cor escura 2 #22352e 3. Pinte a imagem com a cor do foreground 4. Effects / Image Effects / Offset 150 / 150 / Custo e Color marcado / Cor: Background 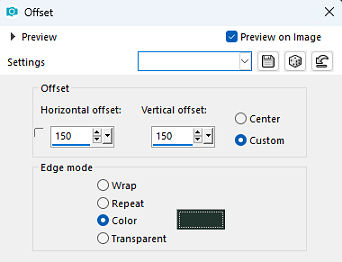
5. Effects / Image Effects / Seamless Tiling / Settings: Default 6. Effects / Image Effects / Seamless Tiling 
7. Effects / Edge Effects / Enhance 8. Ative a ferramenta Selection / Custom Selection e configure Top 0 / Left 475 / Right 650 / Bottom 100 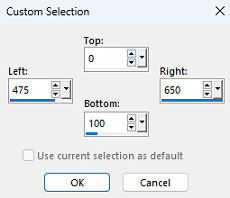
9. Selections / Promote Selection to layer 10. Effects / Plugin / Graphics Plus / Button Beveler II: 145 /255 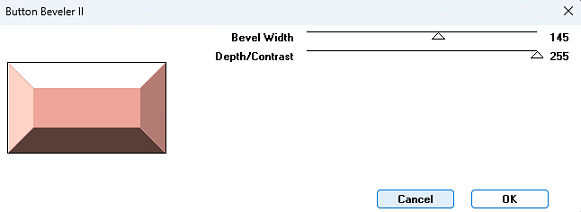
11. Ative a layer de fundo 12. Ative a ferramenta Selection / Custom Selection e configure Top 350 / Left 475 / Right 650 / Bottom 500 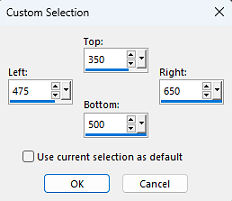
13. Selections / Promote Selection to layer 14. Effects / Plugin / Graphics Plus / Button Beveler II – como antes (em FU2: 145/255) 15. Selections / Select none 16. Ative a layer do topo 17. Layers / Merge / Merge Down 18. Layers / Duplicate 19. Image / Mirror (Flip - Flip Horizontal) 20. Layers / Merge / Merge Down 21. Effects / Image Effects / Seamless tiling – na última configuração usada 22. Effects / 3D Effects / Drop Shadow: 0 / 0 / 75 / 40,00- Cor: preta 23. Selections / Select All 24. Image / Add Borders / Symmetric desmarcado Top e Bottom 25 / Left e Right 75 / Cor: Background 
25. Selections / Invert 26. Effects / Plugin / Simple / Diamonds 27. Adjust / Blur / Gaussian Blur / Radius: 10 28. Effects / 3D Effects / Drop Shadow – como antes 29. Selections / select none 30. Effects / Image Effects / Seamless Tiling 
31. Ative a ferramenta Selection / Custom Selection e configure Top 125 / Left 75 / Right 725 / Bottom 375 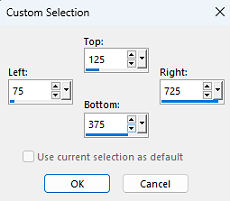
32. Effects / Plugin / Graphics Plus / Button Beveler II – como antes (no FU2: 145/255) 33. Selections / Select All 34. Image / Add Borders / Symmetric desmarcado Top e Bottom 25 / Left e Right 50 / Cor: Foreground 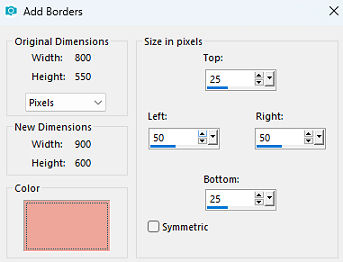
35. Selections / Invert 36. Effects / Plugin / Graphics Plus / Cross Shadow 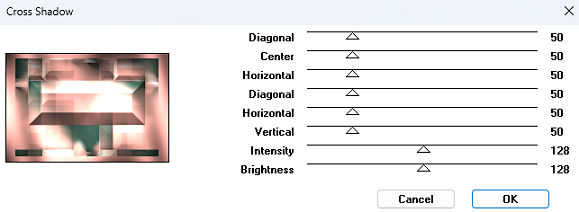
37. Selections / Invert 38. Effects / 3D Effects / Drop Shadow – como antes 39. Selections / select none 40. Effects / Plugin / Graphics Plus / Horizontal Mirror: 220 / 50 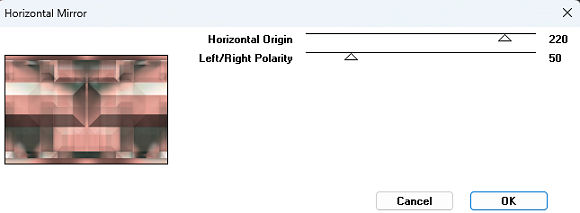
41. Selections / Load/Save Selection / Load Selection from Disk Aplique a seleção “Audrey-1-cre@nnie” 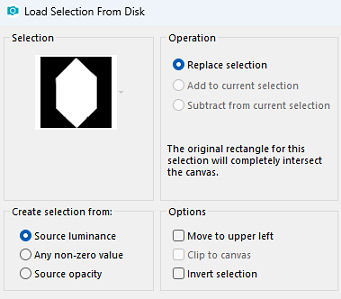
42. Effects / Plugin / Graphics Plus / Button Beveler II – como antes (no FU2: 145/255) 43. Effects / Edge Effects / Enhance 44. Effects / 3D Effects / Drop Shadow – como antes 45. Selections / Select none 46. Effects / Plugin / Simple / Left Right wrap 47. Selections / Load/Save Selection / Load Selection from Disk Aplique a seleção “audrey-2-cre@nnie” 48. Effects / 3D Effects / Drop Shadow – como antes 49. Selections / Promote Selection to layer 50. Effects / Plugin / MEHDI / Weaver: Size Range 50-150 / Size 80 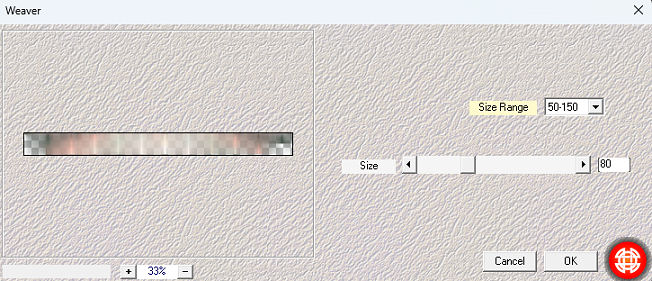
51. Mude o blend mode dessa layer para Multiply 52. Selections / select none Sua imagem estará semelhante a essa 
53. Coloque no foreground uma cor diferente e aqui foi usada a cor: #caa04c 54. Layers / New Raster Layer 55. Pinte a layer com essa cor do foreground 56. Layers / New Mask Layer / From Image Aplique a mask “NarahsMasks_1717” 
57. Layers / Merge / Merge Group 58. Mude o blend mode dessa layer para Dodge 59. Layers / Merge / Merge Visible 60. Layers / Duplicate 61. Image / Resize em 75% - resize all layers desmarcado 62. Ative a ferramenta Selection – clique na barra superior em - layer opaque 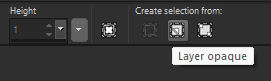
63. Selections / Modify / Select selection borders: Outside / 5 / Anti-alias 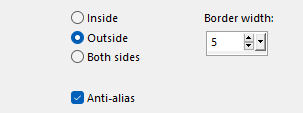
64. Pinte a seleção com a cor do background 65. Selections / Select none 66. Effects / Image Effects / Seamless Tiling 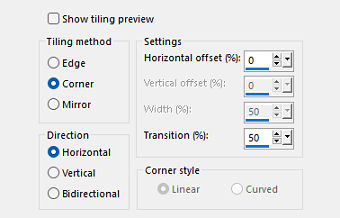
67. Effects / 3D Effects / drop shadow – como antes 68. Ative a layer de fundo 69. Adjust / blur / motion blur: 0 / 100 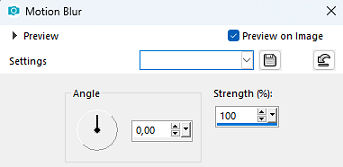
70. Effects / edge effects / enhance 71. Layers / duplicate 72. Image / Flip (flip - flip vertical) 73. Mude o blend mode dessa layer para Difference 74. Baixe a opacidade dessa layer para 50 75. Layers / merge / merge down 76. Ative a layer do topo 77. Layers / new raster layer 78. Volte o foreground para a cor inicial: #eea59a 79. Pinte essa layer com a cor do foreground 80. Layers / new mask layer / from image Aplique novamente a mask “NarahsMasks_1717” 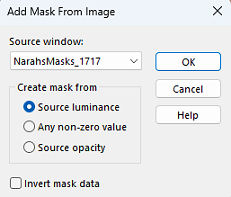
81. Layers / merge / merge group 82. Effects / edge effects / enhance 83. Effects / Edge Effects / Erode 84. Mude o blend mode dessa layer para Hard Light 85. Baixe a opacidade dessa layer para 50 86. Abra o tube LD-model-1728 – Remova a marca dágua - Edit / Copy 87. Edit / Paste as new layer na imagem 88. Image / Resize em 75% - resize all layers desmarcado 89. Aperte a tecla K (select) / configure position x: 155.00 e position y: 0.00 90. Layers / Duplicate 91. Adjust / Blur / Gaussian Blur / Radius: 50 92. Mude o blend mode dessa layer para Multiply 93. Layers / Arrange / Move Down 94. Abra o tube text-audrey - Edit / Copy 95. Edit / Paste as new layer na imagem 96. Position x: 601.00 e position y: 220.00 97. Aperte a tecla M (deselect) 98. Effects / 3D effects / drop shadow: 2 / 2 / 75 / 0 - cor: preta 99. Layers / new raster layer / assine 100. Image / add borders / symmetric / 1 pixel na cor do background 101. Image / resize / width em 800 pixels – resize all layers marcado 102. File / export / jpeg optimizer https://crea-annie-design.nl/audrey.html |  |
|


