Glamour Beauty 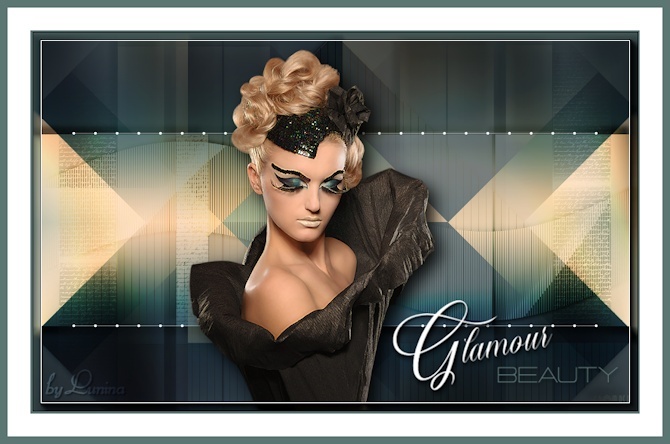
Obrigada Manuela por autorizar a tradução  Material Aqui Agradecimentos aos Tubers pelos materiais: Tube SvB (528) Beauty Mask Mask_07_GB_2019109 Selections SelectionMDesign Lesson 93 Wordart WAMDesign Glamor Beauty Lines psp Stuff by Marja Plugins: Filters Unlimited 2.0 – &<Bkg Designers sf10 IV> @BlueBerry Pie of &<Bkg Kaleidoscope - @BlueBerry Pie Medhi - Wavy Lab 1.1 Mehdi - Sorting Tiles AP 01 (Innovations) – Lines_SilverLining Graphic Plus – Cross Shadow Tramages - Tow The Line Alien Skin Eye Candy 5 Impact - perspective shadow AAA Frames - Photo Frame Coloque as seleções na pasta "Selections" Está usando outras cores e tubes? Este tutorial faz uso extensivo de blend mode opacidade da layer Então, teste tanto a opacidade da layer quanto o Blend Mode porque os efeitos podem resultar diferentes !! Escolha 4 cores de seu tubes Aqui foram usadas as seguintes cores 
Cor 1 #f9d8b7 / Cor 2 #515b67 / Cor 3 #a7b7a9 / Cor 4 #5c7674 Coloque no Foreground a cor 1 e no Background a cor 4 Abra uma imagem de 800 x 500 pixels, transparente Effects / Plugins / Medhi / Wavy Lab 1.1: Style Linear / -3 / 0 / 0 - Cores 1 - 2 - 3 - 4 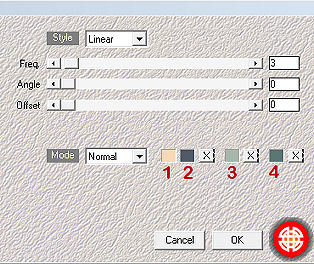
Layers / Duplicate Ative a layer do topo e tire a visibilidade dela Ative a layer de fundo Effects / Plugins / Mehdi / Sorting Tiles Block Range 300-500 / Block 410 / Plus marcado 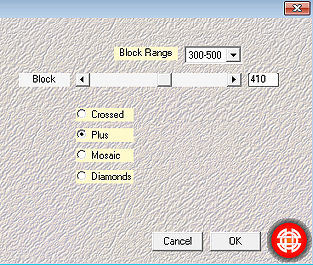
Ative a layer do topo e volte a visibilidade dela (Copy of Raster 1) Effects / Plugins / Mehdi / Sorting Tiles Block Range 300-500 / Block 400 / Crossed marcado 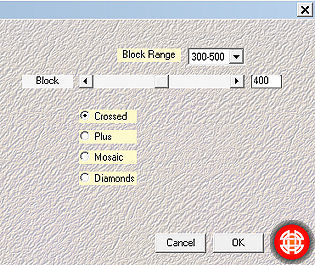
Baixe a opacidade dessa layer para 50 Selections / Load/Save Selection / Load Selection from Disk Aplique a seleção "SelectionMDesign Glamor Beauty" 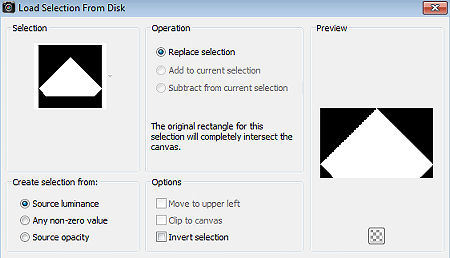
Selections / Promote Selection to layer Selections / Select none Effects / Plugins / AP 01 (Innovations) / Lines_SilverLining Dotty Lines - O restante sem alteração 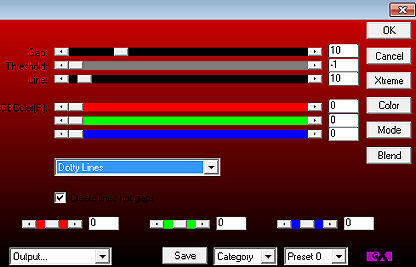
Effects / 3D effects / Drop shadow: 0 / 0 / 50 / 10 - preto Repita o drop shadow Layers / Arrange / Move Down Mude o blend mode da layer para Burn e baixe a opacidade para 55 Ative a layer do topo (Copy of Raster 1) Effects / Plugins / Unlimited 2.0 / &<Bkg Designers sf10 IV> @BlueBerry Pie ou Bkg Kaleidoscope - @BlueBerry Pie Layers / Duplicate Image / Mirror Mude o blend mode dessa layer para Multiply e baixe a opacidade para 90 Ative a layer abaixo (Copy of Raster 1) Effects / Plugins / Graphic Plus / Cross Shadow / Settings: Default Selections / Load/Save Selection / Load Selection from Disk Aplique a seleção "SelectionMDesign Glamor Beauty 1" 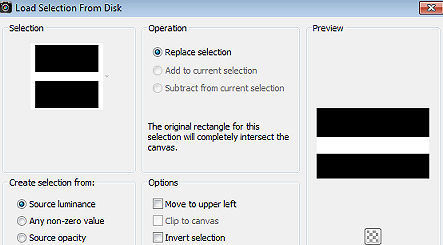
Ative a layer de fundo (Raster 1) Selections / Promote selection to layer Layers / Arrange / Bring do top Adjust / Blur / Gaussian Blur / Radius 25 Effects / Plugins / Tramages / Tow The Line: 15 / 30 / 30 / 30 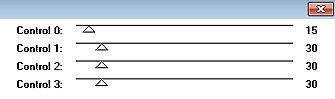
Effects / 3D effects / Drop shadow: 0 / 0 / 50 / 10 - preto Repita o drop shadow Selections / Select none Effects / Distortion Effects / Wave: 0 / 100 / 12 / 100 / Transparent 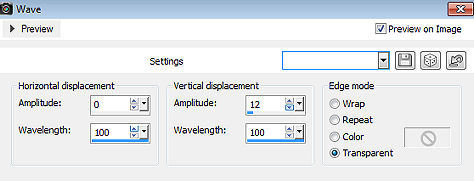
Layers / Arrange / Move Down Mude o blend mode da layer para Overlay Layers / New Raster Layer Pinte a layer com a cor 1 Abra do material a mask "Mask_07_GB_2019109" minimize no Psp Layers / New Mask Layer / From Image aplique a mask Mask_07_GB_2019109 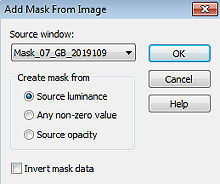
Layers / Merge / Merge Group Effects / Plugins / Graphic Plus / Cross Shadow / Default Effects / 3D effects / Drop shadow: 10 / 10 / 50 / 10 - preto Repita com -10 / -10 / 50 / 10 - preto Layers / Arrange / Move Down Mude o blend mode da layer para Overlay Ative a layer do topo (Copy (2) of Raster 1) Abra do material o tube psp Stuff by Marja - Lines Edit / Copy – Edit / Paste as New Layer Effects / Image Effects / Offset: Horizontal 0 / Vertical -10 / Custom e Transparent marcados Abra do material o tube woman (feminino) / ou o tube de sua escolha Edit / Copy – Edit / Paste as New Layer Resize o tube se desejar e se quiser, dar Mirror Effects / Plugins / Alien Skin Eye Candy 5 Impact / perspective shadow - Aplique o Settings "Drop Shadow, Blurry" 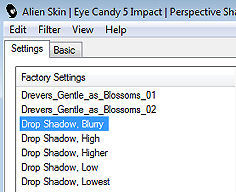
Image / Add Borders / symmetric: 4 pixels na cor 4 30 pixels na cor branca 10 pixels na cor 4 Selections / Load/Save Selection / Load Selection from Disk aplique a seleção "SelectionMDesign Glamor Beauty 2" 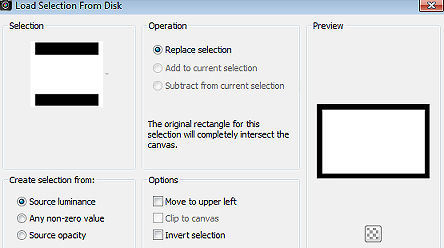
Effects / Plugins / AAA Frames / Photo Frame: 10 / 0 / 0 / 1 / 0 / 0 / 0 / 100 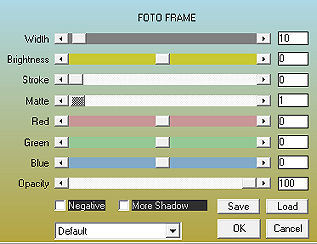
Selections / Select none Abra do material o "WAMDesign Glamor Beauty" Edit / Copy – Edit / Paste as New Layer Mova para base à direita (veja modelo final) Layers / New Raster Layer Assine Layers / Merge / Merge All Layers https://maantje-psp-design.jouwweb.nl/glamour-beauty |  |
|


