Karine 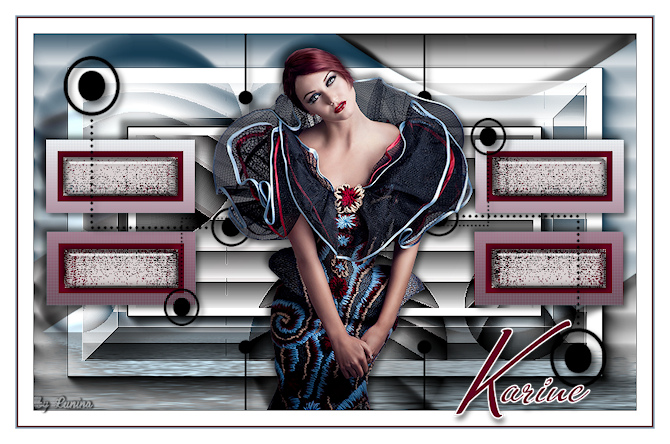
Obrigada Maantje por autorizar a tradução  Agradecimento aos criadores dos tubes e demais materiais: Tube Calguis Mask @nn Selections SelectionMDesignKarine Deco's Crealine - MDesign Deco WAMDesignKarine Plugins: Unlimited 2.0 - VM Natural / Acid Rain ... ** VanDerLee / Unplugged X / Jalusi AAA Frames / Photo Frame Graphic Plus / Cross Shadow Toadies / * Sucking Toad * Bevel II.2 Flaming Pear / Flood Alien Skin Eye Candy 5: Impact / Glass Material Aqui Coloque as seleções na pasta "Selections" Usando outros tubes e cores, pode ter que alterar a opacidade e o blend mode da layer porque pode dar diferença no efeito pedido. Escolha 4 cores de seus tubes Aqui foram escolhidas as seguintes cores:  Cor 1 #d9d1d2 / Cor 2 #8ea7b6 / Cor 3 #64001f / Cor 4 #ffffff Coloque no Foreground a cor 1 e no Background a cor 4 No Foreground forme o gradiente: Style Sunburst / Angle 0 / Repeats 0 / Center Point / Horizontal 10 / Vertical 10 / Invert desmarcado 
Abra uma imagem de 800 x 500 pixels, transparente Pinte a imagem com o gradiente Effects / Plugins / VanDerLee / Unplugged X / Jalusi 12/10 / Background / 12/74/1/0/0 / Transpareny 25 / Normal 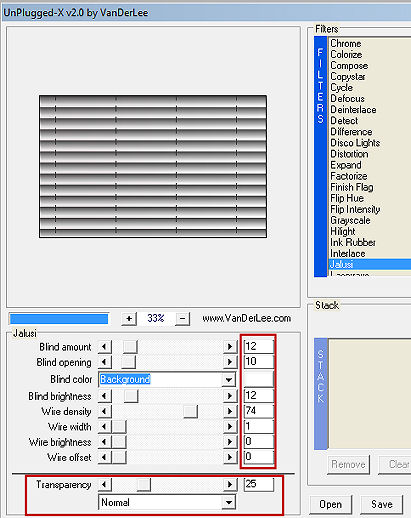
Layers / Duplicate Effects / Plugins / Unlimited 2.0 / VM Natural / Acid Rain...: Altere o valor de "Amount" para 91, e mantenha os demais valores que aparecem Effects / Plugins / AAA Frames / Photo Frame
45 / 0 / 0 / 20 / 0 / 0 / 0 / 100 
Adjust / Sharpness / Sharpen Ative a layer de fundo (Raster 1) Adjust / Blur / Gaussian Blur / Radius 15 Ative a layer do topo (Copy of Raster 1) Selections / Load/save selection / Load selection from disk Aplique a seleção "SelectionsMDesignKarine" 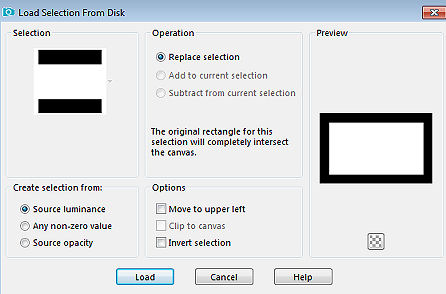
Selections / Promote Selection to Layer Effects / Plugins / AAA Frames / Photo Frame: 60 / 0 / 0 / 10 / 0 / 0 / 0 / 100 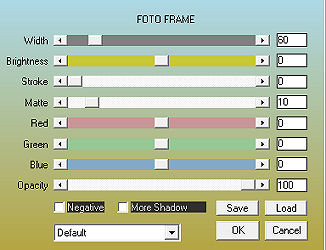
Adjust / Sharpness / Sharpen Selections / Modify / Contract 60 Edit / Copy Edit / Paste as a new layer Selections / Select none Ative a layer abaixo (Promoted Selection) Mude o blend mode para Hard light e baixe a opacidade para 80 Effects / Plugins / Graphic Plus / Cross Shadow / Default Effects / Plugins / Toadies / * Sucking Toad * Bevel II.2... / Default Effects / Edge Effects / Enhance Ative a layer do topo (Raster 2) Effects / 3D Effects / Drop Shadow: 10 / 10 / 50 / 10 - Preto Repita com -10 / -10 / 50 / 10 Layers / New raster layer Pinte com a cor 2 Abra a mask "@ nn_140712_mask_121_tdstudio.jpg" e minimize no Psp Layers / New Mask Layer / From Image aplique a mask @ nn_140712_mask_121_tdstudio.jpg 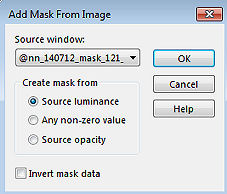
Layers / Merge / Merge group Effects / Plugins / Flaming Pear / Flood: 80 / 0 / 45 / 80 - 50 / 50 / 25 / 15 - 0 / 30 / 30 / Normal 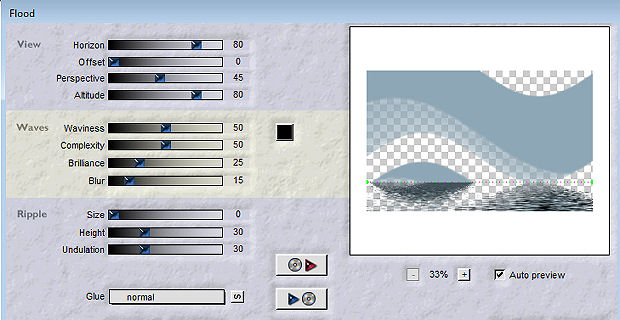
Effects / 3D Effects / Drop Shadow: 10 / 10 / 50 / 10 - Preto Repita com -10 / -10 / 50 / 10 Layers / Arrange / Move Down Repita o Move Down Mude o blend mode da layer para Hard light e baixe a opacidade para 75 Adjust / Sharpness / Sharpen Ative a layer do topo (Raster 2) Coloque no foreground a cor 3 e no Background a cor 4 No foreground forme o gradiente: Style Linear / Angle 0 / Repeats 0 
Layers / New raster layer Selections / Load/save selection / Load selection from disk aplique a seleção "SelectionsMDesignKarine 1" 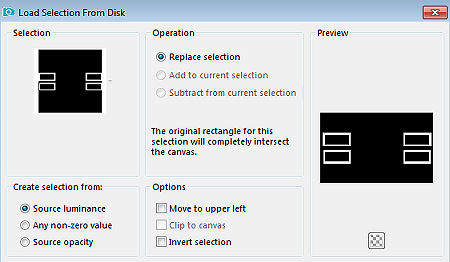
Pinte a seleção com o gradiente Selections / Select none Effects / Texture Effects / Weave: 1 / 1 / 1 / cor 2 em Wave e Gap color 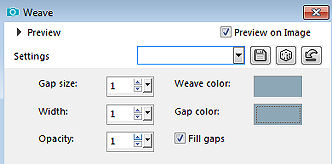
Ative a varinha mágica: Mode: Add / Matching Mode RGB Value Clique dentro das 4 Frames 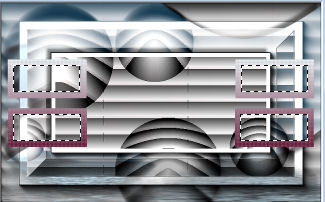
Layers / New raster layer Pinte a seleção com a cor 3 Selections / Modify / Contract 8 Pinte a seleção com a cor 1 Effects / Texture Effects / Mosaic Glass / Default Selections / Modify / Contract 2 Effects / Plugins / Alien Skin Eye Candy 5 / Impact / Glass Settings: Clear Effects / 3D Effects / Drop Shadow: 5 / 5 / 50 / 10 - preto repita com -5 / -5 / 50 / 10 Selections / Select none Layers / merge / merge down Effects / 3D Effects / Drop Shadow: 5 / 5 / 50 / 10 - preto repita com -5 / -5 / 50 / 10 Abra o tube Crealine Edit / Copy - Edit / Paste as a new layer Não mova Effects / 3D Effects / Drop Shadow: 5 / 5 / 50 / 10 - preto Abra o Tube MDesign Deco Edit / Copy - Edit / Paste as a new layer Não mova Effects / 3D Effects / Drop Shadow: 5 / 5 / 50 / 10 - preto Abra o Tube Calguis ou o de sua escolha Edit / Copy - Edit / Paste as a new layer Resize de seu agrado (Aqui dei de 52%, resize all layers desmarcado) Effects / 3D Effects / Drop Shadow: 5 / 5 / 50 / 10 - preto repita com -5 / -5 / 50 / 10 Image / Add borders / symmetric: 20 pixels na cor 4 2 pixels na cor 3 2 pixels na cor 2 20 pixels na cor 4 Abra o tube WAMDesignKarine Edit / Copy - Edit / Paste as a new layer Posicione na base à direita (ver modelo final) Layers / New raster layer Assine Layers / Merge / Merge all layers https://maantje-psp-design.jouwweb.nl/karine |  |
|


