Travel 
Obrigada Maantje por autorizar a tradução  Agradecimentos aos autores dos tubes e demais materiais: Tube JVDE_Misted_Achtergr Stairs735 Tube feminino - Desconhece-se a autoria masks Hazel - GB SelectionsMDesigntravel Brush agiBrush138 Deco Plugins: Unlimited 2.0 - & <Sandflower Specials v - Pool Shadow It @ lian Editors Effect - Effetto Fantasma ** Corolaine and Sensibility - Texture / Reflection AP 01 (Innovations) - Lines_SilverLining AAA Frames - Photo Frame Penta.com - Color Dot Alien Skin Eye Candy 5 Impact - Glass MuRa Seamless - Sharper Sapphire Filters 04 - SapphireFilter _0319 Material Aqui Coloque as seleções na pasta "Selections" do Psp Abra o "agiBrush138_traveloverlay" no psp e o exporte através de File / Export / Custom Brush Usando outras cores pode haver a necessidade de alterar o blend mode e a opacidade da layer porque pode dar diferenças nos efeitos Escolha 4 cores de seus tubes Aqui foram usadas as seguintes cores: 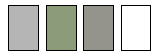
Cor 1 #b6b6b6 / Cor 2 #8a9d7d / Cor 3 #96918c / Cor 4 #ffffff Coloque no Foreground a cor 1 e no Background a cor 2 Forme no foreground o gradiente: Style Linear / Angle 10 / Repeat 0 / Invert marcado 
Abra uma imagem de 800 x 500, Transparent5 Pinte a layer com o gradiente Effects / Plugins / Unlimited 2.0 / & <Sandflower Specials v / Pool Shadow / Default Adjust / Blur / Gaussian Blur / 50 Layers / New raster layer Selections / Select all Abra o tube "JVDE_Misted_Achtergr - Stairs735" ou o tube de sua escolha Edit / Copy - Edit / Paste into selection Selections / Select none Effects / Image Effects / Seamless Tiling / Default Adjust / Blur / Gaussian Blur / 50 Abra a Mask Mask_15_GB_201987 e minimize no Psp Layers / New mask layer / From image localize e aplique a mask Mask_15_GB_201987 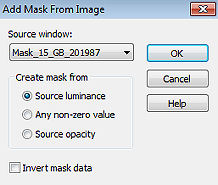
Layers / Merge / Merge group Layers / New raster layer Selections / Select all Abra o tube "JVDE_Misted_Achtergr Stairs735" ou o de sua escolha Edit / Copy - Edit / Paste into selection Selections / Select none Baixe a opacidade dessa layer para 50 Layers / Arrange / Move Down Ative a layer do topo (Group - Raster 2) Selections / Load / save selection / Load selection from disk localize e aplique a seleção "SelectionsMDesigntravel" 
Ative a layer de fundo (Raster 1) Selections / Promote Selection to Layer Selections / Select none Effects / Plugins / Unlimited 2.0 / It @ lian Editors Effect / Effetto Fantasma / Default Effects / Plugins / Sapphire Filters 04 / SapphireFilter _0319 setting: 255 / 255 / 255 / 255 / 255 / 255 / 100 / 100 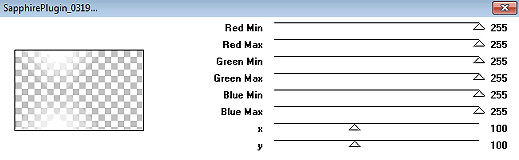
Effects / Plugins / Corolaine and Sensibility / CS_Texture 125 / 45 / 120 / 10 
Effects / Plugins / AP 01 (Innovations) / Lines_SilverLining: 10 / -1 / 10 / 0 / 0 / 0 - Dotty Grid 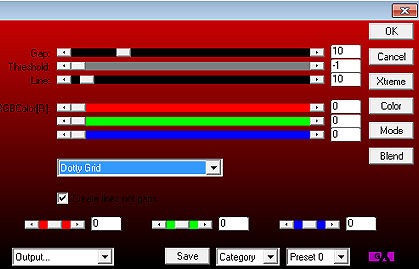
Effects / 3D effects / Drop shadow: 5 / 5 / 50 / 10 - preto Repita com -5 / -5 / 50 / 10 Layers / Arrange / Bring To Top Mude o blend mode para Luminance(Legacy) Selections / Load/save selection / Load selection from disk localize e aplique a seleção "SelectionsMDesigntravel 1" 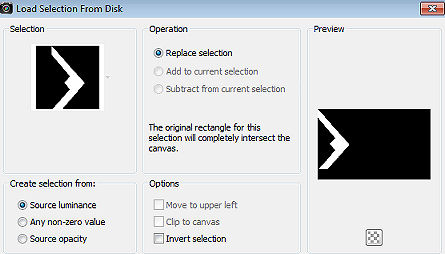
Layers / New Raster Layer Pinte a seleção com a cor 3 Effects / Plugins / Corolaine and Sensibility / CS_ Reflection / Default Mude o blend mode dessa layer para Overlay e baixe a opacidde para 75 Effects / 3D effects / Drop shadow: 5 / 5 / 50 / 5 - preto Selections / Select none Coloque no Foreground a cor 2 e no Background a cor 4 No foreground forme o gradient: Style Linear / Angle 0 / Repeats 0 / Invert marcado 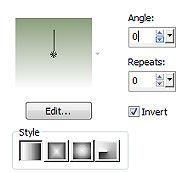
Layers / New raster layer Pinte a layer com o gradiente Abra a mask "mask_hazal19" e minimize noPsp Layers / New mask layer / From image localize e aplique a mask mask_hazal19 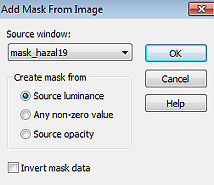
Layers / Merge / Merge group Layers / New Raster Layer Selections / Load/save selection / Load selection from disk localize e aplique a seleção "SelectionsMDesigntravel 2" 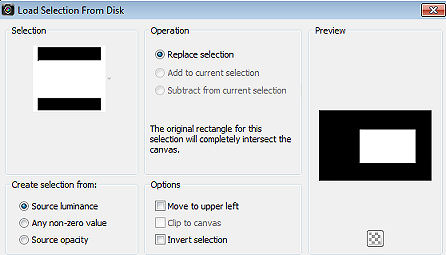
Abra o tube "JVDE_Misted_Achtergr Stairs735" ou o de sua escolha Edit / Copy - Edit / Paste into selection Selections / Invert Layers / New Raster Layer Pinte com a cor 1 Effects / Plugins / AAA Frames / Foto Frame: 50 / 0 / 0 / 50 / 0 / 0 / 0 / 100 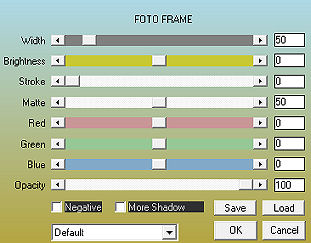
Effects / Plugins / Penta.com / Color Dot / Default Mude o blend mode da layer para Burn Selections / Invert Ative a layer abaixo (Raster 4) Effects / Plugins / Alien Skin Eye Candy 5 Impact / Glass Settings /Clear Selections / Select none Effects / Plugins / MuRa Seamless / Sharpen / Default Ative a layer do topo (Raster 5) Selections / Load/save selection / Load selection from disk localize e aplique a seleção "SelectionsMDesigntravel 3" 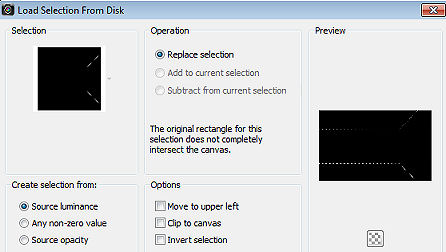
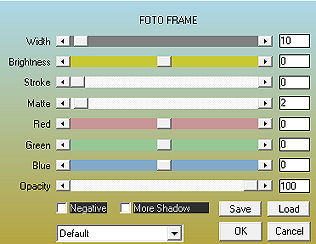
Layers / New Raster Layer Pinte a seleção com a cor 4 Effects / 3D effects / Drop shadow: 5 / 5 / 50 / 10 - preto Selections / Select none Abra o "Deco" Edit / Copy - Edit / Paste as a new layer Não mova Layers / New Raster Layer Ative a ferramenta Paint brush, localize o brush "agiBrush138_traveloverlay" Configure Size 354 - E com a cor 4 , clique 4x - Na parte superior central (Ver modelo final) Effects / 3D Effects / Drop Shadow: 10 / 10 / 50 / 10 - preto Abra o tube Feminino ou o de sua escolha Edit / Copy - Edit / Paste as a new layer Resize a seu gosto Effects / 3D effects / Drop shadow: 5 / 5 / 50 / 10 - preto Repita com -5 / -5 / 50 / 10 Mova o tube para a esquerda Image / Add borders / symmetric marcado: 4 pixels com a cor 4 2 pixels com a cor 3 10 pixels com a cor 4 2 pixels com a cor 2 2 pixels com a cor 1 20 pixels com a cor 4 Selections / Select all Selections / Modify / Contract 40 Effects / Plugins / AAA Frames / Foto Frame: 10 / 0 / 0 / 2 / 0 / 0 / 0 / 100
Selections / Select none Layers / New raster layer Assine Layers / Merge / Merge all layers Salve como Jpeg. https://maantje-psp-design.jouwweb.nl/travel |  |
|


